Kicker Straps – Shoe Modification To Extend Life

One of the things I enjoy about the goalkeeping community is the sharing of hints and tips when it comes to all things kit; this is probably one of my favourites, hopefully you can benefit from this if you don’t already.

I should start by saying that I’ve used a few different brands over the years, and in my opinion OBO’s kickers are amongst the very best for staying in place. Also, while their ‘coated’ kicker straps seem to be the most durable, replacing them can be a costly nuisance – especially for those who regularly play on more abrasive sand-based pitches.

By cutting some studs from the soles of your astroturf trainers to create channels for the straps to sit in you’ll help the kicker to remain in place, and should find that the life of your straps are greatly extended.

Here’s an example of the finished article, posted by *Jones* over at the excellent Field Hockey Forum

To do this yourself, follow the steps below:

  1. Put your trainer only (not foot) in the kicker and do up as you normally would; making sure you have adjusted to the perfect fit and position
  2. Get a marker or felt tip pen and trace the outline on the sole of your shoes where the straps sit
  3. Remove your trainer and carefully cut away any of the ‘studs’ that sit inside the lines you have drawn.
  4. Repeat for your other shoe and kicker.

I’ve found this easiest on regular/old fashioned astroturf trainers which have lots of little studs/spikes on the sole, but the above picture shows it can also be done with the newer style tread.

To remove the studs from the tread I’ve tried lots of things, but for me a regular serrated knife (actually an old steak knife!) works best.

This will make your straps last practically forever (as your remaining astro studs are in contact with the ground, not the the strap itself) and have the added benefits of keeping the kicker itself closer to the turf and help prevent the straps from slipping when on your foot.

The Arc Around The Goal

As the ball moves around the pitch, more shooting lanes open up. As you face these different angles, you have to be able to move across with the ball; moving into cover the new angle, changing angles to suit the change in play and allow you to make the save against the new shot.

The D within the D’

To develop angle skills and a second sense of where you are in relation to the goal, you need to know where you are in the D. Imagining a smaller D within the actual D helps you locate your posts and position. This smaller D is the arc around goal; mirroring the D itself, but reduced for the size of angle of the shooter’s space. Depending on how deep you play within the D (how far you play off the line) and whether you like to step out and aggressively roam around, the size of this arc will change.

Imagine a D of 3 to 4 metres in diameter from the goal-line. The actual size will depend on your reaction speeds and your reach: if you have quicker reflexes, you can get away with playing a deeper style. The steps around the posts, getting from one side to the other will then create the D for you.

arc

The arc

It is important to understand the arc of positioning: shots from the sides are different to front shots straight at you when standing centrally to the goal; stepping tight to the post covers a tight angle on the left or right space, but leaves a massive open space to the other side of you (that shooters can then exploit by passing to someone standing on that side), whereas with a central shot both sides are open to shoot at.

The arc goes from post to post, covering the different angles in relation to where the ball is on the pitch. As the ball moves, your position in the arc moves with it.

arc11

The border line for where you should be in terms of the goal, is as follows:

  • If the ball is central, you would be standing in the middle of goal; covering a straight shot down the middle and read to react to shots to the sides (which the shooter will try for as they can see the shooting space)

  • If the ball is to the left, you would step over to the left post to cover

  • If the ball is to the right, you would move to the right post to close off the space

    Tip: If the ball moves to the goal line, then you would move to cover tight to the post itself (because you can close off the shot at the post, as there is no chance to shoot around you)

You should learn this arc and use it as a general guideline for positioning as the ball moves. Matching where you are to this in training practise and games, you will soon learn it so much that you know where you are automatically without having to look behind you (something only the best keepers can do by the ‘back of their hand’).

However, don’t think you have to move in this pattern all the time – if a pass is made and you have to change position, you need to move as quickly as possible, cutting across the arc to cover the open space.

Also remember that any given keeper’s arc will change as they gain size, strength and ability. You may want to run the exercise with the ropes once a season to see if their arc has changed

Adjusting your angles

Depending on which side the ball is on, you want to be able to move across to cover the post, or step with the play to close down the attacker and cover the shooting space available to them. By moving early, you can set up your triangle and angular positioning to help you in making the save you will face; closing down the shooter’s options to limit their chances of scoring.

arc2

By practising and practising, you should be able to learn how to read a shot: telling if it’s headed wide or at you. Knowing whether a shot will go wide or head to goal is essential to reach a high level of play; that way you know whether you will have to block a potential shot, or let it go wide and out of play.

For obvious writing reasons, I think Ian Taylor and Jeff Benjamin (www.jbgoalkeeping.com) should be accredited as sources, for their useful information in helping me write about this tricky subject of angles!

Hi-Rebound Kickers Review: Why They Don’t Stink

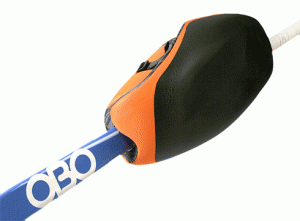
So I’ve had these high rebound kickers for just over a year now, and I have to say, they are probably the best piece of equipment I’ve invested in. They’re light, and best of all they look slick.

High Rebound... again...

I play quite a mixed game, running around the place a lot, staying on my feet, unless faced with a situation where I need to slide/dive. The high rebound kickers suit everything perfectly. I’d like to think I play at a relatively high level, although there’s higher, I’m happy to announce that I’ve had no major injuries at the time of talking. Sure I’ve had the odd knock, and the rare shot that’s hard enough will hurt you even through the kickers, but the average shot is barely even felt when kicking/blocking the ball.

The size and shape of it is another point that’s worthy of note. Other kickers I have tried, your shoe barely fits in with a normal hockey shoe. So you need to go for one of the football astroturf shoes, which well, offer less protection than the hockey shoes do, due to the materials used and that the soles are about 2mm thick. The shape of these fits any sort of shoe, forgetting the shoes you wear for keeping is no longer a problem, as any old pair of runners you own will do the case with these kickers. The integrated locking system is perfect too, only on the most desperate of dives and attempts have I ever experienced any sort of a problem with twisting of the legguard, and even then the twisting is minimal, and you’re still highly protected. Considering my legguards are rubbish and had to be brought into the shop to get most of it replaced, I had a TK leggaurd for the most part of a week, and even with them, they work perfectly, even if the people here may think of the TK gear as “unclean”

They come in flat pack, which obviously isn’t great. It means you need to wear then in and all, but I’ve found the advice given with the kickers, about the hair dryer to mould them to help a lot. I was originally scared when buying them, that they’d take too long to mould, and I had trials for a representative squad coming up. But I found that after about a week of wearing them in at training, I was already able to wear them perfectly, and they’d nearly taken shape, and I had no problems with the tongue. Although a small word of advice, should you have a problem with the tongue, don’t be afraid to wear a pair of shin guards underneath the kickers till they reach comfort levels. Just don’t do it too long, as the most important person on the pitch you don’t want to be looking like a sissy do you?

The rebound levels are perfect! I bought the kickers not really knowing what to expect in that regard. I stepped out onto the pitch, and immediately loved them due to the rebound off them. I don’t know how many times I’ve been able to get the ball up to my strikers, and set up a scoring opportunity, which as a keeper is always an added bonus. You don’t need to put particular attention into clearances any more either, on the quicker shots you simply need to react, and watch the ball fly! The rebound can have a drawback though, It the ball comes up off the kicker, its really comes up. A slightly raised ball coming off the kicker will go playing across the D, and has often resulted in a short corner. Not that great in that respect.

I know at this stage I’m waffling on a bit about how great these things are, and to be honest with you, I am dragging on about their greatness. But its alright, because they deserve it, or at least they deserve a longer review then one on yourself. The straps, so that I can make it a slight bit longer, are brilliant. They’re not those weird plastic things, with the whole, like a belt, that other company’s use, and that take about 8 minutes of your very valuable time to put on. Nor is the buckle to small, so it holds tight, which is great, it means its secure, and whatnot. Trust me, its a good thing. The kicker straps are good too. Durable, and they’re inside, making the kicking surface on the outside of the kicker bigger, which again, is good.

Although there’s a huge amount of pluses with the high rebound kickers, there some minor drawbacks that annoy me:

The front Strap: The front strap for the kickers needs to be brought back a good 1 to 1.5 centimetres. When sliding I often encounter the problem that I end up with that strap between the padding and my shoe, leaving the kicker pointing up towards the sky, and my toe vulnerable to anything the striker decides to throw at it. There’s that extra strap to hold them together, but it gets in the way a bit, and sort of annoys me. Bring it back as I said, and it should be all good.

Wearing: Although the hard wearing layer at the bottom of the kicker is brilliant, there’s some big problems with the wearing that the kicker encounters. After about 8 months the hard layer wears away at the bottom, probably even quicker if playing on older sand based or grit pitches. Ever since then the kicker has been disintegrating at a rapid rate, and although its going to last at least another season, I’d like to see the kicker last a little bit longer, as they can be a bit of a drain on the back pocket of a teenager. I’m not really sure if there’s anyway to fix this, apart from make the durable layer thicker or something

We need green! Although the orange that I have is bright and sexy, I don’t really think there’s enough of a colour option in the kicker department. We have black, blue and orange, and it just isn’t enough. I like being individual, and as everybody knows, if you look good you feel good, and you’ll play good. I want something mental to head out in, like green kickers, and white and orange legguards, You know, go for that Irish look, and if its dazzling, the opposition will have something pretty to look at as they fail to get the ball past me.

Very minor niggles there, especially the last one, which is why I’m gonna conclude in saying that anybody that doesn’t buy these things the next time they’re out to buy a set of kickers, is a fool, and deserves to rot in the world of mediocre kickers, lower leagues, and sore feet. Straight out (well not quite) 9/10 for me. They do everything they have to and more, they just need the odd adjustment and whatnot. But I apart from my 3 little points, I’m not sure where the improve the little beauties. Buy them, buy them now! And no, they do not stink! I would also like to apologize for my horrible spelling.

Kicking

Kicking is fundamental to field hockey goalkeeping; goalkeepers are separated by their ability to pass the ball with their feet. With the ‘foot’ rule for outfield players, we are the only person who is allowed to legally use their feet to our own and our team’s advantage. It is therefore essential that you have good technique to clear the ball when the chance arises.

As the only player on the pitch able to kick the ball, and therefore be able to make clearances; controlling rebounds and directing break outs; it is your responsibility to learn how to influence the play and get a strong kicking ability to help your team and reduce rebound goals.

Clearance method

In essence, the kick is great for rebound control and should be used as such to clear away rebound chances. Kicking the ball away from open players; to the corners and over the sideline, or to your sides where there is no opposition will prevent any scoring chances developing from your clearance.

By thinking carefully, you will be able to clear the ball away to safety and limit any more possible scoring chances.

Learning to kick from both feet

Learning to kick strongly from both feet gives you more options when facing clearance opportunities. You should be able to make a stronger clearance with the opposite foot on clearances to your current side; left foot on right side, and right foot on left side.

By learning to kick from the different feet and bringing your skill up to task, you will have the options that other goalkeepers won’t have; reacting to changes in play to clear the ball away as needed.

The ‘basic’ kick

With the ball near your feet after a save has been made, you can kick the ball to a defender’s stick to help get the ball out of the area. A basic kick suits the need of the situation; not all kicks have to be long, but a simple kick to one of your team mates or away to the side line is sometimes all it needs.

  • First check your angles and get your head in line with the ball

  • Lead with your head; this well help direction the kick

  • Step towards the ball with your non-kicking foot with your toes pointing in the direction you want the ball to go in

  • Kick with your kicking foot like you would kick a football (soccer ball)

  • Kick with the inside of your foot for more control

  • Keep your head and chest over the ball to stop the ball rising up

Before you kick the ball clear, determine your target area (where you want the ball to end up) and the direction it needs to go in. Follow the ball with your eyes to watch its progress and keep the forward balance; keep your ‘eyes over knees over toes’ throughout to keep your stance balanced and provide a clean, fluid kick clear.

Having a good follow through

As with making saves, a good follow through is needed to get a good clearance. Follow through is everything, once the technique has been learnt; when kicking, push through with the kicker after you have kicked the ball, so that it maintains its angle of direction.

Push through with your body, turning your hips and upper body into the move as you push through the kick; following through, up with your leg as you make the kick, to make sure you maintain the ball’s direction.

Kicking with the instep

The main and really the only proper method of kicking is to kick with the instep. Some goalkeepers who point out that a kicking motion of moving the leg across to meet a ball at the edge of the angle and causing a redirection who count as a kick. However, every goalkeeper should be taught an active method of kicking where the goalkeeper gets behind the ball, allowing them to get more power behind for the kick for a stronger and more direct kick, for the ball to go a longer distance, whilst keeping accuracy.

By getting close to the ball and then clearing with the instep, the goalkeeper has far greater control over its direction and will provide a longer clearance.


kicking14

When kicking with the instep, the kicking leg should be drawn back to knee height, and then released to get full force in the clearance. By angling the kicker diagonally to the kicking side (i.e. left or right diagonally along the angle), the ball will be kicked with greater precision.

  • Get behind the ball, ready to launch it away

  • Bring the kicking leg back like a spring, so that you can maximise the power of the kick

  • Kicking with force, drive down and through the ball with momentum to get the best clearance

  • Make sure your leg position stays the same, so that the ball travels where you wanted it to

Pointers

Have your weight forward (head over shoulders) to keep your balance, so you don’t slip back, and have a strong kick with proper balance to make the best possible clearance. Kick with the inside of your foot for better control; turning the foot to angle it where you want the ball to go.

OGO Legguard’s Review

I have decided to write a review about my new OGO legguards (which I’m borrowing from my club), as I think many people underestimate the great aspects of ‘high control’ shaped OGO.

OGO medium legguards

OGO Medium Legguards

When I was given the leg guards I was aware that OGO was the bottom of the OBO range, so I wasn’t too excited about getting them. I expected that they wouldn’t be strong enough, or I would hurt myself, or maybe they would be awkward and uncomfortable. After just one training session I realised that I was completely wrong, and that there are in fact many great advantages with my new leg guards.

I prefer to wear less gear than most other keepers (no arm guards, neck guard, etc.), because I rely on more of an attacking sort of play, kind of like a third defender. This requires me to run around and switch directions with ease, and to achieve this I need light, comfortable leg guards which will stay facing forward and slide beautifully. I find all of these things with my new OGO’s.

While I’m on the subject of sliding, I’ll mention a reason for a lot of my past leg injuries. These injuries have always occurred during an attempt at a second save, when my pads have been swivelled around due to lying down on short corners or sliding at players. I will go for a save with my shin and then realise (usually when it’s too late) that there isn’t actually anything in between the ball and my leg. Luckily for me, this is a thing of the past with OBO’s nifty locking system (see my diagram), which has completely stopped my leg guards from twisting!

obo locking system

OBO Locking System

After getting used to my old legguards, every time I pick up my OGO’s I’m still surprised by how light they are. I’m padding up, padding down, running, stretching, victory dancing, sliding and diving faster than ever before and it has changed my game substantially …for the better of course! Unlike other brands that I have tried, the fact that they are super lightweight does not AT ALL mean they have poor protection – which of course is an extremely relevant aspect, no matter how old you are.

Yes, my OGO’s might not have the same amount of rebound as the famous ‘ROBO Hi Rebound’, but nevertheless I have still been amazed by their remarkable bounciness (apparently it’s a word). I have found the rebound of my OGO’s a very helpful aspect of goalkeeping, as it means I can make a quick, safe clearance out of the D without having to take a massive kick.

Another thing – these leg guards look so cool! You can tell me not to judge a book by its cover as much as you like but, in my opinion, appearance is a surprisingly large part of goalkeeping; looking good is feeling good, and feeling good means a whole lot of confidence. And everybody knows how important confidence is!

I’ve thought and thought, and to be completely honest I cannot think of any problem with the leg guards. I’m playing under-fifteens at the moment, and when I move up to under-eighteens I will probably invest in some more expensive leg guards and kickers (I’m thinking hi control) because my OGO’s are not specifically designed for this age group. That isn’t a fault though, that’s a given.

To conclude, the OGO leg guards have been designed beautifully and offer all of the amazing aspects that people around the world have grown to expect from OBO. I am 100% satisfied with them and can’t wait to play with OBO leg guards of a higher range.

Please feel free to leave me a feedback comment and questions.

Cheers,

Ozzie.

PS: You know how keepers like to whack their stick against their legguards? My OGO’s are so loud! A few days ago I hit my pads with my stick, and one of my defenders jumped about a foot in the air.

Review of Robo Hi Control RHP

During the November sale last year, I bought my own first pair of hand protectors: The Robo Hi Controls. The first time I tried them out, the difference was incredible…

During the November sale last year, I bought my own first pair of hand protectors: The Robo Hi Controls. The first time I tried them out, the difference was incredible…

robo-hi-control-rhp

The Gist

The Robo Hi Control Right Hand Protector is an amazing piece of gear. The technology incorporated is as complicated as a rocket and clearly built for both performance and comfort. The outside of the RHP is as solid as a rock. The “clunk” sound it makes when it’s being hit is very distinguishable. The high-density foam used makes it superior to other hand protectors, in my opinion. The one thing I believe is amazing, is the fact the they used a different foam and probably moulded the little lines along the bottom for when you are going into a log, slide, or dive. When I am going into a slide, I don’t notice anything when my fist hits the ground. The transition from landing on the flat side of the HP to the roll onto my side is impeccably fluid.

Injury  🙁

Previously, a problem I had had with my first RHP, is that whenever I slid, logged or dove and the ball hit my RHP, my hand – especially my thumb – would get quite rattled and a small bruise would even appear on my thumb after the game. I have never had this problem since November. I discovered this is because of the high-density foam on the outside but also a smoother, more comfortable foam on the inside and comforters that line the hand grips. The comforters provide a far more useful utility other than simply, well, comforting the hand. They absorb the water and sweat around the hand that allow me to keep a solid grip on my stick.

What’s the Diff?

Before I got my Robo RHP, the only thing between me and that solid ball was a single layer of mediocre and worn-out foam. My new RHP is made of at least three different foams. It’s hard and durable on the outside and like a feather blanket on the inside 🙂

The finger straps on my previous HP kept coming undone during my game – REALLY dangerous and annoying. This has happened a few times on my new one but every HP I have used this happened. I think it’s a never-ending problem really because my thumb always seems to be moving! The comforters are the ultimate difference I think. My hand has never felt so good being hit at 50 km/h 🙂

I seriously recommend this RHP for players who are “nuts” – a.k.a., diving all over the place like crazy. I have not tried the Hi Rebound model but from what my fellow keepers tell me, their wrist seem to always wobble when they are going into log, dive of slide. I have never had this problem with the Hi Control version.

See for your self:

Cheers,

KanuckKeeper

Read more on the ROBO Hi Control RHP at the OBO website

Custom Bike Trailor For OBO Gear

Check out this cool custom bike trailer!

The tailor is owned by Emma Griffin (age 11) and was made by her farther to enable her to transport her gear to and from training and games- great work Dad!

Emma plays her hockey in Rotterdam, The Netherlands. You may have guessed this from the classic Dutch cow print style markings.

This photo was sent in from Jan Lelieveldt who also goes by the nickname of “Ome Gerard”. Thanks!

If you liked this article you may also want to check out cool custom gear articles

If you have a cool article you want to share with the world you can add a new post,or drop us an e-mail on resources@obo.co.nz

OBO Hi-Control Legguard’s Review

hi-control-legguards

When I purchased my Hi-Control legguards (in my first ever Obo spending spree), I wasn’t sure what to expect- apart from I had heard great things about them from other keepers. I find the hi-controls easy to run in and move about in but overall I was impressed by them because rebound is very good and the ball ends up being in a perfect place away from the attackers.

In the women’s league that I play in the shots are very powerful so the rebound comes into use/effect. I am only 14 so I have to play junior hockey as well for my school, where the shots have almost no power in them, the ball just falls to the ground (off the legguard) where I can kick it away. At first I wasn’t sure about how to effectively control the ball away but over the last few months I have learn’t to control the ball away from the attacker(s). The legguards fit onto my legs and over my Hi-Rebound kickers perfectly and they don’t twist when I dive or get up from a dive. When I am landing from a dive they protect my knees and other bones well (especially compared to other brands gear. A year ago I dislocated my knee from a high, dive landing in my old kit!!)

To improve the legguards I would make them in a numerous amount of colours and I would make the part where you put your leg, about 5cm shorter because sometimes it (depending on what shorts you wear) is a tight fit to have the legguards and the shorts in the right pace because they overlap. I can’t really think of anything else to improve them because overall they fulfill my needs. I haven’t tried the Hi-rebound legguards but at the moment so I can  not compare but compared to my previous legguards that I have used (such as: TK GX4, Slazenger school goalie kit, and the Grays G200) they are absolutely brilliant.

Alton Womens Goalie

Tournament Kit Bag Essentials

While at a tournament and a long way from home it can be very off putting to not have equipment that is needed to do the job and perform at your highest level. For some of us (me too) representative duties can be quite a daunting task given that it may well be the first time that you are out of direct contact with your personal trainers/managers/equipment suppliers (Mum and Dad) (Long suffering wife in my case) Your team is relying on you, and your gear lets you, and them down………………….sometimes duct tape just don’t do the job!

To help with this I have come up with a list of contents for an effective “tour bag” for a keeper. (At least it’s what lives in my bag)

1/ Pads and Kickers
2/ Gloves and inners if worn
3/ Body Armour including Arms/Elbows
4/ Helmet
5/ Padded shorts/Girdle
6/ Stick
7/ Groin/Pelvic protector
8/ Spares Kit
9/ Consumables
10/ Tools
11/ Team supplies

bag-wheelie

Preparation of all the gear
1/ Pads and kickers.
Make sure that the foam is in good condition with all seams secure, straps in good nick with stitching/rivets secure and no buckles/clips rusty/broken. A new set of kicker straps is often a good investment if your’re playing schedule is heavy.
2/ Gloves.
Check for any tears holes etc in the foam and that any straps must be in good nick and clean the damned things (unless you really want your hands to smell like feet!) Wash in a powdered borax solution and rinse well if that doesn’t remove all the pong, try a weak bleach solution, again rinse well and allow to dry out of direct sunlight. Inners if you wear them should be washed with your over-shirts and helmet comfort pads.
3/ Body armour including elbows/arms.
If you wear the segmented fabric covered type, do up the straps and place it in the washing machine for a gentle cycle with a little laundry detergent and listen to it cycle. When the machine is on spin make sure that no part of the armour is above the rim of the drum and touching the stationary body of the machine ‘cause this will burn the fabric and embarrass the hell out of you. Place the armour on a coat hanger and allow it to dry out of direct sunlight. If you wear a foam chest-plate, treat it just the same as your pads and kickers.
4/ Helmet.
It doesn’t matter what type/brand or style you wear, the grill must be in good condition and firmly fastened to the shell of the helmet, all screws must be tight and clips in place and unbroken. Just for hygiene’s sake wash the helmet in a weak bleach solution and work the solution into the foam. Rinse well in clean water and allow to dry before packing the helmet away. I shudder when I see the inside of some helmets that are years old and never been washed. Make sure the comfort liner is clean and in place.
5/ Padded shorts or girdle and cover-shorts.
Put them in the washing machine with your body armour, inspect after washing for cuts, tears or broken seams. Replace of reposition missing/moved foam pads and make sure that the pockets that hold them are tight.
6/ Stick.
No chips, cracks or sharp edges. Grip in good condition and secured.
7/ Groin/Pelvic protector.
For gawd’s sake give the poor thing a wash (throw it in with the armour and shorts) then make sure the elastic is good and that any clips/buckles are whole.

Additional stuff that’s gotta be packed
(Spares Kit? Or what lives in my bag for my gear)
A ½ set of kicker straps (2 long 2 short toe straps)
A set of “StrapSecure” (webbing loops that stop the front toe strap riding up over my boot toe)
1 long pad strap with buckle (can be cut to make a kicker ankle strap with buckle)
Small assortment of helmet screws posts and clips to suit my helmet.
Consumables
Stuff that my team-mates can use to solve all their little problems. This lot lives in a “Tupperware” container in a side pocket of my bag.
A roll of duct tape
A roll of strapping tape
A roll of insulation tape
2 spare stick grips
2 small tubes (1ml) of cyano-acetate cement
A small tube (25ml) of contact cement
A bottle of Ibuprofen tablets
A tube of ‘30+’ sunscreen
A bottle of nail-polish
A bottle of acetone (25ml max)
6 heavy duty zip ties at least 18” long
My good lady wife (also a keeper) carries tampons (I don’t, go figure)
Tools. (In the hold only on flights)
A box-cutter
Star and flat blade screw drivers
Pair bull-nose pliers with cable/wire cutters
Team supplies.
1 dozen practice balls in a cage
2 match balls
2 “Face-off” masks

Explanation of “Consumables”
Do I really have to explain the three tapes?
Every “fieldy” decides the fatter the grip the better the control.
Super Glue in 1ml size is a single use, throw away that can stick most stuff to other stuff.
Contact glue is great for shoes, foam, or any porus material.
Hmm… Drugs…. fixes headaches and inflammation (strains and sprains)
Sunscreen: Great stuff if you play in daylight outside.
No. I’m not going soft. Fixes chips in composite sticks (no moisture entry causing delamination). Apply to helmet screws before tightening to act as a thread lock. Great for marking balls. The correct shade goes well with your cocktail dress (?)
An all purpose cleaner, works on balls, foam, fingernails, removes the adhesive that the three tapes may leave behind removes grease before using glue to stick stuff together.
Sooo handy (known as “flexi cuffs” by police) at a pinch can even replace kicker straps. Let your imagination run wild.
I’m just not going there for the last item.
Explanation of “Tools”
Good sharp blade for cutting flexi cuffs, tape and anything else that needs to be shorter than it is
How else are you going to tighten helmet screws and service the team bus?
For the removal of fingernails under questioning (Oops. family forum) holding of small items with force. Just getting a grip on things that need to be gripped.
Explanation of “Team supplies”
Have you ever tried “warming up” to find that the coach left the balls at the hotel? This is a problem you don’t want and your responsibility to avoid by taking action yourself by providing “warm up” balls.
Don’t want to be seen as the poor country cousins by only having a crappy old ball for the match, get a couple of “kookas” and keep them clean using the acetone.
“Post men” have far more confidence when they have a “face off” to hide their fear behind. They have been known to prevent contamination of the playing surface by blood.

OBO PE Helmet Review

I have chosen to write a review on my PE helmet.

To start off, before purchasing this helmet I used to play in a very mediocre lid, Not going to name names : )

I purchased this helmet at the start of this season and from the moment I took it out of the box I loved it. When I first picked it up I was surprised at the weight of it! sooo light compared to my other lid.

First things first, once opening the box I couldn’t wait to try it on, From box to head was almost a perfect fit without adjusting a thing! I tinkered with the straps a little to get it to the right tightness which took no time at all! This was the first time I’d had a helmet fit perfectly directly from the box without a lot of tinkerage.

Next thing to do was add the stickers, I may be 18 but stickers are always fun to play with whatever your age. OBO provide just the right amount of stickers for the lid and even give you a little template to follow if you don’t have an idea on where to stick them. I spent a while customizing until I was happy with the look, here are a few pictures of it : )

photo0384wphoto03822

Once all the tightening and stickering was done I tried the helmet on with my body armour, My previous helmet used to catch on my body armour when lowering my head a little… Not a problem at all with this helmet.. I was soo chuffed as it was soo damn annoying with the previous helmet!

Next thing to note is the vision! Referring to my old helmet first, the vision was unbelievably poor, the bars of the grill were in the totally wrong place and I had to wear the helmet in the un-correct way to be able to get a good line of sight! The new helmet tho.. what an improvement!  No wearing the helmet in a way it isn’t supposed to be worn, no adjusting of the grill.. just a perfect line of vision.. the first time for a few seasons.

Next The comfort of the helmet. The thickness of the foam could be improved (made a little thicker) But apart from that it was the most comfortable helmet I’d tried on. The velcro tabs that hold the sweat band on are a good idea but after a few uses (and a lot of sweat) the velcro lost its stickiness and fell off. Not really an issue to me as I was considering changing it from two squares of velcro to one long strip anyway. Previous helmets have given me really bad headaches as they were too tight in certain places, such as the temple. This is not an issue with the PE helmet, its really comfortable.

Protection.

I have taken many hits to this helmet, a few to the temple and a few to the front of the grill and not felt a thing.. the only thing I would say is be prepared for the ringing in your ears when you get hit as it makes a really loud noise, I think this is due to the materials used. In the previous helmet I was scared to chase down shots where I knew an undercut could be possible as the helmet didn’t fit properly, when I ran out because of the way I had to wear it, it used to slide down and my vision was severely impaired, I used to close my eyes and turn my head when a ball was coming towards me at head height as I was afraid I would get injured. Since I bought this helmet, the eye closing and head turning problem has ceased and I now try an actively charge down shots without worry.

On the protection issue, 6 games before the end of the season at a training session a ball was undercut from 6-8 foot away from me and hit me square on the left side of my face ( where the grill attaches to the helmet ) I did fall to the ground as the shot took me by surprise and I did feel the shot thru the helmet. Saying this if I hadn’t of been wearing the helmet I would have a very mashed face, the helmet did a brilliant job of protecting me and where the ball made contact with my cheek/grill it left a nasty dent but I am going to say that’s what the helmet is designed to do? it kind of reminded me of crumple zones in a car.

All in all OBO have done a great job in designing this helmet and I would totally recommend it to any player (whatever your level) and personally would buy another one tommorow!