The Ready Stance

The ready stance is your basic form of positioning – readying for the shot, and possible action. In essence, you should be in your ready stance whenever the game is in your end; you should be prepared for anything, as anything could happen. I personally change up and adapt my stance to suit different game situations, but when developing your style it is a good idea to test out the capabilities of your core ready stance, giving you optimum movement and glove usage.


Your ready stance should be suited to you: no-one else can make up your mind for you, or play for you, so working out what works for you will help your play in the long run. If it’s not broken, then don’t fix it, but if you find your stance affecting movement or making higher saves, you may want to change it.


The ‘ready’ stance

Your ready stance is what you go into before facing a shot; making sure you are all ready and raring to go, able to make the most out of your equipment to make the save – gloves out and legs prepared for the shot. As the player comes in, move into your ready stance, making sure you are ready to stop the incoming shot; setting up before means you are better off in your chance of making the save, not having to react immediately once the shot is taken.


Commonly theorised stance

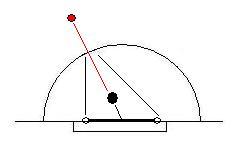
The common theory for a ready stance is based on an open body shape, allowing you optimal movement and flexibility for save making. In the general stance, the gloves are held at mid-height, above the pads and below the shoulders (when raising your arms, your gloves will go above the hips, around chest/stomach height, or higher, depending on what the goalkeeper is comfortable with). The feet are placed shoulder width apart, so that the pads are open, allowing you to cover more space. Positioning of the hands and stick can vary to personal preferences. In readiness for a shot, the goalkeeper should be alert, but relaxed to make the save.


theory_stance1


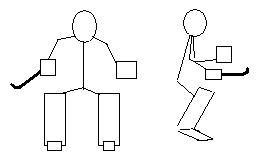
You stand on your balls of your feet rather than the tips, giving you greater balance in responding to the next shot, as discussed in the next section. The integral chin-above-knees-above-toes position has the knees bent and the back crouched with the head forward, with the chin above the knees and the knees above the toes; moving into a save allows you to control the ‘backlash’; not falling over as you over balance.


Getting set for the shot

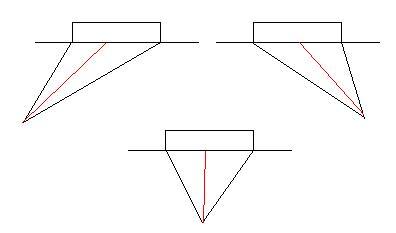
Keep in mind the level of competition you’re facing, as these are common factors in deciding your optimal stance; if you are shorter you’ll want a taller stance, so you can stop the higher shots more easily, whereas if you’re taller person you’ll want a wider, lower stance as you already cover that space, and have trouble moving because of your size. 


If you use a smalleer, closer together stance, it will take you longer to move around the circle, whereas a wider stance will make it easier for you to cover larger distances in smaller steps, but will leave the gap between your pads more vulnerable to a shot there.


Body Posture

How you position your body in relation to the chances of making the save is all important in your preparation for the shot. A fully prepared and set ready stance is central to the ability to make a successful save.


Balance is integral to movement and any save; if you topple back, you lose balance and could fall (putting you out of action for a second save, as you end up lying on the floor), whilst if you balance too far forward, you can end up similarly imbalanced; launching forward and toppling over. Balancing the motion of a save allows you control the shot and rebound better, which is needed for a successful and well executed save-clear; gaining greater control and power over the clearance of the shot during the redirect.


To learn about the different modern styles of the ready stance, follow this link: http://blog.obo.co.nz/2009/05/25/understanding-the-stances/

Review of ROBO Hotpants

Review of ROBO Hotpants

After I had worn the CLOUD hotpants for a while I found I wanted a bit more protection so I upgraded to the ROBO hotpants.

Obo Robo Hotpants
OBO ROBO Hotpants

When I took them out of the bag they immediately felt a lot more solid then the Cloud. Made from all Lycra, good pockets for the padding and good thick padding. Because the padding is thicker and the shorts have small panels in the thigh area just above the main panels movement is not as unhindered as the Cloud. It took about 5 minutes to get used to them, so nothing really worth mentioning.


The fit is even better than the Cloud thanks to the Lycra. It follows your body and stretches with movements so the shorts stay in the right place no matter how weird the moves you make. With the ROBO overpants over them the fit is even better.


The open crotch design makes for a good interaction with the abdo-guard and enough ventilation. Also the lack of padding on the hips makes the pants less hot than some other brands that do have extra padding on the hips. You will get hot and sweaty, but it’s not a real problem.


During the first use, they felt a bit more bulky than the cloud, which is not strange with the thicker padding, but thanks to the Lycra movement is great. There was no breaking in time needed at all.


Just as I did when I got the CLOUD hotpants, I intentionally let a few shots hit the pants to test them and the thick padding did the job excellently. I felt the ball hit the shorts like you feel a ball hit a legguard, no pain or anything.


With the ROBO there isn’t a lot of padding on the side/hip area, just one pad on the hip bone, so when diving the landing can be quite hard. Also during sliding this can be somewhat of a miss. The pads did stay in the right place during the sliding and diving, so that’s a good thing. I currently use a football (soccer) goalie’s padded compression short as a baselayer and this does the job in cushioning the impact of a dive or slide.


I’ve had this one for a couple of years now and there is hardly any wear or tear. I have had to repair the seams around the pockets and the lock-stitching around the edges reasonably often, but as it’s a stretchy fabric there is not much you can do about that.


The outside Lycra around the hip padding shows signs of a hole forming due to sliding. When this wears through it will be a lot harder to repair than the Cloud is, but I doubt you will need to repair it. It will probably not cause a tear because Lycra doesn’t tear easily and by the time it does become a problem all the stretch will be gone from the pants so they will need to be replaced anyway.


I wash the pants every 2 or 3 months which is easy enough to do. Just take out the padding and put the shell in the machine. You can clean the padding with a mild soap and some lukewarm water. (Or just put it in the machine with the pants as I always do, but it’s not the “official” way to do it 😉 ) After everything has dried take your time to put back the padding because it can be a bit of a struggle. Which is a good thing because it means the padding will stay where it’s supposed to.


The above mentioned loss of stretch is the only downside of the use of Lycra. It will loose it’s stretch in time causing a lesser fit. Another point is the hip flexor muscle protection panel. This is a bit thin and has 2 separate hard foam panels on top of it. It makes movement very easy and this way you can take the panel out of the pants, but it also causes fatigue in the softer foam causing it to break. Luckily mine hasn’t broken yet, but I know a couple of other goalies where it has.


Overall I am very happy I bought the ROBO hotpants and when the time comes that it needs to be replaced I will not hesitate and buy another ROBO. I know there are cheaper girdles on the market that offer the same level of protection, but the fit, comfort and ventilation of the ROBO is superior to it’s competitors.

New Addition To OBO Sponsored Players; Ross Meadows

We welcome Ross Meadows to OBO’s particularly amazing people.

Ross plays his club hockey for Hale Hockey Club in Western Australia and captains the SmokeFree WA Thundersticks in the Australian Hockey League.

Having recently received the call up to the Kookaburras squad for the 2009 season, Ross has the ideal opportunity to impress Australian coach Ric Charlesworth ahead of the World Cup Qualifiers in August and the 2009 Champions Trophy in Melbourne during November/ December.

With 4 international caps under his belt Ross will be making an effort to send updates to keepers resources on how he is getting on from his European tour….more from Ross soon.

Understanding The Stances

With the modern stance developing with the increased need for movement, and making use of the hands to make reflexive saves at the higher area of the net, two distinctive styles haves started to stand out. The varying stances will be described and evaluated next: the Y style popular in Europe and the X stance, popular in Australasia, have become the main variations of the standard stance.

The Y stance

Popular in parts of England and Europe (as well as globally throughout the worldwide hockey community in North and South America, India and Pakistan, Malaysia, Russia and the Africa’s), the Y stance has the legs placed together, or not too far apart, with the hands apart, making a Y shape with the body. This creates a blocking barrier; the pads closing off the space, preventing the ball squeezing through the legs, during movement and the hands supporting the coverage of mid-height shots (placing the gloves at around stomach or hip height). With the body bunched up, the goalkeeper has to react reflexively to shots as they face them.

Depending on your preference and the type of shot faced, you could place your hands higher up, within the upper x shape, although most goalkeepers who use a Y stance prefer to have their hands in tight, reacting to each shot as it is released. This allows them to move their gloves into the save as the ball arrives; using their reflexes to make the stop, rather than relying on their positioning, which is helpful when the player disguises a difficult shot, like a reverse hit, which forces the keeper to react instantly once the shot is released.

Just like in soccer, with the gloves lowered, it is easier to dive into low saves, as the hands are already in position for the shot (not having to drop the gloves as you dive to move into the save), whilst making it easier to cut off the shooting space of a low shot when stepping out on the play to close down a shooter.

The X stance

Made popular in Australia, with input from the likes of Stephen Mowlam (), the modern X stance has the legs in a wider stance, related to the shoulder-wide positioning in the common stance; the arms pushed out as well, creating an X shape. This gives the goalkeeper quicker movement around their D, and allows them to move their hands into the save, rather than expecting to make saves via reflex reactions (not having to launch into the saving motion). The hands are raised and outside of the body, giving the goalkeeper greater ability and pro-activeness in moving into all saves against raised shots with the gloves. The gloves raised like this give the goalkeeper a better chance dealing with the incredible drag flicks possible at the highest levels, such as those of Taeke Taekema, and the stance giving greater push into aerial saves.

Depending on the height of the ball (i.e. a lob/penalty flick or high flick in a penalty corner situation), the hands are raised above the chest, at shoulder height or more, pushing them further out as necessary to cover the open sides of the goal. Unlike the Y stance, the goalkeeper has less distance to reach out to; using their reflexes wisely against shots they would otherwise miss, making use of the extra reaction speed to move into the save if they see the ball at the last minute, palming away the ball to safety on the play. With the legs spaced further out, it is also easier to move around, as you are already and the distance provides an increased lateral push, as well as moving into low shots wide of the body, as they are nearer to the shot (rather than with a closed leg stance); giving greater extension as you can push into a reaching leg save or split.

The X stance is also gaining followers across the globe, like Canada’s Mike Mahood, and is fairly popular with the Spanish keepers (influenced by the national goalkeeper coach Martin Drijver), like Fransisco Cortes (Spain’s no 1 who plays his hockey for Club Hockey), who uses a spread out X shape during open play, as seen in the recent Olympics. There is also a European variation of the X stance, as used by Guus Vogels (the famous world class Dutch goalkeeper who has recently retired from international play) where the raised hands are placed outside the body, replicating the symmetrical X shape, but they are closer to the body.

Review: Robo Bodi Arma

This is my review of the Robo Body Armour which i have found to be among the best in the world.

Earlier this season I took ownership of my first set of obo body armour. I have to be honest it was the best money I’ve ever spent. Made from 38 individual pieces of foam (many of which are dual density) this piece of kit is in my opinion among the best in the world. It’s as light as a feather, offers protection similar to that of a nuclear bunker and is as thin as the plot in a Stephen Segal movie.

i own the old model.

I own the old model. i believe the new model is largely the same.

(OBO comment; Largely the same but some key improvements – larger protection area for the sternum, refined shoulder protection and new  fabric.)

Up until this I had either used some school supplied chest pad and separate arm pads or some low-to-mid range body armour, most of which were pretty poor. I settled on a set of Slazenger Phantom Body Armour which in its defence (even if I will be banned forever for saying this) has served me fantastically for the past three years. However, next season I’ll be moving up a division with my club as well as taking the first team place for my school (here’s hoping anyway) so the Slazenger gear really won’t cut the mustard. Don’t get me wrong, the protection is top notch but it’s bulky…. Really bulky!!! I was also considering “Going Dutch” but since the Slazenger gear came with stitched-on arms it was impossible.

So the Slazenger gear had to go. But what to replace it with? Well I toyed with some lower brand gear but I couldn’t find anything to fit as well as the Slazenger stuff (last time mention it I promise). This meant that any time I dived the pads would shift and I’d be left as lame as a duck. Not the metaphorical lame duck either, but a real duck that was actually lame. Maybe from standing on a nail or something.

So I decided to go for a top of the range Robo Body Armour (http://www.obo.co.nz/#Products/ROBO/Body%20Armour) and I’ve never looked back. Straight out of the box I was immediately impressed by the quality. It glistened like nose hair after a sneeze. The mesh felt strong and durable and each contour in the dual density foam felt deliberate and perfectly formed. It fit beautifully too, not like the other brands with a million different straps to secure each pad. In fact there are only 5 straps in total yet they can be adjusted to give a perfect fit. The fact that most of these straps are elastic also has a dramatic effect on the flexibility.

If anybody is considering loosing the weight of the arm pads I wholeheartedly recommend the Robo chest guard. Not only are you loosing the weight of the arm pads but the chest pad its self weighs less than any other I have found. The dual density is tough as nails offering protection in all the right places like the vital organs. With or without the removable inner soft pad it offers protection which is more than adequate all the way up to (and including) international level. The slim fit also allows you to move and react naturally without having to compensate for the pads.

It lasts forever too. Despite the wear and tear of playing on a sand based pitch the signs of this on the chest pad are minimal. Just some minor fraying edges on some of the mesh which I’ve repaired using material from an old smock (actually that’s a tip worth remembering). Such little wear after spending nearly a whole year sliding around on a sand filled pitch leads me to believe that if proper care is taken these pads could last forever.

I have been told that I play with a slightly unusual style just doing whatever feels natural to get the ball away quickly. Since I’ve been using the Robo chest pad I’ve had the option of controlling the ball on my chest at my disposal. Several times this season I’ve been in the situation where the ball has been flicked across the D and my only options were to take it on my chest or deflect it straight into the path of an oncoming forward. In the past I would have just gone with the latter and hope for the best but with this new gear I can take the ball on my chest and have it drop perfectly to clear with my kicker. Without compromising protection the thin design lets you feel the ball on your chest meaning you don’t end up with that numb feeling that comes with the spongier gear. And it no longer hurts the way your tongue hurts when you accidentally staple it to the wall. While this has only happened a hand full of times this year that’s still five or six scoring opportunities that they’ve prevented this season.

Now I know that style isn’t meant to be important to a goalie but let’s face it, all keepers like to look unique. With most of the bulkier chest guards I used to find myself limited to the single tone smocks that most manufacturers offer. While I know that OBO offer a fairly decent selection of colours but if I’m just buying the best one I can find then surely hundreds of other keepers will do the same. With the slim line nature of the ROBO chest guard, however, I have found that I can wear almost any regular t-shirt I can find over my pads. This truly offers a unique selection of styles to choose from.

When it comes to chest pads there’s a huge variety to choose from. I believe that I have sampled a decent cross section of these (including being sponsored by gryphon for a time but that never felt right for me) and can proudly say that I would recommend the Robo Body Armour or Chest Guard to any keeper who wants to perform at their personal best.

The design is simple, like my brother Phill but unlike Phill this design works. It is usable by all and from what I have heard from my fellow keepers there have been no complaints.

If you have any questions feel free to leave comments and I’ll get back to next time I’m online.

Cheers,

Cormac

ROBO Hi Rebound Kicker Review

robo kickers

My favourite piece of kit is the ROBO Hi Rebound Kicker because i have lost count of the times i have misplaced my foot and because of there size the ball deflects off the end hits the post and goes wide:) with my old cloud kickers the ball would just bounce over it. Also the ROBO kickers provide more protection as a keeper the last thing you want to be worrying about is weather or not your kit will protect you against that huge centre forward…ROBO Kickers Rule.

Equipment Overview

Lest we forget, equipment is still a very important part of the game for us keepers. If we turn up to practise against hard shots, with poor equipment, it affects our game to our own detriment. Personal cheap cialis 20mg safety is something we should all take note of, and consider equipment that properly protects us during the game. Quality equipment will not only improve your game by giving you better save making properties, but will help you psychologically; giving you the confidence to make the ‘big’ saves. Keep these factors in mind when you buy new equipment.

The set-up

The goalkeeper’s equipment is made up of a mix of protective and goal stopping gear. The kickers and leg guards cover your feet and leg, for shot stopping and kicking the ball away. The shorts and groin guard protection your lower body, with body armour protecting against shots to your body. Your gloves help you make aerial saves, with your stick giving you use in the game for stopping the ball for saves and being aggressive in tackles or interceptions. Last but not least, your helmet keeps your head safe.

field-hockey-equipment-guide

Level of protection

Kit manufacturing companies often grade the gear they sell in accordance with the protective qualities of equipment. OBO does this in dividing up their OGO, YAHOO, CLOUD and ROBO ranges (for the different levels of protection and weight required), whilst TK uses a numbering system (where 1 is best and professional standard), as do Grays (where the best is level 5). Slazenger, Brabo, Monarch, Mercian and Mazon all grade their kit by the named status of play – national, county,  club etc.

The level of protection matches the level of play: level 3 is club/county, level 4 is regional/high domestic play, and level 5 is international (not forgetting that using a higher level of protection for your level of play will boost confidence and protect against ‘stingers’). Any low levels will suit junior play and lower school level of action. It is worth remembering this when you, or your club, look to purchase new gear.

Making a blocking shape: standing barriers

A lot of goalkeepers, like the school of North American goalkeeping, prefer to have a stance where the body provides a constant blocking shape, keeping a tight stance during all of the play, with the closed legs providing a vertical barrier against possible shots, without any chance of the ball squeezing through. With the body always in this shape, there is no need to push the pads together immediately, when a shot occurs. Although a lot of coaches, especially women’s hockey in Australia teach the block as a save in itself, you should see it only as a means to block off the ball when the shot is headed between your legs.

By making use of a narrow stance, with the pads locked together, there is no chance of the ball getting through you. Although movement is harder, this is good for beginners who are unsure about their abilities on point shots. In game play, this is especially useful against tips and screens where the opposition will be looking to squeeze one through you via a point deflection.

Squeezing the pads

To prevent shots getting through the gap between your pads, you can close them together, thus closing off the possible gap. Whilst this is not encouraged in most situations, as a suitable level of hand-eye co-ordination and understanding of the game will allow, there are times when it should be utilised on one-on-one opportunities, and tips and screens, where the shooters are specifically going for the gaps between your legs. When challenging out against a close-in shot, you can charge out with pads closed to provide a blocking shape; playing the percentages to cover shooting space.

However, you will still see a lot of keepers from all over the world, beginner to pro using it properly to close gaps, but remember: you should not see the block as a method of leg saves: the leg is used on shots to the sides within the ready stance to cover the raised shot. Instead, it is an efficient way of closing off the hole between the legs.

Stopping shots between the pads

On plays where the goalkeeper is moving across against a pass, or moving attackers, it is possible to leave an open gap between the pads, with a wider stance, causing an extremely embarrassing ball as the shooter squeaks the ball through the open pads. By closing the legs against the shot, the goalkeeper is able to close off the available space and vastly reduce the shooter’s scoring chances.

This photo is used by permission from  Alex Masters’ Pan American games action photos; www.alex-masters.com

Review of CLOUD Hotpants

When looking for a decent pair of goalkeeping shorts the options are limited. Luckily OBO has a couple and I decided to try out the Cloud ones.

Cloud Hotpants
Cloud Hotpants

From the box (or bag, which they come in) they looked pretty good. Not bulky, padding in the parts that matter the most and they are very light. The Velcro wrap around design and the belt make for good adjustability and ensure a perfect fit. Also the way you wrap the legs of the pants around your legs make for a good fit as soon as you have done up the Velcro. Unlike some other brands where they close the other way around and you need to fiddle to get them in the right place.

A small area of concern was the mesh cloth on the inside of the pants. As I know that this can easily tear I was wondering whether if it would stand up to “normal abuse”. (I will come back to this point later on) Also the padding on the front seemed a bit on the thin side, but I would just have to see how it would face up to shots. (Again, will get back to that)

After I put them on for the first time, they immediately felt good. Hardly any restriction of movement (if any) and the open crotch design makes for a good interaction with the abdo-guard and enough ventilation. It felt very natural and needed no breaking-in time.

During the first training session I intentionally used the pants to take a few shots, where I would normally use my gloves, just to see how they held up. I don’t play at top level (that’s why I gave the Cloud a chance instead of the much more expensive Robo) but still, there a few hard-hitters in my team (senior men’s league). When the first hard hit headed for the pants I braced for impact and I’m glad I did, because although the real sting was taken out of the shot I really felt it. (“So that’s why they’re much cheaper than the Robo…”)

As said before, I intentionally let the some shots hit the pants just to try them out, which is not what you would normally do. In a normal game situation you will just get hit by the occasional deflection or short distance flick or low power hit and in those situations the Cloud stands up to the job really well. And in ladies games (no offence intended) they will probably be good enough for nearly all shots.

There isn’t a lot of padding on the side/hip area, just one pad on the hip bone, so when diving the landing can be quite hard. Also during sliding this can be somewhat of a miss. The pads did stay in the right place during the sliding and diving, so that’s a good thing.

Some years have past since I bought the Cloud hotpants and they look like a patchwork due to all the repairs that I had to make.

After about half a year the seams around the hip pad pockets started coming loose and the mesh cloth on the inside of the pants started to tear in places. The stitching was fixed easily enough and the mesh can be replaced without too much trouble. (If you save the bag the pants came in, you can use this as a replacement for the mesh.)

After about a year the corners of the leg padding pockets started to show holes on the outside due to the edge of the padding rubbing against it. Also the outside of the pants around the slide area was showing some wear even though I wear the Robo overpants over them. I do tend to slide a lot, probably more than average, so that’s probably why.

Luckily all the padding comes out really easy and the design of the pants is very simple. This means repairs can be made without a lot of hassle and if you do this in time you can extend the lifetime of the pants significantly.

Would I buy them again? To be honest: No. There are a lot of positive things: the weight, fit, movability and that they are easy to repair. But for me the negative points weigh much heavier. They wear quite fast and the padding is mediocre. But above that: for the price of the Cloud you can nowadays buy shorts that are a lot better. When I bought the pants there weren’t that many “clones” around, so I had less options to choose from. Now that almost all other brands have “stolen” the hotpant design there is choice is much more extensive.

In all fairness, my Cloud hotpants are about 3-4 years old and I don’t know if any improvements have been made to the design since then. If there are then the Cloud might give better competition to the other hotpants than the one I have.

Understanding Angles

The principal of angles dictates your whole game; playing the angles and setting up in front of a shot is all about cutting down shooting space, giving you a greater chance of making the save, rather than leaving too much open and having to make every save by throwing yourself around. Learning the different angles made by standing at different will affect how you make the save and your ability to.

The centre line

When the play starts breaking around them, and they become locked in a scramble for the ball, it can become easy for the goalkeeper to get lost and forget their angles. The goalkeeper should be central to the ball; using an imaginary line to get square to the shot. Working on getting to know your angles will mean you know where you are in relation to them when challenging out.

The centre line is the basis of every save and every movement around your goal: the middle of the goal and the goal line determine your angles; coming off the line makes the angle smaller and moving to the side cuts down the angle on your closest post, whilst making the angle to your other side larger. By checking the posts to see they are in a good position, the keeper can work out their angles to decide how far to come out.

angles

Below are diagrams representing angles set up from left and right post and central shots; the red line stands for the centre line, with the lines drawn out from the corner posts, as you would when stepping out from the goal line. Understanding the angle you cover with your positioning will help you close down the shooting space available to the attacker.

angles11

Playing the angles

Learning to play your angles will help determine how and where you make the save. By stepping out along the angle, you can actively cut down the shooting space, making it much easier to make saves as a result. Hanging back on your line leaves too much open space, turning your goal into a shooting gallery for incoming attackers to pick their spots openly. Instead, try to ‘narrow’ your angle to help you make the save; challenging the shooter for their shot.

Post angles

At a tight angle, with the ball in the corner or near the base line, the goalkeeper’s angle covers a small area (blocking off the post) against a shot, so they can stay near the goal. This allows you to cut off the shot tight to the post, stopping the shooter scoring there. Make sure you get your foot right on the post to stop a low ball squeaking past you!

However, to prevent you deflecting a shot into your own goal, you want to stay inside the near posts. At tight angles, you always want to position yourself so any deflected shot will go outside the post. Always be square to the ball (if on the post, getting at a right angle, so you are sideways-on): use your centre line to give yourself the advantage in covering shooting space.

Outside the post - woops! Ball in the net!
Outside the post – woops! Ball in the net!
Inside the post - ball cleared to safety.
Inside the post – ball cleared to safety.

A quick way to tell if you are outside the near post is to point your arms straight sideways when square to the ball; the arm nearest the goal should point outside the near post. If it points inside the post, you need to take another step or two out.

As the ball moves away from goal, the near post is not as much of a concern; your focus now is to move further out to cover the angle of the middle and sides of goal.

Again, Jeff Benjamin should be credited as a source in writing this article.