The Worlds Smallest Keeper Uses OGO Custom Kit

Here is a nice little OBO story for you;

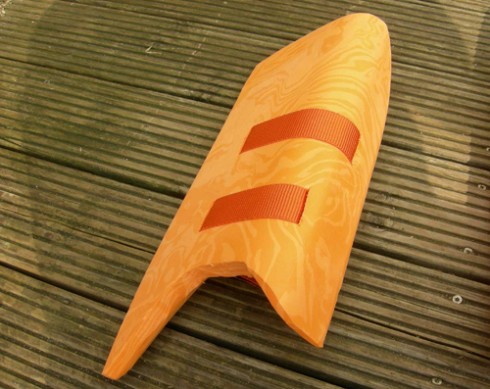
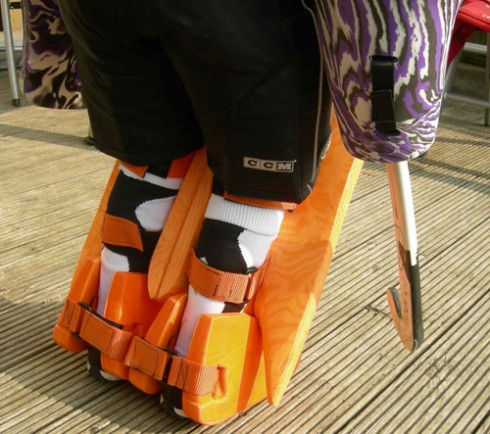
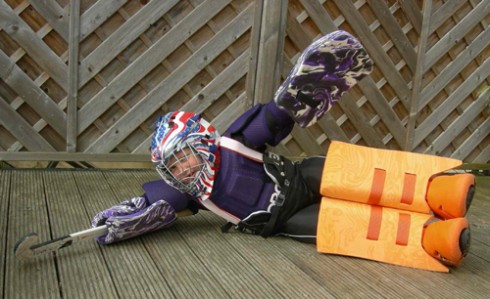
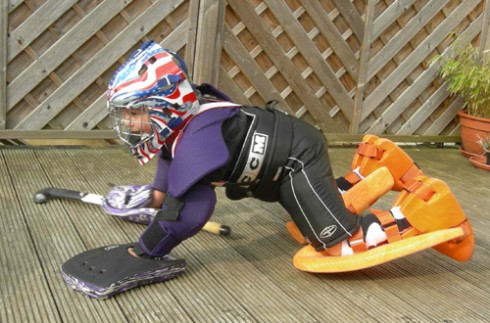
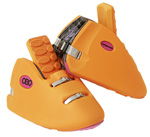
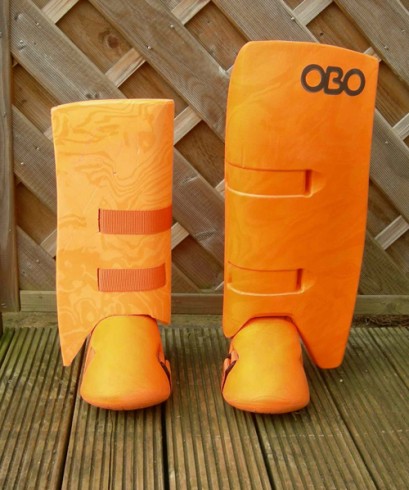
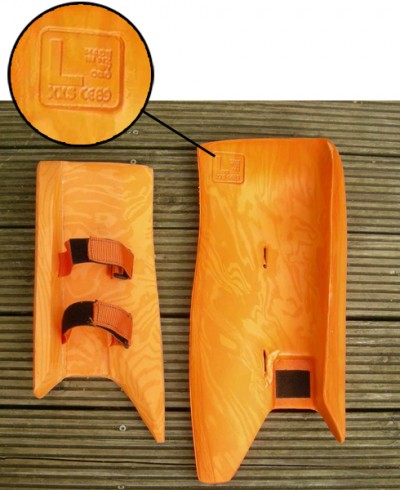
An OBO dad bought the smallest OBO kit possible (OBO OGO XXS) for his Son age 7. However at this age the  legguards were still too big.

At OBO HQ we got a request from dad for some foam and a few tips on how he could make smaller legguards for his son.

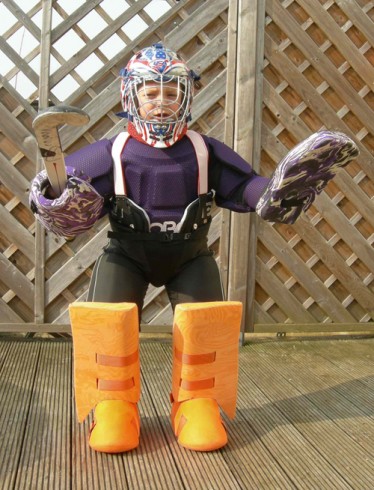
Check out the outcome of the custom kit below:

ogo xss

Custom XXXS legguard / OGO XXS legguad

ogo xxs custom
Custom XXXS right / OGO XXS Left

custom xxxs ogoCustom XXXS OGO

xxxs custom ogo2Custom XXXS OGO Kicker Tongue Grove

Here are dad’s comments:

“I did it! I created the smallest OGO legguards in the world, a 95%
copy of the original. Have a look on the pics I promised you (the original
is the bigger one on the right side, OGO-XXS size, also the kickers…).
The foam you sent me is fantastic. Bonding was no problem, I found a
fantastic glue. But shaping was a challenge…
My son is happy to have this equipment ready now!”

Dad
OBO Unlicensed Develop Department, GERMANY

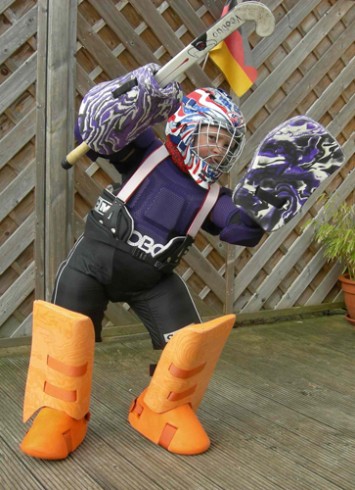
Here are a few shots of the kit in action.

custom ogo xxxs 3

custom ogo kit xxxs
The Worlds Smallest Keeper

xxxs ogo custom kit

ogo custom xxxs

ogo custom kit xxxs

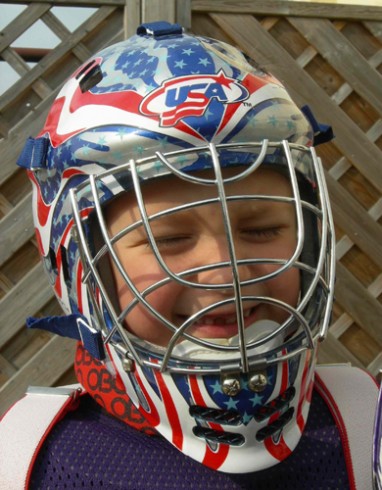
Our goalie started his hockey career age 4 (2006) and plays for TSV Riederich, a small village near Stuttgart.His favourite movie is the DVD from the German Hockey Team while the WCC 2006, Honamas.

obo xxxs keeper ogo

Quite possibly the worlds happiest keeper – good work Dad!

Short Corners: Getting Caught Out On The Drag Flick

When facing a drag flick from the top of the D on a short corner the biggest problem for the goalkeeper is to know how long to stand up (or remain standing) to deal with the incoming shot. If the destination is not given away, with the ability of the shooter to disguise it, you can only react to it. The timing affects your chance to save – you have to match exactly the ball’s arrival time to be successful.

This is a problem that even the world’s best suffer from, as they face the top drag flickers who like to have a few tricks up their sleeve to disguise their intentions and more importantly the destination of the ball. Just like on a penalty flick the shooter can ‘throw the shoulder’ with the keeper expecting a shot up and over them (or a low shot) exposing the open space to the side and slotting the ball away.

At the Olympics, this technique was shown at its best (unfortunately for the goalkeepers there). Germany’s gold winning goal was down to a successful high and looping drag flick on a short corner opportunity, where Fransisco Cortes left his feet early, whilst Vogels was beaten in the bronze medal game by a flick that similarly went up and over him.

When a lot of keepers make the transition to higher levels of play, they can often struggle to combat it, getting beaten by a well executed drag flick. I can personally admit to this in my younger days and other than the humiliation, it’s something you’ll want to eliminate from your game. But obviously the only way you can get better is to make mistakes and learn from them: in a lot of cases, like mine, you may be playing a lower standard but be facing a ringer.

There are not many county (lower division) teams where players can flick that well, but regional and onwards they are part of the game and it is therefore essential that, if that is a considered potential target, it needs to be learnt. You need to be aware that if you are ‘climbing up the ladder’, it is something you will meet and need to work on to beat.

Committing wrongly

The problem with going against the flick is knowing when to time the jump or dive; go down too early and you’ll have the ball roofed over you, but stay up too long and you will lack extension to reach the shot (in this case you will have to jump into the save). Similarly, making the wrong choice of save will hamper your efforts.

It is also difficult to read the direction of the ball: normally the ball will go to the corners or straight; in the path of the stick’s position, but low balls wide of the pad, which are difficult to reach standing up, can also be played by the striker.

Leaving your feet too early

With a drag flick, the goalkeeper in question can easily be caught out (by misjudgement and second guessing on their part) by a high ball that loops upwards onto goal, looking to beat the standing goalkeeper by getting it to a height and position that is impossible to stop. Unlike a strike, which is easier to read, the drag flick can be faster and curves with the flight of the stick; it can sweep into the corner or around you.

A lot of goalkeepers are taken back by the type of shot; confused about how to react and therefore act indecisively and misjudge it, or are tricked by the stick positioning; going down incredibly easy (and fast), leaving a whole area of net above them for the ball to go into. In this situation, the goalkeeper is effectively lobbed, with the ball going straight up over them without the ability to even get a touch on it, since they are too far gone (with downward momentum) to reach into any potential save.

Learning to stay on your feet

In order to prevent the ball zooming past you by aggressively committing too quickly against the flick for the attempted save, you need to work on timing your response to meet the ball. Timing the saving move with the actual shot, rather than going before the ball is released, gives you a better chance of reaction, instead of being beaten so easily.

The trick to saving the drag flick is to react with it: don’t be too early, or too late, as you won’t be able to stop it. React as the ball comes in – ready to stop it on its release, given the speed of the flick. Stay up as long as you need to and outwait the urge to move into a save immediately; be patient and react to the shot as it comes at you.

  • Stay up for the stop by the waiting ‘stopper’ (with their stick down to halt the ball to ensure the best shot on release); the ball will often be stopped dead before the flick to make it easier to drag flick (rather than having to drag a moving ball!)
  • Stay aware of potential corner routines involving players, but do NOT get caught up in their efforts to disguise the shot
  • Keep your concentration – react to it as the flick is released – only moving on the flick itself
  • Watch the ball all the way into the save to make sure you get as much behind it as possible

Making the wrong choice

Another point to take note of is the bad choice of save – going down with a long barrier, when the only means of a save is to stay up. There are still a lot of keepers, despite the rule changes and responding changes in the format and style of the game, that seem to log no matter what (as a first choice move rather than playing the ‘read and react style’), despite the threat of a well executed flick. These are the most vulnerable to a flick given the obvious height and speed of the ball: being lobbed by the ball as they obviously ‘down and out’ on the play.

This is an easy mistake to make that will have disastrous results – giving away a goal for free. Even internationals have managed it; Argentina’s keepers inabilities at short corners were exposed in recent world cups. Indecision will lead to problems as you cannot react with the shot, wasting time and not being fully prepared for a save. Work out how to make the save properly and stick to it: don’t mess around and have a clear plan.

Rule of thumb

The easiest thing is to learn how to read a straight strike versus a flick: working out the shooter’s intentions by their stick positioning. Reading their body language, posture, and looking at their eyes, will help you work out where they are looking to shoot.

A shooter going for a straight strike will grip the stick at the top to gain power and hold the stick nearer their body to control the shot

A shooter drag flicking the ball will have their hands further down the stick to get more control over the flick and hold the stick further back from their body; gaining more upward movement on the flick

The 100kmph Creme Egg!

Hello,

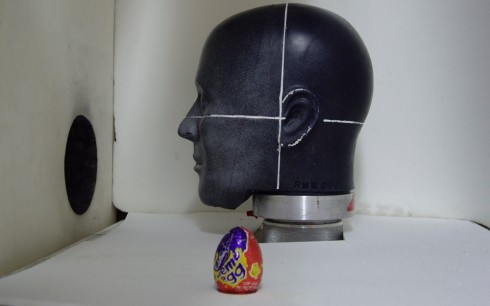
Here at OBO were all about making the best products that are specific to Hockey ie: the impact of a hockey ball. Before now, we really had to test the equipment using an ‘Ouch!’ factor… Now we have quite possibly the most advanced lab in the Southern Hemisphere for testing the impact of hockey balls on different materials, helmets, kickers…and now a Creme Egg!

We will be showing some of our test results from our helmets soon on this KR2.0 site very soon so keep your eyes pealed.

In the mean time we caught a bit of the Easter spirit and thought it would be fun to see what happens when our crash test dummy Noddy tried to eat a Creme Egg.

the 100k creme egg

Check out the video below to find out what happened …

There’s another thing to tick of your list of things to do…

Happy Easter!

Champions Youth Cup

cyc-2009

SportsLink Australia has sent us the following information…

My name is Alexis and i work for Ivan Boulton FIH grade one coach and director of SportsLink Australia. I”ve been asked to let you know about an exciting new hockey tournament which is set to get underway in July and November of this year, ‘The Champions Youth Cup 2009’.

The Champions Youth Cup tournaments are endorsed by Hockey Australia, Hockey New South Wales and Hockey Victoria, the organising bodies for the Champions Trophy tournaments to be played in Sydney and Melbourne 2009.

The Champions Youth Cup tournaments coincide with the Champion Trophies in Sydney and Melbourne, and will offer talented young hockey players not only the opportunity to partake in this exciting event and play against Australian and international teams, but they will also be able attend the Champions Trophy, and meet some of their international hockey heroes!

We are pleased to be associated with these events and supporting our future stars, which is why we would very much like to see if any of your teams would be interested in registering a team in the event.

Since the days are counting down to the tournaments debut, and participating in this fantastic opportunity is something your team might be interested in, I would be more than happy to provide you with more of the relevant information on the event and optional extra’s, as well as discuss the matter further so we can secure your team a place.

I have attached a copy of our promotional flyer which explains the event in more detail, and i’m happy to answer any questions you may have.

Moreover, If you happen to know of another team that would also benefit from, or be interested in partaking in Champions Youth Cup, it would be much appreciated if you could kindly forward this email to them.

Thank you very much for taking the time to read this, and i hope to hear from you shortly.

Sincerely, Alexis.

Alexis Laird
Mobile +61 415 497 692
www.sportslinkaustralia.com.au

View promotional flyer.
You will need the free Adobe Reader to open the PDF.

OBO Elbow Guard Product Tour

Our ROBO Elbow guard is in the final stages of our βeta testing programme and we are just making the final tweaks before we launch the product. This product will in your local OBO supplier soon.

robo-elbow-guard

Here is a quick video displaying how the elbow guard is reversible so you can adjust the product to suit your style of play…. Some keepers prefer to have more protection on their forearm and others on their biceps.

I have also taken a few photos to demonstrate how the guard will work with full or half protection with Hi Control and Hi Rebound RHP’s. To view the presentation click below.

[HTML1]

Keep an eye out in our βeta testing section to get more views on this and other new OBO products.

Here is a link to NicfromSweeden’s review

Knees Up Knee Protector

OBO and myself (along with other keepers) have been working together to produce a knee protector that would protect the exposed top part of the knee joint. The goal for this project was to make a light weight, protective piece of equipment that didn’t hinder a keepers mobility or effect performance by being bulky and cumbersome. The knee protector had to fit in and work with a keepers leg and thigh protection and help to prevent injury to the delicate ligaments and bones found in the top of the knee joint.

I’ve been testing a prototype since Mid-March with very encouraging results. We’re at the stage where we feel we’re almost ready to take the product to market, save for a few minor tweaks here and there. I’m now at the point where I’m allowed to release images of the prototype and I would appreciate it if you could take the time to give some feedback and impressions on the design and if you would consider using it (or why you wouldn’t).

The 2016 balklänningar This is one of our best collections yet and we are very proud of this years formal dress collection!

The basic design of the knee protector is a soft foam part that wraps around the knee cap itself with a HD foam part which wraps around the thigh, snuggly covering and protecting upper part of the knee and knee ligaments. Velcro straps are used to hold the unit in place.

A view of the knee protector on the knee. As you can see, the unit sits close to the body so not to interfere with the leg guard or shorts.

Image of the knee protector with the HD Foam on the “inside” of the leg.

A view from above.

The knee protector whilst wearing SPs and Hot Pants. As you can see, the knee protector fits in the leg channel easily and under the bottom of my hot pants. Note: I like to wear my gear TIGHT and I had no problems with the knee protector making the leg guards or hot pants feel uncomfortable.

If anyone has any questions at all, please feel free to ask and I will answer them as quickly and as thoroughly as I can.

Thanks,

Zip

Check out GB Goalkeeper Ali McGregor’s review

How To Keep Your Goalkeeping Kit In Top Condition

Here are some great tips and advice on how to keep your kit in its best condition.

1.After each training session or game, take the gear out of the bag to allow it to dry. It helps prevent odours and damage to body armour and other gear can be monitored and repaired.

2.Before putting the helmet into the gear bag after use wipe out the inside (use a small towel or rag kept in the bag and regularly washed). This will prevent both mould and a build up of odours in the helmet.

3.Where possible try and wash all the gear at least every month. Washing the gear will help to reduce odours and will prolong the life of all the gear in particular the body armour.

3.1 Use your bathtub or washtub to soak all gear including pads, kickers, gloves, helmet and any body armour in a solution of borax (approx 1 lid full) in plenty of cold water. Borax is available in the cleaning products section of most supermarkets.

3.2 Leave to soak for several hours or till the next day if possible. The pads, kickers and gloves will not remain covered with the solution. It is important that they are turned a couple of times and are re-immersed when possible. (You can use a scrubbing brush to remove any marks and dirt off any equipment if necessary).

3.3 After soaking drain the water completely.

3.4 Refill the tub with cold water and add a generous measure of fabric conditioner. Ensure that the tub is reasonably full to allow all items to be well rinsed.

3.5 Allow the gear to soak for at least 2 hours to remove any residue of the borax. If this is not done it is possible for a skin reaction to occur so it is quite important to ensure a good rinse process is followed.

3.6 Drain completely and hang the gear on the line. The gear will dry quite well overnight. The gloves need to be stood up to allow water to drain away. If the left hand glove still smells after the washing process put a diluted solution of bleach into it and leave for a short while then rinse thoroughly with clean water and some fabric softener. This will remove the odour.

3.7 The bag can also be washed in this solution if necessary, as it will absorb odours from the gear it carries.

3.8 If the helmet has any mould on the foam inside, this can be removed by using bleach and a small brush (toothbrush or similar will do the job). You will then need to rinse to remove any residue.

4.When the gear is dry, check all the gear for any damage that needs repairing.

4.1 Look for any areas of separation on the pads and kickers, which may need reglueing. This includes any tears or splits. Reglue as necessary using contact adhesive or shoe goo.

4.2 Check kicker and pad straps and if necessary, replace prior to them breaking and being a problem. It is likely that the kicker straps will break more often that the pad straps. Checking for wear and early replacement can prevent these problems from occurring. Look for any padding in the helmet, which may be loose and need reglueing. Check any straps and other replaceable items such as chinstraps are in good order. Repair and replace as necessary.

4.3 Check all the screws on the helmet and tighten any that may be loose. You may need to do this on a weekly basis. It can be useful to carry a couple of short handled screwdrivers in the gear bag to manage this process. If any screws or other pieces have been lost, replacement kits can be purchased. Also check for any splits or cracks to ensure that the helmet continues to meet the safety standards required.

4.4 Check body armour for any wear. If necessary repair any small tears and broken seams with a large needle and strong thread. Any major damage can be repaired by a saddler or a shoe repair company. If maintenance and checking of body armour is carried out on a regular basis, this allows repairs to be made quickly with minimal disruption to training and games.

4.5 Check the bag for any damage, which can be repaired. A saddler or shoe repair company can repair damage.

5. To assist with odours emanating from the gear and bag whilst in the car, a can of Glen20 kept in the bag and sprayed in the car and gear bag can temporarily neutralise the odours. However, keeping the gear reasonably clean and dry can help prevent any problems with odour. DO NOT USE DE-ODOURANTS AS THEY ATTACK THE FOAM If you are not leaving the playing fields straight away it may be helpful to leave the gear out to dry a bit before packing up.

6. It is in your interests to keep the gear well maintained and clean as it will last longer and will therefore not be a financial drain. If the steps listed above are adhered to any replacements or repairs due to wear and tear can be carried out quickly to minimise any disruption to you, your team, coach or club. Any repairs should be carried out as quickly as possible to ensure that gear is always ready for use.

7. It is imperative that you check your gear at the completion of the season to ensure that your gear will be in good playing order at the beginning of the next season. You will also be able to organise the purchase of new gear, which will reduce any extra costs to start the next season. This will also enable you to wear any new gear in prior to the start of the next season.

kit-maintance

Download the PDF

Thanks to Animal who supplied the PDF and wrote the content.

The Second Save

Consequent rebound shots after the initial save are one of the hardest jobs for a goalkeeper to deal with. Unable to clear the ball and with going straight back out into play, further shots are guaranteed, with the shooter having more and more chances to bury it. The longer the ball stays in the D, the more chances the opposition has to shot in on goal, so you want to do all in your power to get rid of it. These are the types of situations that can either be a goalkeeper’s recurring nightmare, or their team’s saving hour!

What to do

If you do have to face multiple shots, then you want to be able to react to each one – concentrating on the single save each time to maximise your ability to stop the ball. ‘Keeping your head on’ and staying confident will make the save much easier to complete as you are comfortable in dealing with the pressure of the situation. Don’t ‘lose your head’, diving around all over the place and putting yourself in danger.

If you have to run back or across into cover open space, then be calm about it; using speed, but concentrating on the related angles and appropriate positioning to the shooter. The sooner you get there, the more area you can block if the shot comes in (if the shooter takes their time, then you have even more of an advantage!).

With the shot coming from the other side of you, as a pass is made, or the ball was redirected there, you will have to race back to cover the changed angle. If the shot is closer in (i.e. it went to outside of you on the save), then you can step and shuffle across to move into the space and shot.

Getting into the ‘zone’ really helps. As soon as you get going, you’ll feel unstoppable. But don’t forget to clear if you can, otherwise all your attempts will be fruitless.

Pointers:

  • Stay back and react to the shot as it comes in, giving you more reaction time for the save
  • If the shot is raised, try to stay on your feet as the ball could end up going over you; unless it is not possible to do so.
  • If you have to dive across, as you are likely to be forced into extending on side shots, then get up as soon as possible, otherwise you will be ‘down and out’, giving away a goal to the shooter
  • The sequence of potential saves is all dependent on the speed of recovery: the sooner you get back up, the more time you have to make that split-second difference in reacting to the next save
  • Never surrender: don’t give up and keep battling to keep the ball out of the net

The longer the ball stays in the D, the more time and opportunity the opposition has to score. Get rid of the ball as soon as possible.


Closing down the attacker

If you are alone with against the attacker (i.e. you have no defence and are left to deal with the play), then you can run out to meet them. By reacting quickly and instantly running out to meet them in-tight, you immediately close down the available shooting space and force them to move around you, or shoot straight into you. If the shot is released then you are in a capable position to stop it – being on the ‘doorstep’ to cover the strike.

Pointers:

  • Square up to the shooter, covering the angle close, so that they have little to shoot at (unable to see much of the goal) – forcing the shot into you for an easy save
  • Channel them; going out on the angle, to reach the top of the triangle, to cover the sides
  • Be ready to block as you are so close; dropping your hands to face the shooter to provide more coverage
  • Also be aware of a shot between the legs (with a gap there) and be ready to close them together
  • Remember to react – if an acute angle shot to the edges of goal is attempted, you need to stop it
  • Make sure you have lightning fast reflexes (sharpen them if needs be) to be able to react, as the shot will be so close , giving you little time to react

Rule of thumb:

If the shooter is alone then come out and challenge to make their life harder; only a good shot should beat you.

If there are multiple shooters then ‘hang back’ and react to it, as there are more options to deal with and more space to shoot at.

If the shooter does move, instead of shooting, be ready to move with them and tackle of stop a shot.

Eliminating the second save

When making the save, you want to be able to clear it away as soon and as safely as possible, so that further opportunities can’t develop. By getting rid of the ball, you are effectively stopping any further chance of scoring – shutting down the opposition.

The best place to put the ball is out to the sides or the back line, where attackers cannot get hold of it, as it is now out of play (try to clear the rebound on the save, but you can use a kick if needed after the initial save). If not, then kick it as far as you can away from danger, preferably outside the D, so that you have time to recover, reposition and get set for the next shot. Otherwise, try to get it to a defender who can then clear it away with their stick, or pass to another team mate to keep hold of possession.

If the ball has gone out on the save, depending on the rebound quality of your kickers and pads, you will have to chase it down to get in reach of clearing it. Don’t be static or laid back; actively come out to get to the ball and make a strong clearance out of harm’s way. That way you will be able to respond better and get more behind it, as you have more time to think and see the space available.

Be decisive: take charge of the game.

Remember: you can’t intentionally kick the ball back line after the shot is stopped. If you do, then you will be penalised with a short corner (the sidelines are still okay though). On making the save to push away, it needs to be a fluid single movement; angling the kicker or pad to turn away the ball in the correct direction.

First save mindset

You should focus on each save as it presents itself – concentrating on that shot singularly each time. Your priority is the first save: make the save and eliminate the rebound, and you prevent any further scoring chances. No more chances means no goals.

Lots of coaches teach the maxim (saying) of ‘one shot only’. They want professionals at the top of their game to make that one save on that one shot – they don’t want them messing things up by giving the opposition more opportunities than they should have.

If you watch football/soccer and look at the way rebound goals occur, then you should learn for your own game; say if a keeper ‘spills’ the shot; dropping the ball or failing to smother it, it is all too easy for the shooter to come in again and put it past the downed keeper.

Focus on the first save – prioritise the save and the controlled clearance of the rebound. Don’t give away further chances.
 

Review of OBO ROBO elbow protectors and OBO Senior Knee protectors

Review of OBO ROBO elbow protectors and OBO Senior Knee protectors

by Niclas Franzén Swedish national goalkeeper and goalkeeper for Partille Sport Club

Please excuse my grammatical and spelling errors
This review consist of three parts “First impression”, “Review after testing” and “Pictures”

First impression

Elbow pads
At first look I was a bit confused with its “weird” design and at first try I thought they were the bulkiest pads I had ever tried BUT then I started to take a closer look at the elbow pads and noticed what I would like to call GENIOUS design! First I started by just adjusting the straps a bit and this made it fit nicer then I removed the “elbowpit”/forearm/bicep protection and I was in love basically all the bulk was gone and they fitted better with my SP gloves especially the right one and when I tried to remove the ground/inner protection the pad became even better!

I’m wearing them around the house for the moment to get used to the feeling (I have not used elbow protection for a long time so it’s a bit odd for me at first) without having a go with them in goal yet I really think OBO have designed a product that able to catch a really really wide audience. When using all protection it’s like a full arm guard and when removing the first pad it becomes a protective elbow protector and when taking the last part away it becomes a super flexible elbow protector (of course I understand that protection will not be as good but for me who is used to not having anything at all its still much better than nothing. I feel that the elbow bone is well protected and so is the forearm I think it will be great for PCs when going down because the most brittle parts of the arm is protected it’s just like I want it

The only slight downside with the pad is that I don’t think some of the elastics is tight enough when removing all the extra protection but it’s a easy fix with the good old sewing machine and maybe it says more about the size of my biceps than the product itself 😉

Kneepads
as for the kneepads they don’t hinder the movement to bad actually and after wearing them for a while they started to get the shape of my leg however I can’t get used to the straps at the back of my knee because of the straps but it might not be a issue when wearing long socks also I have yet to see how they fit with my girdle.

Review after testing

Elbowpads
First of all I want to say FINALLY a elbow protector that’s designed for fieldhockey instead of a ice hockey elbow protector sold as a fieldhockey one.
After testing the elbow pads for one and a half month I feel I can give the pads a fair review after breaking them in properly. I like these elbow pads a lot and I they are certainly the best I have ever tried I like the idea that it’s possible to remove/add protection to make them fit the needs of the user. One might like to have full protection for training but just wants to wear the “shell” for games, personally I’m extremely sensitive when it comes to bulk and for over two years I have played “dutch” and I can honestly say that these elbow pads are the only reason I have even considered moving back to joint protection. With all protection they act like a small version of the full arm guards (a pair of full arms that fits the sp RHP much better than the actual full arms) with just the inner protection added you get added protection against the ground and also against balls that hits the elbow bone. Lastly with just the “shell” you get a good hard shell with some soft damping on the inside which is the way I use them I feel it gives me the best mix of protection and flexibility the full lower arm is protection and the elbow bone which are the pars of the arm I feel the need to protect. I lent the elbow protectors to another goalkeeper in my club who normally are using full arm protection and he was impressed by the flexibility and he still felt just as confident as when he use his full arm protection so I really do believe they fit all goalkeepers from the ones who loves playing “dutch” to the ones who swears by their full arm protection it might also be a good way if you want to go down from full arm protection to more flexible protection as you can remove the extra protection when you feel confident to do so.
I would say no matter how you use them the protection is still great both against the ground and against balls the hard plastic panels combined with the soft inner makes a perfect combination.

Kneepads
When I was testing these knee protectors I never got hit so I can’t comment on the protection but I was actually surprised how flexible the kneepads were after breaking them in, I would say that they don’t hinder my movement a bit and they fitted well both with my old OBO girdle as well as the newer model so that was not really a problem. They also managed to stay in place fairly well but could move a little after making several saves in a row but it was an easy fix as soon as the ball left the circle. Personally I have had a hard time adjusting to the feel of having something around my joint and even if it does not hinder me it’s a mental block to me so personally I’m not a huge fan of these. However I would have loved these as a junior when I got hit more on my knees and I could see why goalies who slide a lot would like these but these are really for everyone because we all get forced to do some more or less “ugly saves” from time to time (I have even heard a rumor the these kneepads were the reason Ali McGregor could play on after getting hit on the knee during the Olympics). I also lent the knee pads to the same keeper in my club who got to try the elbow pads and as I write he still have not given them back to me he just loves them (mental note I have to buy a pair for him when he has his birthday so I can keep mine for myself).
I think some goalkeepers will absolutely love them and some would hate them me myself is somewhere between these two camps I can’t say I love them but I can’t say I hate them either because after all it’s a good product who are going to give many keepers out there a little more confidence to know that even if they give the little extra during the match they will know for sure that they will be able to go to work Monday morning because let’s face it most of us got work on the side of hockey.

I hope people will find this review helpful and that it has given you a better idea of these great new OBO products.

Feel free to contact me if you have any questions.

//NicfromSweden