Going ‘Dutch’

These days you will see a fair amount of goalkeepers in different leagues going without full arm protection. ‘Padding down’ with a goalkeeper removing their arm guards completely to gain extra movement (without the added weight or restriction of bulky arm padding) and speed in glove saves, is often referred to as ‘going Dutch’ because of the history of their goalkeepers going ‘armless’. In Holland, hockey coaches teach their goalkeepers a method of goalkeeping that encourages an active style of play; proactively reacting to every shot, rather than simply focusing on blocking the ball.

When goalkeepers started out in hockey, there was very little kit available. Even when ice hockey protection was introduced into the game, arm guards weren’t available or produced, leaving goalkeepers to stop shots unguarded. The ball still travelled at great speed, with shots travelling at speeds of 85kph. Back in the ’80s when Ian Taylor was playing and further back than that, keepers fearlessly logged against hits and charged down short corners wearing effectively basic and poor padding. Now that’s crazy!!

goingdutch

Reasons

There are specific reasons for doing this; it isn’t just something taken lightly. With arm pads, goalkeepers find them bulky and restrictive. This both weighs down the goalkeeper’s arms and reduces the ability to fully move the arms, resulting in slower, restrained movements. Elbow pads can also be too tight, stopping that reflex save with the timing of reacting to an instant save on a drag flick or hard strike. With the elbow joint muscles limited by the tightness of the strapping, you cannot fully move into the save on instinct, stopped by the applied pressure.

At the higher levels of play, goalkeepers and players will make informed risks (knowing the benefits and fully aware of the potential consequences of their decision) in order to get an advantage, however great, against the opposition to get that edge in defending the goal. Assessing the risk, the chances of getting hit on the elbow are rare, but are still possible (especially when leaving it vulnerable going down on the play to block) – it is up to you to make a personal decision whether to take the risks or not.

Advantages

The benefits of losing arm protection are significant in a modern game dominated by drag flicks and speedy hits and reverse shots, where you can really make use of increased reaction times. With your arms free and unrestricted, you gain full movement to stop shots. You can now react fully to the shot, getting yourself behind the save and pushing into block and power away the ball, with the ability to move into the save with all your effort; making sure you have full concentration.

Your body also has an integral fear of being hit by anything at speed. This automatic reflex allows you to speed up your reaction to an incoming shot, literally zipping out to stop the ball. With increased speeds and flexibility to move for the save, you can react ever quicker to the ball.

Style changes

Reducing your available protection will obviously have a direct impact on the way you play, given self preservation and the option of saves open to you. The Dutch style itself is a more upright, patient style of play, staying up to challenge the shooter and cover space. Without the arms padded, it is easier to concentrate on splitting the two different levels of hit: shots below your hips and shots above them. With your leg pads dealing with low shots, it is the arms that are more active against raised shots.

You will have to be more careful being aggressive; charging out to cut down the shooter’s angle. In-close action is especially dangerous with the shot so near you and little time to react; extremely vulnerable against a mid-height shot (if you have dropped your arms to reinforce coverage around the pads). It is also important to note the related psychology. If you fear the shot, then you shouldn’t attempt blocking, as you are more likely to flinch, with your muscles tightening up and making any impact worse.

If you like to log on short corners, then you should have a spare arm pad (placed behind your goal during play), which you can put on in the interlude before the corner. This way, your extended arm is fully protected against a shot off the arm when extending out to your right. Your left arm is ok and can be brought into your body or behind the body and pads, with the glove facing out, to protect you from a direct hit.

Adapted stance

Adapting your stance allows you to take care of protecting yourself from being hit. If a shot was to undercut you and hit you square on a bare elbow there’s not much you can do for damage control!

To protect your elbows, you need to bring your gloves out in front of you to cover your elbows; have your palms facing out, blocking your elbow and arm, covering if a shot was headed there. This feels weird at first, but you will get used to it, and it’s for the best. From your stance, you can then move into the save, reacting with the shot.

goingdutch11

goingdutch3

You will also find that goalkeepers ‘padding down’ keep their arms tighter into the body; drawing their elbows in close to their chest/stomach. This allows them to protect the elbow by keeping it out of harm’s way – not exposed on the play to be hit.

Save making

Making saves without, you have to focus on making every save as it comes, and getting behind it to protect from being hit. You can no longer play a blocking style, since your arms are now exposed to the play: unlike before, you can’t use your arms for save or go out standing in front of a shot to block.

You should be more active with your saves, getting a glove on every raised shot and actively pushing away the rebound, driving the ball to safety on the save.

Going down against the play needs to be reconsidered as you are leaving your arms open to being hit, as is slide tackling or blocking, where you. When diving, you are just as vulnerable.

Training

At training, keepers will go back to protecting their arms: wearing their arm pads during drills to protect themselves from the odd knock. The shots you will face in a game are isolated and separated, so it is easier to protect yourself, prepared against each single shot, whereas in training balls are pelted at you non-stop, without pause.

Outfielders aren’t so nice and will often treat the goalkeeper like a human pin cushion – trying to take off your head, or carelessly smashing it at you. It is therefore an obvious decision to pad ‘back up’ again to look after yourself. Even Guus Vogels (recently retired internationally, but the established Dutch no 1 keeper for a long time until recently, and considered the world’s best) wears elbow pads at training to protect his bones.

Injuries

If you are in serious pain, and cannot move your arm at all, then you should get about consulting medical advice. A shot straight off the bare arm has obvious dangers; a crack off the elbow is especially bad. Severe bruising is the result in most cases, but a bullet of a shot could break it, leaving with a hair line fracture or full on break (putting you out for six weeks). Soft tissue damaging can result from getting hit; nerve damage can lead to eventual numbness. You can also get the equivalent of tennis elbow by landing regularly on your elbow after diving saves. Serious injuries can even require surgery.

Risks

Getting hit on the elbow is the biggest as it is the worst place to get hit (and difficult to heal). Learning to get your glove across and out in front to cover is essential. If you do go down against shots, you can bring your glove in front of the right elbow and forearm to protect against the straight strike aimed at your stick side.

Protecting skin

With sliding on bare arms for tackles or diving on the pitch surface, you can get some really nice burns. A lot of goalkeepers wear their ‘skins’ (water absorbent tops) under their chest pad to cover their elbows from shedding flesh. Some goalkeepers even wear inline/roller skating elbow pads simply to look out after their skin.

Disclaimer’s note: Going Dutch is a personal choice and is up to you to decide whether or not you want to take the risk; don’t be influenced by other keepers and the professionals or feel the need to conform if it’s not your ‘thing’ and doesn’t suit your style. It is best to give it a go once you have enough experience behind your belt and are old enough as a senior keeper to decided; too many junior keepers have been ‘welcomed’ into the bigger leagues with merciless shooters looking to hurt them so they can’t stop further shots.

Remember that you are responsible for your actions; it wasn’t the shooter’s fault they hit you (unless it was maliciously intended), you are just as much to blame. A break could put you out of the game, and you may not have a reserve keeper – costing your team the game.

OBO WebSite Developers Win Award

Fracture’s new website features managing director James McKee (left) and Nick Shaw.

Auckland website design company Fracture has always aimed to be
different and last month its unique approach was recognised by a
significant international accolade. Its web design work for local
architects Jasmax won the business category of the South by Southwest
Interactive Awards, held in Texas. Co-founder and creative director
Nick Shaw spoke to Simon Hendery about building a business that stands
out in a crowded market.

Click here to read more on this article

Via NZ Herald

Check out Fractures award winning “virtual building” Jasmax website.

Short Corners: Getting Caught Out On The Drag Flick

When facing a drag flick from the top of the D on a short corner the biggest problem for the goalkeeper is to know how long to stand up (or remain standing) to deal with the incoming shot. If the destination is not given away, with the ability of the shooter to disguise it, you can only react to it. The timing affects your chance to save – you have to match exactly the ball’s arrival time to be successful.

This is a problem that even the world’s best suffer from, as they face the top drag flickers who like to have a few tricks up their sleeve to disguise their intentions and more importantly the destination of the ball. Just like on a penalty flick the shooter can ‘throw the shoulder’ with the keeper expecting a shot up and over them (or a low shot) exposing the open space to the side and slotting the ball away.

At the Olympics, this technique was shown at its best (unfortunately for the goalkeepers there). Germany’s gold winning goal was down to a successful high and looping drag flick on a short corner opportunity, where Fransisco Cortes left his feet early, whilst Vogels was beaten in the bronze medal game by a flick that similarly went up and over him.

s_corner_flick1

When a lot of keepers make the transition to higher levels of play, they can often struggle to combat it, getting beaten by a well executed drag flick. I can personally admit to this in my younger days and other than the humiliation, it’s something you’ll want to eliminate from your game. But obviously the only way you can get better is to make mistakes and learn from them: in a lot of cases, like mine, you may be playing a lower standard but be facing a ringer.

There are not many county (lower division) teams where players can flick that well, but regional and onwards they are part of the game and it is therefore essential that, if that is a considered potential target, it needs to be learnt. You need to be aware that if you are ‘climbing up the ladder’, it is something you will meet and need to work on to beat.

Committing wrongly

The problem with going against the flick is knowing when to time the jump or dive; go down too early and you’ll have the ball roofed over you, but stay up too long and you will lack extension to reach the shot (in this case you will have to jump into the save). Similarly, making the wrong choice of save will hamper your efforts.

It is also difficult to read the direction of the ball: normally the ball will go to the corners or straight; in the path of the stick’s position, but low balls wide of the pad, which are difficult to reach standing up, can also be played by the striker.

Leaving your feet too early

With a drag flick, the goalkeeper in question can easily be caught out (by misjudgement and second guessing on their part) by a high ball that loops upwards onto goal, looking to beat the standing goalkeeper by getting it to a height and position that is impossible to stop. Unlike a strike, which is easier to read, the drag flick can be faster and curves with the flight of the stick; it can sweep into the corner or around you.

A lot of goalkeepers are taken back by the type of shot; confused about how to react and therefore act indecisively and misjudge it, or are tricked by the stick positioning; going down incredibly easy (and fast), leaving a whole area of net above them for the ball to go into. In this situation, the goalkeeper is effectively lobbed, with the ball going straight up over them without the ability to even get a touch on it, since they are too far gone (with downward momentum) to reach into any potential save.

s_corner_flick2

Learning to stay on your feet

In order to prevent the ball zooming past you by aggressively committing too quickly against the flick for the attempted save, you need to work on timing your response to meet the ball. Timing the saving move with the actual shot, rather than going before the ball is released, gives you a better chance of reaction, instead of being beaten so easily.

The trick to saving the drag flick is to react with it: don’t be too early, or too late, as you won’t be able to stop it. React as the ball comes in – ready to stop it on its release, given the speed of the flick. Stay up as long as you need to and outwait the urge to move into a save immediately; be patient and react to the shot as it comes at you.

  • Stay up for the stop by the waiting ‘stopper’ (with their stick down to halt the ball to ensure the best shot on release); the ball will often be stopped dead before the flick to make it easier to drag flick (rather than having to drag a moving ball!)
  • Stay aware of potential corner routines involving players, but do NOT get caught up in their efforts to disguise the shot
  • Keep your concentration – react to it as the flick is released – only moving on the flick itself
  • Watch the ball all the way into the save to make sure you get as much behind it as possible

Making the wrong choice

Another point to take note of is the bad choice of save – going down with a long barrier, when the only means of a save is to stay up. There are still a lot of keepers, despite the rule changes and responding changes in the format and style of the game, that seem to log no matter what (as a first choice move rather than playing the ‘read and react style’), despite the threat of a well executed flick. These are the most vulnerable to a flick given the obvious height and speed of the ball: being lobbed by the ball as they obviously ‘down and out’ on the play.

This is an easy mistake to make that will have disastrous results – giving away a goal for free. Even internationals have managed it; Argentina’s keepers inabilities at short corners were exposed in recent world cups. Indecision will lead to problems as you cannot react with the shot, wasting time and not being fully prepared for a save. Work out how to make the save properly and stick to it: don’t mess around and have a clear plan.

Try to go down only when necessary. Or prepare to get embarassed!

Rule of thumb

The easiest thing is to learn how to read a straight strike versus a flick: working out the shooter’s intentions by their stick positioning. Reading their body language, posture, and looking at their eyes, will help you work out where they are looking to shoot.

A shooter going for a straight strike will grip the stick at the top to gain power and hold the stick nearer their body to control the shot

A shooter drag flicking the ball will have their hands further down the stick to get more control over the flick and hold the stick further back from their body; gaining more upward movement on the flick

Champions Youth Cup

cyc-2009

SportsLink Australia has sent us the following information…

My name is Alexis and i work for Ivan Boulton FIH grade one coach and director of SportsLink Australia. I”ve been asked to let you know about an exciting new hockey tournament which is set to get underway in July and November of this year, ‘The Champions Youth Cup 2009’.

The Champions Youth Cup tournaments are endorsed by Hockey Australia, Hockey New South Wales and Hockey Victoria, the organising bodies for the Champions Trophy tournaments to be played in Sydney and Melbourne 2009.

The Champions Youth Cup tournaments coincide with the Champion Trophies in Sydney and Melbourne, and will offer talented young hockey players not only the opportunity to partake in this exciting event and play against Australian and international teams, but they will also be able attend the Champions Trophy, and meet some of their international hockey heroes!

We are pleased to be associated with these events and supporting our future stars, which is why we would very much like to see if any of your teams would be interested in registering a team in the event.

Since the days are counting down to the tournaments debut, and participating in this fantastic opportunity is something your team might be interested in, I would be more than happy to provide you with more of the relevant information on the event and optional extra’s, as well as discuss the matter further so we can secure your team a place.

I have attached a copy of our promotional flyer which explains the event in more detail, and i’m happy to answer any questions you may have.

Moreover, If you happen to know of another team that would also benefit from, or be interested in partaking in Champions Youth Cup, it would be much appreciated if you could kindly forward this email to them.

Thank you very much for taking the time to read this, and i hope to hear from you shortly.

Sincerely, Alexis.

Alexis Laird
Mobile +61 415 497 692
www.sportslinkaustralia.com.au

View promotional flyer.
You will need the free Adobe Reader to open the PDF.

The Second Save

Consequent rebound shots after the initial save are one of the hardest jobs for a goalkeeper to deal with. Unable to clear the ball and with going straight back out into play, further shots are guaranteed, with the shooter having more and more chances to bury it. The longer the ball stays in the D, the more chances the opposition has to shot in on goal, so you want to do all in your power to get rid of it. These are the types of situations that can either be a goalkeeper’s recurring nightmare, or their team’s saving hour!

What to do

If you do have to face multiple shots, then you want to be able to react to each one – concentrating on the single save each time to maximise your ability to stop the ball. ‘Keeping your head on’ and staying confident will make the save much easier to complete as you are comfortable in dealing with the pressure of the situation. Don’t ‘lose your head’, diving around all over the place and putting yourself in danger.

If you have to run back or across into cover open space, then be calm about it; using speed, but concentrating on the related angles and appropriate positioning to the shooter. The sooner you get there, the more area you can block if the shot comes in (if the shooter takes their time, then you have even more of an advantage!).

With the shot coming from the other side of you, as a pass is made, or the ball was redirected there, you will have to race back to cover the changed angle. If the shot is closer in (i.e. it went to outside of you on the save), then you can step and shuffle across to move into the space and shot.

Getting into the ‘zone’ really helps. As soon as you get going, you’ll feel unstoppable. But don’t forget to clear if you can, otherwise all your attempts will be fruitless.

After the first save, you need to react instantly to be able to cover open ground.

After the first save, you need to react instantly to be able to cover open ground.

Pointers:

  • Stay back and react to the shot as it comes in, giving you more reaction time for the save
  • If the shot is raised, try to stay on your feet as the ball could end up going over you; unless it is not possible to do so.
  • If you have to dive across, as you are likely to be forced into extending on side shots, then get up as soon as possible, otherwise you will be ‘down and out’, giving away a goal to the shooter
  • The sequence of potential saves is all dependent on the speed of recovery: the sooner you get back up, the more time you have to make that split-second difference in reacting to the next save
  • Never surrender: don’t give up and keep battling to keep the ball out of the net

The longer the ball stays in the D, the more time and opportunity the opposition has to score. Get rid of the ball as soon as possible.


Closing down the attacker

If you are alone with against the attacker (i.e. you have no defence and are left to deal with the play), then you can run out to meet them. By reacting quickly and instantly running out to meet them in-tight, you immediately close down the available shooting space and force them to move around you, or shoot straight into you. If the shot is released then you are in a capable position to stop it – being on the ‘doorstep’ to cover the strike.

second_save1

Come out and close down the attacker to limit their shooting space.

Pointers:

  • Square up to the shooter, covering the angle close, so that they have little to shoot at (unable to see much of the goal) – forcing the shot into you for an easy save
  • Channel them; going out on the angle, to reach the top of the triangle, to cover the sides
  • Be ready to block as you are so close; dropping your hands to face the shooter to provide more coverage
  • Also be aware of a shot between the legs (with a gap there) and be ready to close them together
  • Remember to react – if an acute angle shot to the edges of goal is attempted, you need to stop it
  • Make sure you have lightning fast reflexes (sharpen them if needs be) to be able to react, as the shot will be so close , giving you little time to react

Rule of thumb:

If the shooter is alone then come out and challenge to make their life harder; only a good shot should beat you.

If there are multiple shooters then ‘hang back’ and react to it, as there are more options to deal with and more space to shoot at.

If the shooter does move, instead of shooting, be ready to move with them and tackle of stop a shot.

Eliminating the second save

When making the save, you want to be able to clear it away as soon and as safely as possible, so that further opportunities can’t develop. By getting rid of the ball, you are effectively stopping any further chance of scoring – shutting down the opposition.

The best place to put the ball is out to the sides or the back line, where attackers cannot get hold of it, as it is now out of play (try to clear the rebound on the save, but you can use a kick if needed after the initial save). If not, then kick it as far as you can away from danger, preferably outside the D, so that you have time to recover, reposition and get set for the next shot. Otherwise, try to get it to a defender who can then clear it away with their stick, or pass to another team mate to keep hold of possession.

If the ball has gone out on the save, depending on the rebound quality of your kickers and pads, you will have to chase it down to get in reach of clearing it. Don’t be static or laid back; actively come out to get to the ball and make a strong clearance out of harm’s way. That way you will be able to respond better and get more behind it, as you have more time to think and see the space available.

Be decisive: take charge of the game.

Remember: you can’t intentionally kick the ball back line after the shot is stopped. If you do, then you will be penalised with a short corner (the sidelines are still okay though). On making the save to push away, it needs to be a fluid single movement; angling the kicker or pad to turn away the ball in the correct direction.

First save mindset

You should focus on each save as it presents itself – concentrating on that shot singularly each time. Your priority is the first save: make the save and eliminate the rebound, and you prevent any further scoring chances. No more chances means no goals.

Lots of coaches teach the maxim (saying) of ‘one shot only’. They want professionals at the top of their game to make that one save on that one shot – they don’t want them messing things up by giving the opposition more opportunities than they should have.

If you watch football/soccer and look at the way rebound goals occur, then you should learn for your own game; say if a keeper ‘spills’ the shot; dropping the ball or failing to smother it, it is all too easy for the shooter to come in again and put it past the downed keeper.

Focus on the first save – prioritise the save and the controlled clearance of the rebound. Don’t give away further chances.


Not Getting Into Your Stance In Time

Getting into the stance, when the action is not specifically close, is something that troubles a whole range of keepers with saving and decision making ability, which can cost them in the game. It is so important to get into your ready stance before the stance – the better prepared you are, the more chance you have of stopping the shot.

You can never not bother with getting into your stance before a shot. Even when the ball is under one of your player’s control, you don’t know if they are going to have it taken from them and go onto have a scoring chance. I’ve recently been watching a number of keepers who are incredibly lazy in their efforts.

Other than not being ready for action and not making the save, you are not mentally prepared for game action. If you are not capable of being alert and watchful all game long (along with the need to pull off big saves when called upon in the last few minutes of the game), then you shouldn’t be getting selected to play.

Getting beaten

By not being in your ready stance and being ‘behind the play’ (i.e. not watching it properly and keeping a back seat), you leave yourself vulnerable. If you are unbalanced in your stance, then you will not be capable of making the save; tilting too far backwards, unable to reach the ball. A great example of this was Des Abbott’s goal that Vogels allowed in the bronze medal match at the Olympics; allowing a goal through the legs as he wasn’t set, falling back and letting it through him. If he had however been ready, he could have closed the gaps by bringing his legs in.

There are a few British national league keepers who still regularly fail to get set in time; a goal on a broken play within the D at a national conference league game I watched over the weekend is such an example. Expecting the umpire to call the other way (as the team had got most of their decisions their way), the goalkeeper was standing at the post, not in a suitable stance, the ball got loose and was then smashed in. By not being set for the shot, he was easily beaten, unaware of the impending danger.

In contrast, by being in your ready stance when the play is around you (and your defence; getting sucked into the idea of your role as shot stopper, is not the right idea), you are ready and raring for the save; your gloves up for the incoming shot.

It is no good just getting into your stance when the play gets in close; if you are caught off guard when a change occurs, like a deflection, then you are responsible for your lack of attention that led to that goal, by simply not being ready to make a save. By getting set before a play develops, you also help reduce the mental stress of waiting to see a shot in a tight game, since you are ‘switched on’.

Rule of thumb

The best way to judge the play is to watch and stay with it the entire game. As the ball gets closer, you need to ‘switch on’ and get to where it is on the pitch; moving with the ball as it moves and staying in your stance, ready for anything to happen.

By point of rule, if the play is in your half, you should be within your ready stance, ready for shots outside the D: you never know what’s going to happen next and should therefore always be alert and ready for anything (i.e. a pro technique is to put in a ball for a runner to get on the end of for a deflection, or a two on one that develops after a defensive mishap).

By getting ready in your stance, with your hands up and body forward, before a play is even made, you WILL be ready for an unprepared save, compared to other keepers who will get caught short by their inactive laziness.

Just watch the pros and see how they do it, like recent games in the Olympics (Vogels is a great example, except vs Australia) and you’ll understand. As the play gets closer you are nearer and nearer to, you are ever more likely to face a shot.

Look at this keeper: he is not even in his stance and just watching the play - if a shot came in, he would not be ready for it.
Look at this keeper:
he is not even in his stance and is just
watching the play – if a shot came in, he
would not be ready for it.

However, this keeper is ready - his hands are up and his legs are apart, ready for action.
However, this keeper is ready – his hands are up
and his legs are apart in his stance, ready for action.

Key points:

  • When the ball is past the half way line, you should be in your ready stance
  • Always move with the play; adjusting your angles to suit where the ball is
  • Be active not a ‘ball watcher’ – be ready to take control of the situation, instead of just being an observer to what’s going on in front of you

Watch and learn

This is not just a problem that plagues our sport: if you watch (on Match of the Day [British TV] or anything similar), you’ll notice how the keepers that don’t bother to get set lag behind the play and allow goals out of failed ability to prepare for the shot.

In national league games I’ve watched keepers stand there stock still not even bothering to get into a ready stance, on free hits and plays around the D, when they should honestly be set in their stance, ready for a shot. Just because a team is weaker than you are and you are winning, it doesn’t mean there is any reason for you to switch off and sit back; for all you know the next play may go against you and you are beaten, when you aren’t mentally or bodily (position) set.

Self awareness

You have to be aware of your own attitude to the game to really succeed. If you don’t look ready, then shooters will pick up on this; rather than taking a ‘back seat’ during games, concentrate on being there all the time to deal with whatever comes your way.

As always, practise is key to success: train yourself to ALWAYS be in your stance and on the angle of where the ball is, to be set. At training, focus on getting yourself in your stance immediately and in line for the shot, allowing you to maximise your chances.

Daily Eating Plan

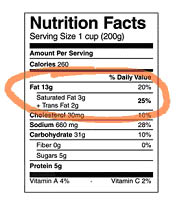
nutrition-factsGet used to planning what you’re going to eat each day. Planning helps to stop eating whatever, whenever. Check the labels for the amount of fat, carbs, and protein they contain.This is an example of an eating plan for a player who has a light run in the morning followed by training or game in the afternoon.

Time

Type of meal Type of foods

Pre-run snack for energy Glass of water for hydration and a glass of fruit juice for energy

7:00am

Run

8:00am

Breakfast high in carbohydrates to replenish and build up energy stores Cereal & milk, or toast with jam/honey etc, fruit or fruit juice, water

10:00am

Snack to maintain energy stores Scone or muffin or muesli bar, fruit, yoghurt, water

12:00pm

Pre training meal 4 hours prior to help build energy stores Filled rolls or sandwiches, fruit, muesli bar, fruit juice, water

2:30pm

Snack 2 hours prior to training to maintain energy stores Scone or muffin or muesli bar, fruit, yoghurt, water

Pre training to ensure well hydrated Water

4:00pm

Training/game

During training for hydration (and energy) Water (but for high intensity training or long cardio use a sports drink)

After training to replenish energy stores Sports drink, muesli bar, water, fruit. Protein (drink) for muscle growth.

7:00pm

Dinner to build up energy stores Rice/pasta, vegetables, lean meat, water

Evening Snack (if required) Fruit or low fat ice cream or low fat biscuits

Hydration

Drinking adequate amounts of fluid can prevent dehydration, reduce heat disorders, and provide a convenient source of energy. It can get pretty hot in all that gear and fluids help regulate your body’s temperature. Ensuring you have sufficient fluids before and during training, can improve your performance. Replacing lost fluid after training helps in your body’s recovery.

Drinking adequate amounts of fluid can prevent dehydration, reduce heat disorders, and provide a convenient source of energy. It can get pretty hot in all that gear and fluids help regulate your body’s temperature. Ensuring you have sufficient fluids before and during training, can improve your performance. Replacing lost fluid after training helps in your body’s recovery.

Water - your best defence

Water

Water is the easiest and most convenient fluid to drink. You should drink at least 2 litres of water each day, but more when you train. You should drink adequate water prior to training and games to keep you hydrated. Drink regularly throughout training – about every 15 minutes. Afterwards, water should be drunk to compensate for lost fluid from sweating. It is a good idea to drink water that contains electrolytes to replace the ones you lose through sweat. If you train longer than an hour or at a high intensity you would benefit from a sports drink.

Sports Drinks

As well as keeping you hydrated, sports drinks provide a source of carbohydrates, and sodium to fuel you during intense training sessions and replace lost electrolytes.

For most goalkeepers water will be sufficient during trainings and the game. After the game consume more fluid from either water or a sports drink. If the training session is particular intense, look to have a sports drink.

Note: Don’t confuse energy drinks with sports drinks. Energy drinks can contain caffeine and although they can give you a quick hit of energy, they do more bad than good. Energy drinks should be avoided.

How to be a Steel Ball of Muscle

Bruises, sprains, knocks and even broken bones come with the territory of a goalkeeper. Protein helps in the repair and recovery of damaged muscles and tissues, and in the recovery of energy stores. Consuming sufficient amounts of protein enables your body to recovery from training and to build strength. For young goalkeepers, protein is also needed for normal daily growth of the body. Those who are wanting to “bulk up”, must also consume protein.

If you want to build muscle you got to eat man!

Most people consume enough protein for their normal daily needs but sports people need to monitor their protein intake especially when they are trying to increase muscle. You should daily consume 1 – 1.5g of protein per kilogram of your own weight so an 80kg person should consume 80-120 g of protein each day depending on the intensity of the training. Young goalkeepers still growing should daily eat 2g/Kg of body weight.

Dairy products, eggs, meat and vegetables are all good sources of protein as to are protein bars and protein shakes.

How not to be a butterball of fat

Extra weight can slow you down. Although fat helps protect the organs from damage, we prefer our gear to do that. Simply put, if you eat more than your body needs, you get fat. Obviously the moral is not to overeat. Consume enough food to provide energy for all your daily activities – training, recovery, growth etc.

Extra weight can slow you down. Although fat helps protect the organs from damage, we prefer our gear to do that. Simply put, if you eat more than your body needs, you get fat. Obviously the moral is not to overeat. Consume enough food to provide energy for all your daily activities – training, recovery, growth etc.

To avoid fat, avoid these places

Extra weight can slow you down. Although fat helps protect the organs from damage, we prefer our gear to do that. Simply put, if you eat more than your body needs, you get fat. Obviously the moral is not to overeat. Consume enough food to provide energy for all your daily activities – training, recovery, growth etc.

As well as how much you eat, you should also consider what you eat. Decreasing fatty foods such as fast food, fried food, and junk food will reduce the amount of fat you consume but by also decreasing your sugar intake (sweets, cakes, biscuits and soft drinks) will stop your body converting sugar to fat.

By keeping energy requirements and food consumption in balance, and consuming very little fatty foods and sugar, you can not only avoid fat increases, but also decrease the amount of fat that you do have.