One of the most important parts of any keeper’s game is his (or her) equipment. Good equipment, effectively used, is one of the cornerstones of goalkeeping. When a keeper chooses his equipment, he’s choosing a style of play. That’s an important choice. Unfortunately, that’s not a choice that all keepers get to make for themselves. Many keepers are provided with kit through their clubs or schools. Other keepers are responsible for providing their own equipment. Whether you or your team is responsible for your equipment, money can be an issue. You can’t spend what you don’t have. Having said that, there are ways to get the most out of the kit you do have and a number of things to consider when selecting new equipment.
In the next two tips, we’ll cover equipment. We’ll give you an idea of what to look for, how it should fit and how to take care of it. In part one, we’ll cover general things to think about when selecting and caring for equipment, and specifically, equipment bags, kicker and leg guards. Part two will cover pants, upper body protection, hand protectors, sticks, helmets, shoes and everything else.
Before we start, there are a number of things to consider when selecting equipment. First and foremost is the level you play at. Above all else, goalkeeping equipment must be protective. If you’re getting hurt with what you’re using, new equipment is more than a good idea. Identifying the level you play at isn’t just a matter of age. Playing level is impacted by the skill and size of your teammates and opposition, as well as the surface you play. Twelve year old club girls on grass don’t need the same gear as 25 year old International men on turf. That much is obvious. The point where a 16-17 year old moves on to senior elite pads isn’t always so easy to identify. If you are consistently being exposed to dangerous shots, especially lifted shots that don’t allow you time to react, adequate protection is essential. Adequate equipment should not leave a keeper consistently bruised and battered.
Equipment can be an expensive investment. You want to make sure you get the most out of your investment. If you’re still growing physically, it’s a good idea to wait before spending a lot of money on pads that might only fit you for a season. By the same token, hold off on making a substantial investment in kit if you’re not sure that you’ll be playing in two seasons. We talked about the importance of having kit that’s appropriate to the level you play at. It’s also important to consider the level you ultimately want to play at. Junior level pads have different playing qualities than more elite type pads, especially leg guards and kickers. If your aspiration is to play at the highest level, playing with and getting used to that gear is important. It doesn’t make a lot of sense to spend time on a tricycle if you want to ride a bike.
When selecting equipment, do your homework. The internet is a great resource for information on equipment. Many manufacturers have websites that illustrate their products. Make sure what those websites illustrate. Nice photos and catchy slogans are great, but technical information is important. What materials are pads constructed of? How are they made? What is a company’s history? Who is using their gear? How are their products serviced (i.e. where are their local agents, what are their return policies, what kind of customer support do they offer?)? These are all important things to consider when investing in equipment.
Taking proper care of equipment is as important as selecting the right gear. Care and maintenance of your equipment is a fairly broad subject and it can cover everything from “de-funking” (odor reduction) to unforeseen pre-game buckle replacement. It’s a matter of taking care of the things you can take care of well before a match or training session and having the resources to take care of the unexpected mishaps that hockey brings.
First off, let’s start with some of the things required to keep your kit in good shape. One of the most important things is the ability to read. OBO products (and some other makes) come with product information sheets. They’re there for a reason. Not only do they give you cool schematic pictures of your pads, they also give you some technical information about the equipment and often, instructions on how to properly use and take care of it. Make sure you have it and read it if at all possible. If you’re using a club or school’s kit, that’s not always possible, but companies like OBO do have that information online. In addition, check the Product Tips and Q&A section of the OBO website for OBO products, there is a ton of useful information there.
As I mentioned, it’s important that you have the resources to handle equipment emergencies. I keep a small tool bag with my kit. You don’t need to lug a whole tool box with you, but a few items are all you need for most repairs. I have screw drivers (Phillips and regular head), regular and needle nose pliers, scissors and an adjustable wrench (in a pinch it doubles as a hammer) that I keep in portable tool kit. I also keep what’s called a leatherman (a multi purpose tool that has files, an awl/leather punch, knife blades, screw drivers, and pliers all on one tool) in addition to several heavy needles and threads. I’ll keep an assortment of extra helmet hardware (screws and bolts), as well as spare kicker straps and buckles and duct and athletic tape in the tool kit. I have a small plastic box (like Tupperware) that I keep the tools and materials in and keep it in my equipment bag.
I also have a bigger repair kit that I keep at home. Other items to keep on hand are Shoe Goo or some other kind of plastic/rubber/foam adhesive. Plastic scrub brushes and mild household cleansers are also strongly recommended. Get in the habit of checking your equipment regularly after you’ve played or trained. It’s a lot easier to mend/replace something that’s breaking after training as opposed to trying to repair it when it’s broken during warm up or worse, during a match. As we deal with specific items of equipment, we’ll cover the tools and techniques used for their respective care and maintenance.
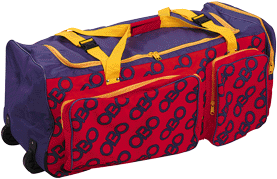
Equipment Bag
 |
| Wheelie bag |
 |
| Body bag |
This is where all kit starts and ends up. While not a huge thing (figuratively speaking), a good equipment bag is quite useful. When you think about storing and transporting your kit, you start to realize all the deficiencies in your equipment bag if it isn’t up to the task. Gear can be heavy, especially when it’s wet. In addition, there is a lot of gear. The last thing you want is a bag that is too small, or isn’t sturdy enough to carry all of your kit.
When investing in a bag, there are things to check for. Is the bag waterproof? That’s important not only because hockey is a game that’s played in the rain or on watered turfs, but because often after a match, your kit is wet with moisture and/or sweat. Sometimes keeping moisture in (on a very temporary basis) is as important as keeping moisture out. Plastic bags are also good for keeping wet stuff from dry stuff.
Side and end pockets are useful. Not only do they help keep things separate, like especially wet, disgusting items from the only semi-damp disgusting items, but they allow you keeper to organize your kit. The more organized my bag is, the easier it is to find things and the less likely I am to forget things when I pack. If I’m going away for a weekend tournament, I’ll throw a couple of shirt hangers and newspaper in my bag. Newspaper is excellent for drying out wet shoes. Hangers are good for airing and drying pants and upper body pads.
On the sturdy front, check the stitching on the bag. There should be double-stitching or rivets where straps are attached. Make sure the material the bag is made of is strong enough to carry the load and stress of carrying your equipment. It’s also a good idea to see where the stress of the bag is when you carry it fully loaded. If you’ve got to walk a fair distance with your bag, the last thing you want is to lose the circulation to your arm as you’re carrying the bag. Equipment bags with wheels are a welcome development. It’s not a bad idea to test drive an equipment bag. Wheels aren’t too handy if the handle of the bag is positioned so that your bag is crashing into the back of your legs as you pull it.
Kickers
 |
| Robo kickers |
 |
| Cloud 9 kickers |
 |
| Yahoo kickers |
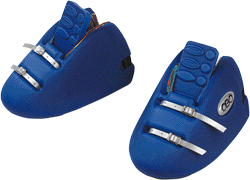
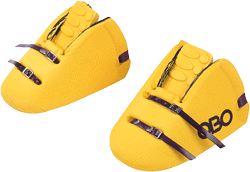
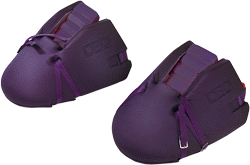
There are still a variety of different kickers available on the market and in various stages of circulation. If there’s one piece of equipment that should be replaced immediately, if not sooner, whether it is inherited or recently purchased, it’s bad kickers. Bad kickers can be, but are not limited to, bamboo and leather square toe kickers (yes, they’re still out there), worn foam kickers, kickers that are too big, or kickers that are too small.
First off, kickers determine the techniques available to you to clear the ball. Modern hockey requires a keeper to be able to first time clear a shot. In square toe kickers, that is a technique that is among other things, extremely painful, if not virtually impossible. It’s like trying to drill a hole with a wrench, square toe kickers are simply not the right tool.
If you’ve inherited kickers, whatever the type or brand, make sure they fit. If kickers are too big, you won’t be able to fasten the straps tight enough to secure them on your feet. If they’re close, you might be able to punch extra holes in the straps to make them fit. That might keep them on your feet for a while, but the biggest problem with kickers that are too big is that they’re difficult to move in. The foot doesn’t make actual contact with the field, the kickers does. As a result, you end up slipping or tripping.
When kickers are too small, the problem is usually equally obvious. Toes hang out, or the kicker doesn’t sit back far enough to cover the heel. There don’t seem to be enough holes in the straps on the large end at the back of the kicker or you can’t pull the buckle tight enough to get the kicker to sit right. Once again, you might be able to work around it by punching extra holes, but after time and practice, you’ll find that you end up getting hit in all the places that are exposed with kickers that are too small.
The problems with worn kickers are equally painful. When high-density foam kickers break down, they lose their rebound and protective qualities. The same applies to worn square toe kickers. Both are about as useful as over-sized slippers and should be put out to pasture. Just because kickers are old and ugly, doesn’t mean they have to be replaced. A well struck shot will sometimes sting no matter how new, or good your kickers are. There’s a difference between sting and collapsing in a heap in pain when the ball contacts your instep. The rebound qualities of the kicker are far more important. As long as rebound off the kicker is fairly proportional to the speed of the shot coming in, there’s life in the kicker.
If after you’ve assessed what you have in your kit bag and finding it lacking, or you just want new kickers there’s a lot out there, good and bad. OBO kickers, whether they are Robos, Cloud 9s or Yahoos, are all similarly shaped. For a young keeper that’s important because he’ll be playing in a kicker that’s shaped the same way as he grows as a person and a keeper. The kicker is designed with a tongue that locks the leg guard in place and keeps it from twisting. In the Robo line, the straps that keep the kicker down on the foot are built into the kicker. This keeps them from sliding back on the foot, sometimes a problem with kickers that have external straps.
When selecting a kicker, durability can be a consideration. How long a kicker will last depends on how often you play, the surface you play on, and the velocity of shots you face. OBO kickers are designed to wear well. The foam has a coating that stands up to abrasive surfaces like sand-filled pitches far better than the average foam kicker. The kickers also have bonded rubbing strips for the bottom of the kicker where most contact comes. This adds life to the kicker without sacrificing rebound. If there’s a complaint about OBOs, it’s that they last too long.
High rebound kickers use foam that is less dense than normal kickers. They offer great rebound, but over time and use, the foam compacts, losing elasticity and rebound. If you play a lot and don’t have the resources to replace your kickers, high rebound kickers probably aren’t your best choice. On the other hand, if you want a kicker that puts a shot back as quick as it comes in, they’re the way to go.
No matter what kickers you select, they become a useless accessory if your foot won’t stay in them. This is a common problem with kickers that use external, web nylon straps. Toe straps frequently slip and the front of your foot is exposed. There are a number of ways to deal with this. You can tape the toe strap (front) to the strap that goes around the ball of the foot (rear). Don’t use so much tape that you lose contact surface with the bottom of your shoe. You can also merge the strap that goes around the ball of the foot with the toe strap so that they cross under the foot. Finally, the way some kickers fit, you might not need the toe strap at all.
Care of kickers is fairly straightforward. Kickers can get dirty and do need to be cleaned even on artificial surfaces and especially on natural surfaces. A plastic scrub brush and a mild household detergent are usually all you need to put a sparkle back into the foam bits of your kit. Avoid cleansers that are abrasive or caustic. On the maintenance front, two tools are very handy, an awl and needle-nose pliers. An awl is great for punching holes in straps when your feet seem to fit just between the pre-punched holes. Needle-nose pliers are good for crimping the roller part of buckles that always seem to come off when you tighten your straps. They’re also quite useful when you first slot the internal straps through kickers.
There is a breaking in period for high-density foam kickers. Like any new piece of new equipment, you should use them in training before you break them out in a game. When breaking in kickers, I’ll usually wear two pair of socks for the first three or four training sessions. Foam can be stiff and will rub all the sensitive areas around your ankles. An extra pair of socks will eliminate most of that chafing.
Most kickers are shipped flat from the manufacturer. To help shape the kicker, tighten the straps as far as they’ll go. Beating the kicker with a stick or wrapping them snugly in an elastic bandage are also good ways to speed the break in process. Know that bottom line, all kickers usually need to break in are three good training sessions with lots of shots.
There’s a wide range of price to kickers and leg guards. If you are buying kickers, it is best to buy the matching leg guards. You should plan on spending about half your goalkeeping budget on leg guards and kickers. If there’s a place to go cheap on equipment, this isn’t the place to do it. Nothing will limit the development of a keeper more than bad pads and kickers.
Leg guards
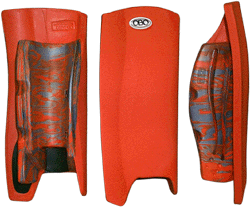 |
| Robo SP legguards |
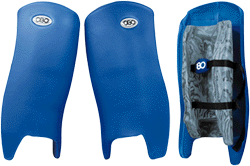 |
| Robo legguards |
Leg guards and kickers are the most important pieces of equipment for a keeper. Watch the game for any length of time and you realize that easily more than half the plays on a ball made by the keeper are with those two pieces of equipment. Leg guards and kickers aren’t important solely for the frequency that they’re used. Equally important is how they’re used and that’s determined by the type of leg guards and kickers a keeper uses.
Leg guards came in two types before 1985, cricket pads and skeleton (or continental) leg guards. Cricket pads were taken directly from that sport. They’re made of canvas and stuffed with cloth scraps. They’ re designed more as incidental protection, rather than primary protection (you don’t try to get hit with the ball in cricket). Skeleton leg guards are made of canvas or leather and have bamboo cane ribs along the front and canvas with cloth scraps behind the canes for protection. They are designed for a person intending to be hit by a ball, but they have their own deficiencies. A well-struck shot will break bamboo.
Cricket pads, skeleton leg guards, cloth and bamboo square toe kickers are all still available and used, especially at the junior and lower club level. They can provide adequate protection with severe technique limitations. I would not honestly encourage anyone to buy them, but they are usable, especially skeleton leg guards. Why? Because when a keeper, club or school is faced with having to buy a full set of goalkeeping equipment, costs can be a major consideration. Some items might need to wait. If you have to make a decision between replacing kickers or skeleton leg guards, there isn’t a decision in my mind. You replace the kickers.
If you’ve inherited a set of cricket pads or skeleton leg guards, realize full well that if someone hits a ball on your leg pads really hard, you’re going to feel it. If you play at a level where that doesn’t happen, then you’re all right. If injury or discomfort is something you’re looking to avoid, foam shin guards and/or kneepads worn under your leg guards are a good idea. With the advent of instep kicking, many keepers find the inside of their leg is a vulnerable area. You can similarly turn foam shin guards to cover the calf area if you’re getting hit with shots there. Make sure you really need the additional padding. Many keepers who have worn shin guards with other pads will use them when they get newer leg guards out of habit. Most leg guards that have wrap around protection will not sit properly on the leg with shin guards stuffed under them.
None of these problems exist with good high-density foam leg guards. High-density foam leg guards come in a variety of styles, sizes and densities from a number of manufacturers. Make sure the foam thickness of the pad corresponds to the level you play at. The harder the shot, the thicker the foam needs to be. When buying leg guards, it’s usually best to buy kickers at the same time. If you are using kickers and leg guards from two different manufacturers, make sure they are compatible. OBO kickers can be used with other leg guards, but one of their best features is the tongue that locks them in to place with OBO leg guards. Other kickers have different designs around the ankles that require modification if they’re to be used with other brands of leg guards.
When you buy leg guards, the surface you play on does have an impact. Whether it is grass, sand-filled turf, dry turf or water-based turf, the surface you play and train on will affect the life of your leg guards. Playing style will also affect pad life. If you’re a keeper that slides a lot on sand-filled pitches, the life span of your pads is likely to be much shorter than the upright keeper who plays on a watered turf.
There are a number of things to take in to consideration when it comes to leg guards. First, make sure they fit. Leg guards should protect from above the kicker to above the knee. Leg guards that are too short leave the keeper’s knees exposed, especially as the keeper moves. Pads that are too big are cumbersome and often painful to wear. They dig into the top of the kicker and the straps often rub directly behind the knee, chafing and digging into your leg. Leg guards should protect the inside of the calf. Just as the instep is a primary clearing surface, the inside of the leg is a frequent saving surface.
Depending on the type of leg guards you wear, maintenance will take different forms. Leather skeleton pads need to be left out to dry after use. Leather straps will crack or rot quickly if you don’t properly air dry your pads. In addition, metal buckles will rust. You should replace broken canes in skeleton pads. Obviously foam leg guards don’t have these problems. You should check straps periodically. Most foam leg guards now have nylon straps with plastic buckles. Occasionally the stitching around the buckles will wear and they should be re-stitched before you have them go in the game. Most manufacturers sell replacement straps and buckles for their pads, but if you’re in a bind many sporting goods or camping stores sell backpacking supplies (plastic buckles and nylon strap) that can be used.
It’s a good idea to clean your pads periodically. Skeleton pads can be scrubbed down with a wet hand brush. Foam pads can be cleaned using a mild household cleanser and a scrub brush. Even if you play on watered turf and your pads seem clean, washing and rinsing them on a regular basis is a good idea. Foam can absorb sweat and you can easily get a nice coat of bacterial slime going if you don’t clean your pads. In addition to smelling, that bacteria can cause a nasty rash. When drying foam equipment, always air dry it and avoid keeping it in direct sunlight or extreme heat for extended periods of time. The inside of a car can reach 100 degrees centigrade in the summer, hot enough to damage foam.
Next: Everything else
Good luck,
Jon
email Jon
Please note that OBO together with Jon O’Haire hold copyright over any
material appearing on tips pages. We welcome the printing and distribution of
these tips, provided that they are not sold, or used for financial gain. This
paragraph must appear on all printed or distributed copies. The photographs
above must not be used in any form without express permission from Jon O’Haire.


