Advanced positioning

To make the most of angle play, and challenging the shooter’s angle of the possible shot, you must understand your positioning in relation to the goal, and the ball itself. By really challenging the angle, and ‘getting in the face’ of the shooter, you should be able to force the shot wide; coming out so far that they miss because there is nothing of the net to shoot at.


Covering the angle

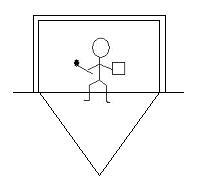
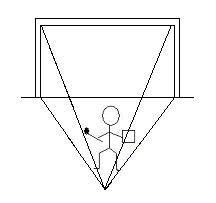
When playing the angles, it is necessary to understand how your depth in goal affects your ability to make the save. Staying on your line means that shots to the sides will be much further away, forcing you to extend and across in order to make the save, whereas coming off your line closes down the angle, making an easier save. Draw a mental line between the striker and centre of goal and positioning correctly, you can reduce the amount of space the striker can shoot at.


If you have the chance to challenge the angle, use positioning to your advantage to allow you to cover more of the shot, rather than making the save difficult for yourself.


angles7 

Gap control

Gap control is basically the space between you and the shooter. With a small gap between you and the attacker, they will have less space to shoot at, and will have to shoot at you, or look for the space in the corners, whereas not challenging and hanging back against the shot, will give the shooter more options. By playing the gaps actively, you are able to limit the shooting space the shooter can see, reducing their options of scoring; actively challenging to pick their spot wisely from a number of options that have been cut down by you limiting the angle they can see.


Goalkeeper with strong gap control, vastly reducing the shooter’s scoring chances.


Goalkeeper with poor gap positioning, leaving too much of the net open for the shooter.


Making use of your angles

Now that you have grown used to positioning yourself in the correct angle around goal and the D, it is important to employ your angles in playing a situation to your advantage. Learning to be aggressive with your positioning to challenge the shooter really gives you an edge when faced with an open opportunity against a one on one or set play scenario (like a close-in shot developing from a pass within the packed D from a free hit or long corner), where you can actively reduce scoring chances by stepping out to meet the shot. This way you have the means at your disposal to give you the upper hand in reducing the chances of a goal; it is up to you to use them.


Narrowing the angle

The most important skill of angle play by the goalkeeper is narrowing the player’s shooting angle to make it harder for them to score; bringing the goalkeeper closer to the shot, to make the save easier, whilst taking away valuable shooting space at the same time. As the attacker comes in to for the shot the goalkeeper steps out onto the angle, getting in position to cover the shooting space, thus reducing the shooter’s options.


By challenging the shooter, you make it harder for them; having to take time to choose the shot, by which time you are ready and waiting.


Staying on your line gives the shooter too much space to choose from on the play.


By challenging off your line, you can dramatically reduce the shooting options.


Here, the goalkeeper moves off his line to challenge the angle to his left post (holding the right post to force the shot to his left).


Deciding on your stance

The age old perspective is that positioning in a stance is up for to you to decide, according to your height, weight etc. or should follow a theoretic stance. Again, everybody is different, so not everyone’s going to be happy doing the same thing. Body posture affects both how you make the save and how you move around the D.


Of course different stances generally to apply for different situations; if you’re charging down a shot you’re not going to have your legs wide apart, and if you’re stopping a low shot to the side you don’t want your feet together, but the stance mentioned here is more movement based.


Which stance should I use?

Which stance you use depends on your personal abilities (in terms of reflexes, reaching out for shots from a glove stance, or strength, in being able to stand with a widened leg stance and being able to move further in a shorter time span, due to the strength of your leg muscles). There is no ‘set method’ for a ready stance, and each has its own advantages and disadvantages. It is up to deciding which is better for you and plays to your strengths, that will determine the ready stance you use.


Experiment to find what works for you, and then stick to it. As you start off in ‘between the sticks’ as a younger keeper, it’s best to iron out the basics, so you will find a lot of goalkeepers using a simple ‘y’ stance. As you get older, you will want to develop your style and skills to counter the development of the opposition players, which includes working on a better ready stance. However, change will not come naturally (along with the dangers of bad habits recurring) and you will have to work and train hard to adapt. You will find that positioning yourself wider apart with your hands held raised is uncomfortable and weird at first, so it will need work and practice to programme your brain for it, but the benefits will pay off if you want to use this stance.


A lot of pro keepers use a ‘flexible stance’; that is, they adapt it to the situation and its needs, despite having a predominant stance they use for most of the time. When action gets tighter in and the D gets filled up, they will lower their gloves ready to block off a lower shot (playing the percentages to cover shooting space and the most obvious shot able), whereas when in open and set plays, they will go back to readying for a potential raised shot, given the shooter’s time and space to release a high ball. Learning to read the play and make judgements like this will help you with your overall game and shot stopping abilities.


Ultimately, go with what works best for you: you are the central role in this situation and you have to be the one stopping all those shots! Don’t be put off by what other people are doing; what others say (unless your coach does have a point in fixing an issue!) or the goalkeepers you idolise do (unless they play a similar style and you think you can fit that into yours). Stick with what works for you – only you know what’s best can decide and can make the decision with that information.

The Ready Stance

The ready stance is your basic form of positioning – readying for the shot, and possible action. In essence, you should be in your ready stance whenever the game is in your end; you should be prepared for anything, as anything could happen. I personally change up and adapt my stance to suit different game situations, but when developing your style it is a good idea to test out the capabilities of your core ready stance, giving you optimum movement and glove usage.


Your ready stance should be suited to you: no-one else can make up your mind for you, or play for you, so working out what works for you will help your play in the long run. If it’s not broken, then don’t fix it, but if you find your stance affecting movement or making higher saves, you may want to change it.


The ‘ready’ stance

Your ready stance is what you go into before facing a shot; making sure you are all ready and raring to go, able to make the most out of your equipment to make the save – gloves out and legs prepared for the shot. As the player comes in, move into your ready stance, making sure you are ready to stop the incoming shot; setting up before means you are better off in your chance of making the save, not having to react immediately once the shot is taken.


Commonly theorised stance

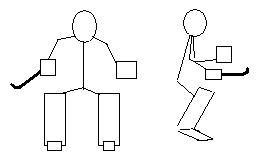
The common theory for a ready stance is based on an open body shape, allowing you optimal movement and flexibility for save making. In the general stance, the gloves are held at mid-height, above the pads and below the shoulders (when raising your arms, your gloves will go above the hips, around chest/stomach height, or higher, depending on what the goalkeeper is comfortable with). The feet are placed shoulder width apart, so that the pads are open, allowing you to cover more space. Positioning of the hands and stick can vary to personal preferences. In readiness for a shot, the goalkeeper should be alert, but relaxed to make the save.


theory_stance1


You stand on your balls of your feet rather than the tips, giving you greater balance in responding to the next shot, as discussed in the next section. The integral chin-above-knees-above-toes position has the knees bent and the back crouched with the head forward, with the chin above the knees and the knees above the toes; moving into a save allows you to control the ‘backlash’; not falling over as you over balance.


Getting set for the shot

Keep in mind the level of competition you’re facing, as these are common factors in deciding your optimal stance; if you are shorter you’ll want a taller stance, so you can stop the higher shots more easily, whereas if you’re taller person you’ll want a wider, lower stance as you already cover that space, and have trouble moving because of your size. 


If you use a smalleer, closer together stance, it will take you longer to move around the circle, whereas a wider stance will make it easier for you to cover larger distances in smaller steps, but will leave the gap between your pads more vulnerable to a shot there.


Body Posture

How you position your body in relation to the chances of making the save is all important in your preparation for the shot. A fully prepared and set ready stance is central to the ability to make a successful save.


Balance is integral to movement and any save; if you topple back, you lose balance and could fall (putting you out of action for a second save, as you end up lying on the floor), whilst if you balance too far forward, you can end up similarly imbalanced; launching forward and toppling over. Balancing the motion of a save allows you control the shot and rebound better, which is needed for a successful and well executed save-clear; gaining greater control and power over the clearance of the shot during the redirect.


To learn about the different modern styles of the ready stance, follow this link: http://blog.obo.co.nz/2009/05/25/understanding-the-stances/

Understanding The Stances

With the modern stance developing with the increased need for movement, and making use of the hands to make reflexive saves at the higher area of the net, two distinctive styles haves started to stand out. The varying stances will be described and evaluated next: the Y style popular in Europe and the X stance, popular in Australasia, have become the main variations of the standard stance.

The Y stance

Popular in parts of England and Europe (as well as globally throughout the worldwide hockey community in North and South America, India and Pakistan, Malaysia, Russia and the Africa’s), the Y stance has the legs placed together, or not too far apart, with the hands apart, making a Y shape with the body. This creates a blocking barrier; the pads closing off the space, preventing the ball squeezing through the legs, during movement and the hands supporting the coverage of mid-height shots (placing the gloves at around stomach or hip height). With the body bunched up, the goalkeeper has to react reflexively to shots as they face them.

Depending on your preference and the type of shot faced, you could place your hands higher up, within the upper x shape, although most goalkeepers who use a Y stance prefer to have their hands in tight, reacting to each shot as it is released. This allows them to move their gloves into the save as the ball arrives; using their reflexes to make the stop, rather than relying on their positioning, which is helpful when the player disguises a difficult shot, like a reverse hit, which forces the keeper to react instantly once the shot is released.

Just like in soccer, with the gloves lowered, it is easier to dive into low saves, as the hands are already in position for the shot (not having to drop the gloves as you dive to move into the save), whilst making it easier to cut off the shooting space of a low shot when stepping out on the play to close down a shooter.

y-stance

The X stance

Made popular in Australia, with input from the likes of Stephen Mowlam (), the modern X stance has the legs in a wider stance, related to the shoulder-wide positioning in the common stance; the arms pushed out as well, creating an X shape. This gives the goalkeeper quicker movement around their D, and allows them to move their hands into the save, rather than expecting to make saves via reflex reactions (not having to launch into the saving motion). The hands are raised and outside of the body, giving the goalkeeper greater ability and pro-activeness in moving into all saves against raised shots with the gloves. The gloves raised like this give the goalkeeper a better chance dealing with the incredible drag flicks possible at the highest levels, such as those of Taeke Taekema, and the stance giving greater push into aerial saves.

Depending on the height of the ball (i.e. a lob/penalty flick or high flick in a penalty corner situation), the hands are raised above the chest, at shoulder height or more, pushing them further out as necessary to cover the open sides of the goal. Unlike the Y stance, the goalkeeper has less distance to reach out to; using their reflexes wisely against shots they would otherwise miss, making use of the extra reaction speed to move into the save if they see the ball at the last minute, palming away the ball to safety on the play. With the legs spaced further out, it is also easier to move around, as you are already and the distance provides an increased lateral push, as well as moving into low shots wide of the body, as they are nearer to the shot (rather than with a closed leg stance); giving greater extension as you can push into a reaching leg save or split.

The X stance is also gaining followers across the globe, like Canada’s Mike Mahood, and is fairly popular with the Spanish keepers (influenced by the national goalkeeper coach Martin Drijver), like Fransisco Cortes (Spain’s no 1 who plays his hockey for Club Hockey), who uses a spread out X shape during open play, as seen in the recent Olympics. There is also a European variation of the X stance, as used by Guus Vogels (the famous world class Dutch goalkeeper who has recently retired from international play) where the raised hands are placed outside the body, replicating the symmetrical X shape, but they are closer to the body.

x-stance

Making a blocking shape: standing barriers

A lot of goalkeepers, like the school of North American goalkeeping, prefer to have a stance where the body provides a constant blocking shape, keeping a tight stance during all of the play, with the closed legs providing a vertical barrier against possible shots, without any chance of the ball squeezing through. With the body always in this shape, there is no need to push the pads together immediately, when a shot occurs. Although a lot of coaches, especially women’s hockey in Australia teach the block as a save in itself, you should see it only as a means to block off the ball when the shot is headed between your legs.


By making use of a narrow stance, with the pads locked together, there is no chance of the ball getting through you. Although movement is harder, this is good for beginners who are unsure about their abilities on point shots. In game play, this is especially useful against tips and screens where the opposition will be looking to squeeze one through you via a point deflection.


standing_barrier


Squeezing the pads

To prevent shots getting through the gap between your pads, you can close them together, thus closing off the possible gap. Whilst this is not encouraged in most situations, as a suitable level of hand-eye co-ordination and understanding of the game will allow, there are times when it should be utilised on one-on-one opportunities, and tips and screens, where the shooters are specifically going for the gaps between your legs. When challenging out against a close-in shot, you can charge out with pads closed to provide a blocking shape; playing the percentages to cover shooting space.


However, you will still see a lot of keepers from all over the world, beginner to pro using it properly to close gaps, but remember: you should not see the block as a method of leg saves: the leg is used on shots to the sides within the ready stance to cover the raised shot. Instead, it is an efficient way of closing off the hole between the legs.


Stopping shots between the pads

On plays where the goalkeeper is moving across against a pass, or moving attackers, it is possible to leave an open gap between the pads, with a wider stance, causing an extremely embarrassing ball as the shooter squeaks the ball through the open pads. By closing the legs against the shot, the goalkeeper is able to close off the available space and vastly reduce the shooter’s scoring chances.

This photo is used by permission from  Alex Masters’ Pan American games action photos; www.alex-masters.com

Understanding Angles

The principal of angles dictates your whole game; playing the angles and setting up in front of a shot is all about cutting down shooting space, giving you a greater chance of making the save, rather than leaving too much open and having to make every save by throwing yourself around. Learning the different angles made by standing at different will affect how you make the save and your ability to.

The centre line

When the play starts breaking around them, and they become locked in a scramble for the ball, it can become easy for the goalkeeper to get lost and forget their angles. The goalkeeper should be central to the ball; using an imaginary line to get square to the shot. Working on getting to know your angles will mean you know where you are in relation to them when challenging out.

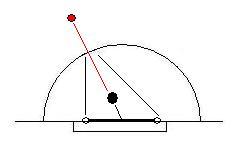
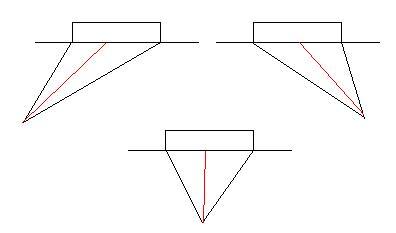
The centre line is the basis of every save and every movement around your goal: the middle of the goal and the goal line determine your angles; coming off the line makes the angle smaller and moving to the side cuts down the angle on your closest post, whilst making the angle to your other side larger. By checking the posts to see they are in a good position, the keeper can work out their angles to decide how far to come out.

angles

Below are diagrams representing angles set up from left and right post and central shots; the red line stands for the centre line, with the lines drawn out from the corner posts, as you would when stepping out from the goal line. Understanding the angle you cover with your positioning will help you close down the shooting space available to the attacker.

angles11

Playing the angles

Learning to play your angles will help determine how and where you make the save. By stepping out along the angle, you can actively cut down the shooting space, making it much easier to make saves as a result. Hanging back on your line leaves too much open space, turning your goal into a shooting gallery for incoming attackers to pick their spots openly. Instead, try to ‘narrow’ your angle to help you make the save; challenging the shooter for their shot.

Post angles

At a tight angle, with the ball in the corner or near the base line, the goalkeeper’s angle covers a small area (blocking off the post) against a shot, so they can stay near the goal. This allows you to cut off the shot tight to the post, stopping the shooter scoring there. Make sure you get your foot right on the post to stop a low ball squeaking past you!

angles2

However, to prevent you deflecting a shot into your own goal, you want to stay inside the near posts. At tight angles, you always want to position yourself so any deflected shot will go outside the post. Always be square to the ball (if on the post, getting at a right angle, so you are sideways-on): use your centre line to give yourself the advantage in covering shooting space.

Outside the post - woops! Ball in the net!
Inside the post - ball cleared to safety.

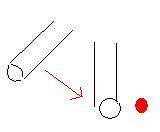
A quick way to tell if you are outside the near post is to point your arms straight sideways when square to the ball; the arm nearest the goal should point outside the near post. If it points inside the post, you need to take another step or two out.

As the ball moves away from goal, the near post is not as much of a concern; your focus now is to move further out to cover the angle of the middle and sides of goal.

Again, Jeff Benjamin should be credited as a source in writing this article.

The Arc Around The Goal

As the ball moves around the pitch, more shooting lanes open up. As you face these different angles, you have to be able to move across with the ball; moving into cover the new angle, changing angles to suit the change in play and allow you to make the save against the new shot.

The D within the D’

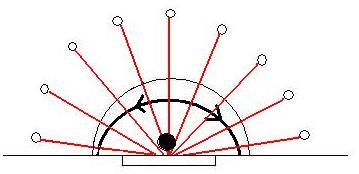
To develop angle skills and a second sense of where you are in relation to the goal, you need to know where you are in the D. Imagining a smaller D within the actual D helps you locate your posts and position. This smaller D is the arc around goal; mirroring the D itself, but reduced for the size of angle of the shooter’s space. Depending on how deep you play within the D (how far you play off the line) and whether you like to step out and aggressively roam around, the size of this arc will change.

Imagine a D of 3 to 4 metres in diameter from the goal-line. The actual size will depend on your reaction speeds and your reach: if you have quicker reflexes, you can get away with playing a deeper style. The steps around the posts, getting from one side to the other will then create the D for you.

arc

The arc

It is important to understand the arc of positioning: shots from the sides are different to front shots straight at you when standing centrally to the goal; stepping tight to the post covers a tight angle on the left or right space, but leaves a massive open space to the other side of you (that shooters can then exploit by passing to someone standing on that side), whereas with a central shot both sides are open to shoot at.

The arc goes from post to post, covering the different angles in relation to where the ball is on the pitch. As the ball moves, your position in the arc moves with it.

arc11

The border line for where you should be in terms of the goal, is as follows:

  • If the ball is central, you would be standing in the middle of goal; covering a straight shot down the middle and read to react to shots to the sides (which the shooter will try for as they can see the shooting space)

  • If the ball is to the left, you would step over to the left post to cover

  • If the ball is to the right, you would move to the right post to close off the space

    Tip: If the ball moves to the goal line, then you would move to cover tight to the post itself (because you can close off the shot at the post, as there is no chance to shoot around you)

You should learn this arc and use it as a general guideline for positioning as the ball moves. Matching where you are to this in training practise and games, you will soon learn it so much that you know where you are automatically without having to look behind you (something only the best keepers can do by the ‘back of their hand’).

However, don’t think you have to move in this pattern all the time – if a pass is made and you have to change position, you need to move as quickly as possible, cutting across the arc to cover the open space.

Also remember that any given keeper’s arc will change as they gain size, strength and ability. You may want to run the exercise with the ropes once a season to see if their arc has changed

Adjusting your angles

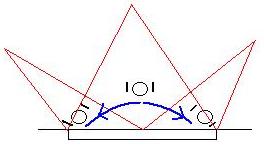
Depending on which side the ball is on, you want to be able to move across to cover the post, or step with the play to close down the attacker and cover the shooting space available to them. By moving early, you can set up your triangle and angular positioning to help you in making the save you will face; closing down the shooter’s options to limit their chances of scoring.

arc2

By practising and practising, you should be able to learn how to read a shot: telling if it’s headed wide or at you. Knowing whether a shot will go wide or head to goal is essential to reach a high level of play; that way you know whether you will have to block a potential shot, or let it go wide and out of play.

For obvious writing reasons, I think Ian Taylor and Jeff Benjamin (www.jbgoalkeeping.com) should be accredited as sources, for their useful information in helping me write about this tricky subject of angles!

Kicking

Kicking is fundamental to field hockey goalkeeping; goalkeepers are separated by their ability to pass the ball with their feet. With the ‘foot’ rule for outfield players, we are the only person who is allowed to legally use their feet to our own and our team’s advantage. It is therefore essential that you have good technique to clear the ball when the chance arises.


As the only player on the pitch able to kick the ball, and therefore be able to make clearances; controlling rebounds and directing break outs; it is your responsibility to learn how to influence the play and get a strong kicking ability to help your team and reduce rebound goals.


Clearance method

In essence, the kick is great for rebound control and should be used as such to clear away rebound chances. Kicking the ball away from open players; to the corners and over the sideline, or to your sides where there is no opposition will prevent any scoring chances developing from your clearance.


By thinking carefully, you will be able to clear the ball away to safety and limit any more possible scoring chances.


Learning to kick from both feet

Learning to kick strongly from both feet gives you more options when facing clearance opportunities. You should be able to make a stronger clearance with the opposite foot on clearances to your current side; left foot on right side, and right foot on left side.


By learning to kick from the different feet and bringing your skill up to task, you will have the options that other goalkeepers won’t have; reacting to changes in play to clear the ball away as needed.


The ‘basic’ kick

With the ball near your feet after a save has been made, you can kick the ball to a defender’s stick to help get the ball out of the area. A basic kick suits the need of the situation; not all kicks have to be long, but a simple kick to one of your team mates or away to the side line is sometimes all it needs.

kicking22


  • First check your angles and get your head in line with the ball

  • Lead with your head; this well help direction the kick

  • Step towards the ball with your non-kicking foot with your toes pointing in the direction you want the ball to go in

  • Kick with your kicking foot like you would kick a football (soccer ball)

  • Kick with the inside of your foot for more control

  • Keep your head and chest over the ball to stop the ball rising up


Before you kick the ball clear, determine your target area (where you want the ball to end up) and the direction it needs to go in. Follow the ball with your eyes to watch its progress and keep the forward balance; keep your ‘eyes over knees over toes’ throughout to keep your stance balanced and provide a clean, fluid kick clear.


Having a good follow through

As with making saves, a good follow through is needed to get a good clearance. Follow through is everything, once the technique has been learnt; when kicking, push through with the kicker after you have kicked the ball, so that it maintains its angle of direction.


Push through with your body, turning your hips and upper body into the move as you push through the kick; following through, up with your leg as you make the kick, to make sure you maintain the ball’s direction.


Kicking with the instep

The main and really the only proper method of kicking is to kick with the instep. Some goalkeepers who point out that a kicking motion of moving the leg across to meet a ball at the edge of the angle and causing a redirection who count as a kick. However, every goalkeeper should be taught an active method of kicking where the goalkeeper gets behind the ball, allowing them to get more power behind for the kick for a stronger and more direct kick, for the ball to go a longer distance, whilst keeping accuracy.


By getting close to the ball and then clearing with the instep, the goalkeeper has far greater control over its direction and will provide a longer clearance.

kicking4


kicking14


When kicking with the instep, the kicking leg should be drawn back to knee height, and then released to get full force in the clearance. By angling the kicker diagonally to the kicking side (i.e. left or right diagonally along the angle), the ball will be kicked with greater precision.


  • Get behind the ball, ready to launch it away

  • Bring the kicking leg back like a spring, so that you can maximise the power of the kick

  • Kicking with force, drive down and through the ball with momentum to get the best clearance

  • Make sure your leg position stays the same, so that the ball travels where you wanted it to


Pointers

Have your weight forward (head over shoulders) to keep your balance, so you don’t slip back, and have a strong kick with proper balance to make the best possible clearance. Kick with the inside of your foot for better control; turning the foot to angle it where you want the ball to go.

Common Injuries And Treatments

The problem with injuries, other than actually having to deal with the suffering of sitting out when you feel you should be playing, and then putting up with the pain involved, is that being sporting injuries, they are more of a specialist subject that are hard to deal with, and are not very well understood. We don’t all have access to sports therapists, so how can you tell what’s wrong? How many times have you gone to A & E only to be told that there isn’t anything really wrong with you, and there’s little you can do about it?

The misdiagnosis and waste of precious time in itself, is more than annoying. Therefore, I’ve put together a useful guide to injuries you’re likely to suffer during your careering, and their respective treatments, which you’ll hopefully be able to make use of, without having to rely on an ignorant doctor (that is, one who doesn’t have the sporting knowledge to be of any help!).

Treating swelling

Swelling is the most common form of punishment that your body will come across when enduring the vigour of the game. As it becomes a regularity, you will need to know the best means of dealing with it.

Icing the wound

Ice is the best way of dealing with swelling; holding an ice pack or a packet of frozen peas over the swelling, for a length of time, will reduce the actual swelling. If you’ve got the balls (no pun intended), then you can make use of an ice bath: simply fill your bath up with freezing cold water, and then slowly immerse yourself into it, spending enough time in the cold to help alleviate the pain and reduce the swelling bump. The cold temperature will help to alleviate the pressure on the muscle area.

Dealing with severe bruising

Severe bruising is obviously far worse than your average bruise, but is actually not as bad as it sounds; your skin will be tender than usual, and more vulnerable to further damage. If not treated properly, they can lead to a contusion, which is both painful and annoying; medication for the pain and rest will speed up the recovery, needing a few weeks off the game to let it heal properly.

Contusions

Unlike bruises, contusions need time to rest and then reworked; the bunched muscle needs rehabilitation to remove the ‘lump’ that has formed in the cartilage. Physiotherapy can be found from a hospital appointment; the necessary stretches needed to help it.

Muscular injuries

Muscle injuries are easy to come across in any sport and any position; whilst you may bruise or batter yourself during the game, for whatever reason, it is so easy to forget how the rest of your body can be affected. By not stretching properly, you are begging for an injury, and that is not to mention the possibility of unfair and unfortunate time out of playing as a result.

Strains

It is easy enough to strain any muscle, especially if you have not stretched enough, let alone done any. If you are late to a game, or want to skip warm ups (so you don’t have to face any of those nasty stingers), you’re not doing yourself any favours by not properly warning, in fact you’re making the situation worse. By not stretching, you are putting yourself at easy risk of muscle injury.

In my experience the most common areas of strains are in the leg area (mainly your groin), which can be caused by over extending your body in a desperate attempt to make the save, where you are not used to doing the splits or do not have the flexibility to normally do so, or in the shoulder area. A lot of goalkeepers don’t even know how to work out their shoulder joints properly, despite how important they are for making saves.

You need strong shoulders to give you the articulation necessary to move your gloves to make the saves; without it, you are going to damage the rotator cuff. Working out with weights will help strengthen them.

Pulls

A pulled muscle is essentially a strained one: once the muscle has been damaged, you should rest it and rehab it until it has repaired itself. A damaged muscle will result in a strengthened muscle; the body dealing with the problem by repairing itself. Give yourself a week or so to heal, depending on the severity; stretching out the muscle to help the process.

Tears

Torn muscles are much more serious, and worse than your general pull. The hamstring, like soccer players, is most vulnerable if you like to make use of your leg muscles to stretch on the play for splits saves. Muscle tears will need longer to repair themselves.

Lower body injuries

There are a number of areas vulnerable to injury below your hips. A lack of suitable equipment that does not meet the standard of play, or a degrading and beat up set of equipment, are the main cause of these problems. If you do not have a level of protection that can protect you from hard shots, you can only expect to end up battered and bruised.

The feet

You feet are the most susceptible part of your lower body to injury; if your feet are poorly protected, then you can seriously damage them. Your feet are an important part of your bodily structure; you need them to balance and grip the pitch, providing the movement you require to keep up with the speed of the game. You should make the effort to protect your feet; if you strap your kickers too loosely, you can expect nothing but trouble.

Bruising

A direct shot to your kicker can result in a bruise if the kicker is not padded enough or on properly. The bruised toenail will take almost a month to heal and drop off. A shot to the side of your feet could lead to broken bones if it is that hard. If your foot does not fit the kicker, or slips loose, then you can expose yourself to being hit; getting caught there as you try to make a save.

Fractures

If you face a powerful shot with full force against your foot, and the kickers you are wearing do not provide enough protection, then you are likely to suffer a fracture.

Soft tissue damage

Poorly kept shoes can leave your feet in pain. There are a number of types of damage to the soft tissue on your feet, and a number of causes. These are listed below:

  • Blisters – skin rubbing against the shoe causing the kin to irritate and separate; thicker socks are preventative

The blister should be prevented from popping, in case of further pain.

  • Calluses – the skin will thicken as it is continually irritated;

If it gets too thick or dries out, a blister will form under it; a gauze will prevent the pressure.

  • Corns – similar to calluses, toes tightly squeezed by the shoe

    Caused by too much pressure on the toes; pressure needs relieving with padding.

Leg injuries

Whilst your legs are generally more protected than the rest of your body, with new technology allowing you to save the majority of shots with your pads without any consequent pain, it is possible that unprotected areas will give you problems.

The knee

The knee area always seems to be overlooked by field hockey goalkeepers; although the arm area can be left unprotected, over personal preference issues, the knee is the only area uncovered and can be hit when shown to the shooter during movement.

The thigh

If you have short shorts, which do not cover the thigh area above your knees, or do not wear your shorts low enough to cover this space, you will leave yourself open to shots to these areas, which can lead to annoying contusions.

Fractures

Unless you face are really hard shot, there is not much chance of a fracture, thankfully. Against a hockey ball, although it can reach excessive speeds, you are more likely to be bruised than broken. Your knee area is only open when in movement, or when dropping onto the knees to make a stop; you are more likely to be hit when moving into the shot, than when making saves to the lower area of the net when standing.

Bruising

A direct and hard strike your shorts can result in a nasty and should be treated by regular icing to ease the swelling. Echinacea cream can also be useful in speeding up the healing process.

Torso injuries

Injuries to the body are also down to poorly maintained equipment or equipment that does not meet the standard of play. Hard shots to the body are more dangerous if you are not protected well enough; there are a lot of chest protectors out there that do not have rib padding, or well padded chest pieces.

The ribs

You can take shots to the ribs any time during a game; if the shot goes high, and your body is in the way, there is a chance you will get hit there, and if you go down against a shot, especially when logging. Down on the ground and with the play continuing, you are likely to take your fare share of whacks as players try to do anything to get the ball free or put the ball in the net; meaning you will get struck hard by flying sticks.

If you are a positional goalkeeper who likes to utilise their body unit to fill up space in the goal and make the save with your body, then you should be aware of the possible problems.

The stomach

Although the ribs are more vulnerable to well placed shots, if they are not properly protected, lack of padding to the stomach can result in ‘winding’ you, or giving you nice welts to show for your efforts.

Bruising

Bruising to your abdominal wall should be treated in the same way as any other bruises you get; however, you should be aware of damage to the organs that lie underneath the abdominal muscles. Stretching should be avoided, unless cramp is experienced, and any painful movement should also be avoided.

Fractures

If the bruising on the chest is more painful than normal, and abrasions are present, then you should get it checked out, and possibly x-rayed. If the bone has not separated, then six weeks of rest will heal the bone. Taping and bracing the rib may be required.

Upper body injuries

Injuries to the upper body are also down to poorly maintained equipment or equipment that does not meet the standard of play. Hard shots to the body are more dangerous if you are not protected well enough; if you choose not to wear any form of padding on your arms out of choice concerning discomfort and weight issues affect reaction speeds, than you are best to stay clear of shots around these areas, and try to avoid such dangers.

The arms

The arms are vulnerable to high shots where you have moved the arm into make the save, or have unwittingly positioned it, as a result of attempting a glove save; pushing the arm directly into the path of the ball.

Fractures

Hard shots to your arms can result in breaks. Your arms are most vulnerable when going down against a shot on penalty corners where you choose to log; you are putting your arm in danger, especially if it is poorly protected. If you cannot move your arm and are in severe pain, then you should consider a trip down A & E.

Bruising

Bruising can occur down any area of the arm; the harder the shot and the less protection, the worse the condition of the bruising. Not wearing any arm protection does encourage your reflexes to do the work as mentally your flinching turns into reaction saves, but you will pay the price sooner or later; just make sure you don’t get in the way of hard shots!

Dislocated shoulders

The shoulder is vulnerable to knocks when diving down onto the pitch to make saves. It is very easy to fall onto the arm when going down in a tackle or save, knocking the shoulder ‘out of joint’, or actually dislocating it if the fall is hard enough.

Winding

‘Winding’ is caused by a short-term injury to the abdomen, affecting the diaphragm, the main breathing muscle. To help you start breathing again, slowly get up from the hips, allowing the lungs to expel air, before expanding to take in air. Note that being hit in the groin area will have the same affect! You don’t always need to show you’re the ‘man’ when you’re hunched over.

Head injuries

The head area should not be overlooked when considering potential injuries and damage when playing games. The head is just as vulnerable as any other part of your body, if not more so. There are a number of shooters out there with a very powerful shot, but a poor helmet will put you in danger.

A poor use of your head to make the save, other than the shot going straight for you, or the ball redirecting into you, is another possible concern; if you want to use your head to make saves, practise your soccer heading, or something seriously bad could happen.

Concussions

Taking a shot straight to the head will generally lead to (as you would expect it to) concussion symptoms. General ringing in the ears will be the start of your worries, other than the shock experienced; after such an event a nice cup of tea or alternative additive is a good idea to calm the nerves.

The source of the concussion will depend upon the area you were hit in; a shot central to your head could cause sight problems, whilst a shot to the sides or forehead area and above can be more concussion related (the cage absorbing the impact of a full frontal shot; if the cage is made out of suitably strong enough metal, the padding will absorb the shot, but the plastic could crack if the shot is hard enough).

After such a shot, you will probably need to replace the cage, if it is bent or cracked; there is no point wearing the same headgear if it is going to lead to serious safety problems.

Sprains and strains

The whiplash of the shot can cause your neck problems. The strong force of the shot snapping the neck backwards or forwards will sprain the muscles surrounding your neck. If the pain is that bad, then a neck collar or brace to limit the painful movement is advised, but the standard treatment for relief (raising your neck via pillows etc. to alleviate movement) is encouraged.

Compression of the vertebrae

Compression of the neck vertebrae and discs can be caused by a fall or blow where the force reaches the top of your head, especially if it is bent forward 20 or 30 degrees. Of course this is very rare, and may not happen at all, but when diving or falling with speed against a shot, you can put your body in danger, especially if going with great momentum. The blow can shatter a vertebrae, pushing it into the spinal cord; pain or tingling burning will be felt along the arm or hand as a result.

You may remember the tales of the soccer goalkeepers who fractured their collar bones and continued playing: just remember that proper technique will keep you safe from injury. This is not included to scare, but simply to keep you fully aware of the dangers. If the pain is that bad, you should get yourself x-rayed immediately.

Getting the wind knocked out of you

A short straight at your neck can obviously cause you significant pain. You will be in need of need immediate treatment due to the seriousness of the injury, possibly even having to spend the night in A & E.

Neck

If you are not wearing suitable neck protection, or choose not to wear any at all, then you are likely to end up causing yourself serious harm sooner or later in your career. While the decision is entirely personal, I would recommend you protect your knock before you end up with serious problems.

A shot to the neck can be potentially catastrophic. There are some body armours out there on the market , leaving the goalkeeper dangerously exposed if they do not wear a neck guard. Similarly, the clavicle (or throat), as well as the bones below your neck can be hit, causing swelling that can suppress your airway and breathing, or worse. Most of the professional goaltenders in the NHL (ice hockey) do not wear any neck protection, and there have been a few cases like this during this year’s season. Their excuses being that a dangler (plastic shell worn as a cover below their helmet) causes irritation or is distracting for them to fully concentrate on the game.
However, facing a 90 – 100 mph puck that strikes like a bullet is beyond insane. This is no different in field hockey: so protect your throat!

Other possible injuries

Whilst outfield players are more likely to suffer broken noses and shots to the head, it is possible to lose a tooth or two if facing a hard shot, if wearing inappropriate and unsuitable headgear, such as a cage not strong enough to face the level of shots you play against.

Obviously it would not be ideal to wear a mouth guard as it will limit your vocal abilities, but should be considered. It could happen, but I don’t want to completely scare you; as the boy scouts say, ‘be prepared for anything’.