Slide Tackling

There have been a lot of questions about what to do in situations where a keeper is faced with a forward bearing down on him or her alone. Most centre around what the keeper should do. There isn’t a text book answer that says, “If the forward enters the circle with a five yard gap between him and his defender, at a 45′ angle to the goal and the ball on his front stick, the keeper extends his body in a prone position to his strong stick side at a rate of speed of 15 mph, bisecting the path of the ball at his midsection.” That’s certainly one way of handling the situation, but the fact of the matter is there isn’t any one way to play any one situation, especially one on ones with the keeper and a forward.

There have been a lot of questions about what to do in situations where a keeper is faced with a forward bearing down on him or her alone. Most centre around what the keeper should do. There isn’t a text book answer that says, “If the forward enters the circle with a five yard gap between him and his defender, at a 45′ angle to the goal and the ball on his front stick, the keeper extends his body in a prone position to his strong stick side at a rate of speed of 15 mph, bisecting the path of the ball at his midsection.” That’s certainly one way of handling the situation, but the fact of the matter is there isn’t any one way to play any one situation, especially one on ones with the keeper and a forward.

When a keeper is faced with an unmarked forward breaking to goal, he has seconds to assess the situation and come up with a plan that will allow his team to succeed. First off, we need to qualify what success is. Success is not allowing your opponent to score, pure and simple. Having said that, how does a keeper go about succeeding? He does that by not allowing his opponent to make the play he wants. That comes by making a forward beat you in a path he doesn’t want to take, by making him take a shot he doesn’t want to take from a place he doesn’t want to take it from, early or later than he wants to take it. Now, how do you do that?

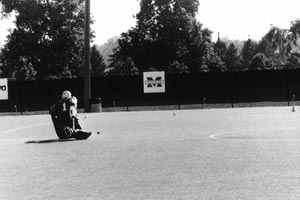
A forward with the ball alone at the 25 can be a pretty intimidating site for a keeper. By the same token, a keeper poised and ready at the top of the circle can be equally intimidating. This takes us back to our plan. Before a forward can score, he’s got to get into the circle. As a keeper, that gives me a boundary that if successfully defended, never allows a shot to happen. As the forward enters the circle, elements that give him the advantage are time, vision, control of the ball and speed. Those elements can also work against him. It’s hard for a forward to have vision and control of the ball. When he’s got vision, typically that’s when the ball is off his stick. When he’s got speed, the ball is either on his stick and his head is down, or the ball’s off his stick. Those are the times when a keeper can win the situation.

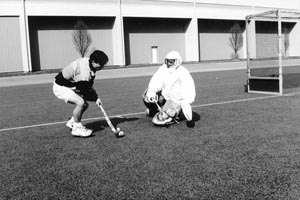
One of the skills I can use to win the situation is a slide tackle. What are the elements of a slide tackle? The two big ones are timing and execution. As far as timing my tackle and positioning myself, I want to time my tackle so that the forward is just entering the circle. That means that I want to start my tackle two to three yards inside the circle. When taking a forward on top of the circle, I’m not just going out and dropping. Slide tackle means forward slide tackle. There is a lead up, and a follow through to the tackle. Timing is key and I’ve got to wait until the forward has committed to a direction. If the forward is going from my left to right, I have an ideal opportunity to tackle him strong stick side. As he goes from my right to left, I’ll usually have to take him on my reverse stick.

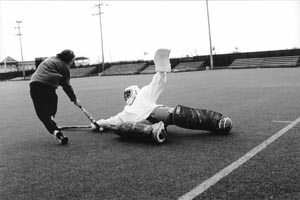
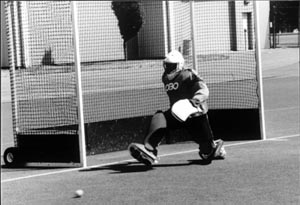
A strong stick tackle from the baseline.

Footwork is key in setting up the slide tackle. If I get too close to the forward on a slide, I miss the ball and take out the forward. If I’m too far away, the forward can pull the ball around me. By the same token, if I get wrong footed, I’m not going to be able to slide to the side I want. If I want to make a strong stick tackle, my last step is going to be off my left foot. As I push off my left foot, my right leg is out in front of my body as I go down. My goal is to make my body a big, sliding, horizontal block. To do that, I need to get down and horizontal quickly. I try to get my right leg out and get down on my right hip as quickly as possible while extending my torso out at the same time. I use my hip and elbow to brace myself as I go down. When I make my slide, my hips and shoulders are in a line perpendicular to the ground so that my block is as tall as it can be. If my hips and shoulders are angled back, the forward can throw the ball over or I risk having the ball deflect off and over me.

I like to line the ball up on my chest when sliding for a couple of reasons. If I line the ball up on my hands, the forward can beat me by pulling a yard to his left. If he does that on my chest, I can still tackle with my stick. I’ll also adjust the grip on my stick in a one on one situation so that I use the full length of my stick. It’s critical that if you do go tackle with your stick, you tackle through the line of the forward’s pull. A common mistake is for the keeper to make his tackle parallel to the line of the pull and as a result, the forward runs around his tackle. Also, my upper body is a more substantial obstacle for a forward to run through Wedding Dresses .

Obviously a keeper should be well equipped if slide tackling is going to be a safe, productive part of his game. The skill requires courage. The thing we alluded to before was intimidation, and I’ll go out on a limb and say the thought of a keeper coming after a forward at the top of the circle can be fairly unnerving. If you’ve never performed a slide tackle before, the thought of a forward running in to you can be pretty scary. The reality is that one on ones are a lot like the game of chicken. If you wait long enough most forwards bail. No forward likes to get hit by a flying speed bump and that’s what a well-executed slide tackle is like. When you stop the ball on your chest, the forward usually ends up jumping over you and you now have the ball with time and space to clear it.

Tackling to the reverse stick is basically the same except to the other side. I’m setting up the tackle by pushing off my right foot and throwing my left leg and hip out. I’m trying to get my hip down and torso extended as quickly as possible. If there is a difference between tackling on the front and reverse stick, it’s that I can’t extend as far on my upper body side with my reverse stick. As a result, I may to have turn on to my stomach to get full extension if I’m pulled wide.

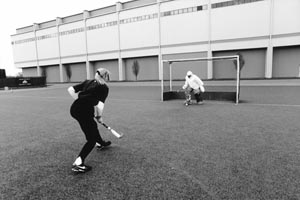
A slide tackle to the reverse stick side, from the baseline.

Whether, I’m slide tackling to my reverse or strong stick, I’ve got to be aware that a forward with vision may try to throw the ball over me as I’m sliding. It’s important that I stay focused on the ball and the angle of the forward’s stick as he comes in. While I’m definitely looking to get down and wide in a hurry, I still have to be able to deal with a flick over me.

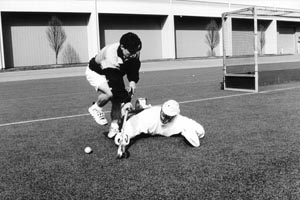
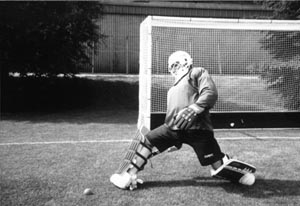
The tackle executed, fully extended.

If a forward has vision and control of the ball, a slide tackle isn’t going to be in his best interests. A keeper has to try to stay with the forward until he’s got the forward in a position where the keeper has the advantage. Going back to our initial criteria for success, that’s taking a forward to a place he doesn’t want to be. If I want a forward to take the ball to his reverse stick, I might want to overplay to my left, to bait him to go to my right where I can make a strong stick tackle. It might mean that I go out and stay up and force the forward to go around me. If I’ve got help coming back in the form of a defender, time may be all I need to win the situation.

If I’m trying to take on a forward upright away from the goal, it’s important that I keep my steps small and quick. If I take big, long steps, it may seem that I cover more ground, but I also leave a lot of gaps as I move. I’m vulnerable between my legs and to any shot that’s put on the leg that I have weight on. I want to keep my hips square to the forward so I can move in either direction. So I don’t get wrong-footed, I try to keep my shoulders in a line inside straight up from the balls of my feet with my weight slightly forward. Ultimately, a forward should be able to outrun a fully padded keeper and a keeper will be forced to put on a skill. At that point the skill is a dive.

A dive is different than a slide. As we talked about before, a slide has forward momentum to it. A dive typically comes from movement to the side. If I’m taking a forward on upright, my dive will come about the time that my shoulders start to get outside the line of my feet as I move. That’s about the time that my movement stops being controlled. A dive isn’t just falling in the direction of the ball. A dive is an explosive movement where I’m pushing off both legs to get extension.

Once I’ve successfully stopped the ball, composure is important. If I’ve been able to clear the ball out of circle, then I’m up quickly and recover back to the goal. If I’ve only stopped the ball, it’s important to take in the situation. Do I have help? If I do, I can just leave the ball for a team-mate. If I don’t have help, I need to assess where and how to clear the ball, depending on the amount of time I have available. If I’m tackling on my strong stick side, sweeping the ball with my stick to the nearest sideline is the easiest, quickest method. If the forward has run past me, I may have the time to get to my feet and clear the ball with my kicker. If the forward is still right on top of me, I may not be in the position to get up. If getting up is going to allow the forward to put the ball under me, then I need to stay down. That doesn’t mean I don’t try to move to the ball, it just means that I’m moving from a prone position.

We’ve talked a lot about the technique aspects of one on ones; now, a few notes about the tactical aspects. One on ones can happen at the top of the circle or along the baseline. They can occur when there is one forward in the circle, or six forwards and several defenders. For me, a one on one situation is any situation where there is not a defender available to play the forward with the ball and the likely, resulting scenario is going to result in a scoring opportunity that doesn’t favour my team.

If I’m going to take a forward on, I must communicate that to my defence so they can work with me, either to cover the goal or mark passing lanes that open as a result of my leaving the goal. When I leave the goal, I can’t go out for the sake of going out. I’ve got to go out to get ball. There will be some situations where a forward has support. I must be aware of where that support is, as well as know where my help is coming from. I’ve got to be able to anticipate the shot as well as the pass. Sometimes that might mean that I’ve got to cheat a little trying to play both the pass and the shot.

If there is a recurring theme in many of these tips, it’s that there are a lot of ways to play situations, especially one on ones. Several things help you be successful: know your strengths, work on your weaknesses and learn from your experiences. If I’ve been beaten in a one on one, write down what you did in the situation. The same holds true for when you’re successful, write it down. There is nothing random about success. Do what works; work on what doesn’t. It may take time, but if you work on situations methodically, consistent success is usually the payoff.

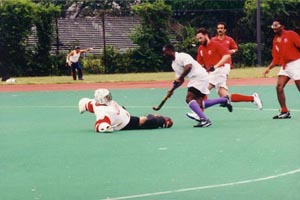
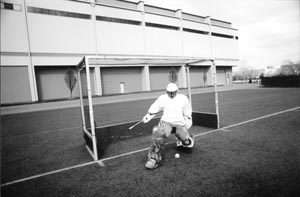
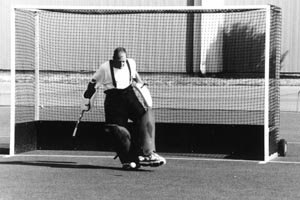
Making the tackle at the top of the circle (ignore that man in the undershirt, he’s not helping!).

Good luck,

Jon

e-mail Jon

Please note that OBO together with Jon O’Haire hold copyright over any material appearing on tips pages. We welcome the printing and distribution of these tips, provided that they are not sold, or used for financial gain. This paragraph must appear on all printed or distributed copies. The photographs above must not be used in any form without express permission from Jon O’Haire.

Kicking

There is no more essential skill to a keeper in the game of hockey, than kicking. Just as a field player must have stick skills, a keeper must have kicking skills. The importance of this most basic of skills is often overlooked. People tend to think all a keeper need do is worry about saving the ball. A keeper can make all the saves in the world in a game, but if he can’t clear the ball, he almost assures himself of allowing goals.

There is no more essential skill to a keeper in the game of hockey, than kicking. Just as a field player must have stick skills, a keeper must have kicking skills. The importance of this most basic of skills is often overlooked. People tend to think all a keeper need do is worry about saving the ball. A keeper can make all the saves in the world in a game, but if he can’t clear the ball, he almost assures himself of allowing goals.

Typically most practices for a keeper centre around stopping shots on goal. He is presented with some forwards, about thirty balls and faced with various exercises designed to do nothing more than test his reflexes. Stop one shot; move on to the next. It is essential that keepers get in his mind set that a save is not completed until the ball is safely cleared to a defender or out over the side line. Think about the situations in a game that can require a keeper to play a ball with his feet. Loose balls in the circle, passes in the goal area, shots in the circle and back passes from his defenders are all opportunities for keepers to create positive ball possession for his team-mates.

Kicking is an active skill that incorporates many techniques. Note the word active. Kicking is not simply allowing the ball to hit your foot and redirect. It can be, especially on hard shots, but in most cases, it involves a keeper stepping up to interject himself into a situation and playing the ball.

Kicking is controlling the ball. For the sake of this piece, we’re only going to discuss one type of kicker, high-density foam. On high-density foam kickers, the area of greatest control is located on the instep, between the ankle and the round of the foot. If a keeper is looking to play the ball with his foot for maximum control, instep is the way to go. The type of ball you’re dealing with, obviously impacts the technique a keeper has available to him to kick the ball with his instep.

For shots that are basically straight at a keeper (surprisingly they constitute a large percentage of the balls a keeper faces), he is stepping in to play the ball, rather than waiting for the ball to come to him. The kick starts from a good ready position, with the keeper up on the balls of his feet. The mechanic starts with the keeper opening the foot/instep of his kicking leg up to the angle that he wants to clear to. He is pushing off from his non-kicking leg. As he goes forward, he leads with his head, then his chest. If a keeper does this, the knee of his kicking leg should be in a straight line up from his foot when he makes contact with the ball. As he contacts the ball, the follow through of his kick should carry on to the line of the clear. Assuming he does all this, the results should be a low, hard, clear to target.

Common problems for keepers with kicking seem to come from relatively few areas. They range from kicks rising, to inaccuracies, to little or no power. One at a time, these are the things to look for:

Rising balls – start on the balls of your feet. Get on to the line of the ball early. Open up the instep of your kicking foot. Push forward off your non-kicking leg. Get your head out in front of your body. Kick through with your kicking foot towards your target.

If you don’t push off with your non-kicking leg, your head goes back, which results in a keeper making contact with ball with his foot in an angle in front of his knee. Think about your foot as a golf club, and in this position your foot is a 9 iron.

Inaccuracies – When a keeper has problems with accuracy, they usually stem from him not getting on to the line of the ball early enough. There is a lot of footwork in getting your body in to a position where you can kick to your desired target. It’s a lot of short quick steps, very similar to how a tennis player moves. A keeper will also have trouble kicking to his target if he doesn’t open up his body to change the angle. If a keeper doesn’t change the angle of his body with a straight on shot, an instep clear will go directly back to the shooter. That’s a bad thing.

A keeper needs to open up his stance to change the angle of the ball. It starts with him opening up his shoulder, then his hip, then his instep on his kicking side. Opening up will give him a slight back swing as he steps for his last “prep step” before performing the kick (we’ll call the steps you take to set up performing a skill as “prep steps”). The downswing on the kick should be in as direct a line as possible, along the line of where you want the ball to go (i.e. towards your target).

Keepers also have problems with accuracy when they don’t open up their instep up early enough to the ball, or take it on their foot between the ankle and the round of the foot. When a keeper doesn’t open up early enough he ends up twisting his foot as he is kicking. He can’t get any follow through. Unless you take the ball on the sweet spot of the kicker, you’re making contact with a rounded surface at either your heel or your toe.

No Power – problems with power often come from the plant. If your plant leg is too far away when you kick the ball, you have to reach with your kicking foot getting out in front of the knee at contact. This causes you to basically kick with the bottom of your foot, as opposed to your kicker. Unless you have high-density foam on the bottom of your shoes, you’re going to have a problem getting power. Follow through adds power to kicks and the only way to get is to be able push off with your plant leg and kick through the ball.

The keeper is about to kick the ball with his right foot. Notice how the knee is out in front of the foot before making contact with the ball. As contact is made the knee will be straight up from the foot.

Kicking through the ball. The keeper has pushed off his left leg, to be able to kick through the ball with his right leg. Note how the head and chest are forward.

How not to kick, the keeper has his foot out in front of his body, with his weight back. The ball will rise off the kicker.

In the tips to come, we’ll cover other kicking techniques and give you drill ideas designed to improve your kicking.

Good luck,

Jon

e-mail Jon

Please note that OBO together with Jon O’Haire hold copyright over any material appearing on tips pages. We welcome the printing and distribution of these tips, provided that they are not sold, or used for financial gain. This paragraph must appear on all printed or distributed copies. The photographs above must not be used in any form without express permission from Jon O’Haire.

Kickers

No matter how talented a carpenter is, with bad tools he'll be hard pressed to produce a good product. The same holds true for a keeper. A good keeper with bad pads has a hard job, made harder.

No matter how talented a carpenter is, with bad tools he’ll be hard pressed to produce a good product. The same holds true for a keeper. A good keeper with bad pads has a hard job, made harder.

How does the job get easier? Simple logic says good equipment helps. Somewhere along the line, though, logic has become expensive when it comes to pads. Outfitting a keeper can be expensive and money isn’t always something that’s available by the buckets.

It is possible for a keeper to be well kitted without spending a fortune, just as it’s possible for a keeper to spend a ton of money and be poorly protected. Part of being well kitted is assessing what you have and what you need based on the requirements of the level you play, the surface you play on, your size, your aspirations, your gender and finally your budget.

In the modern game, the typical list for the well kitted keeper includes a helmet with face mask, chest protector, pelvic protection, padded shorts, hand protection, legguards and kickers. At the international level, a keeper can easily spend over US$1,000 on equipment. By the same token, you don’t have to spend US$1,000 to have a set of useful equipment.

Very rarely does a keeper come to the goals without some kit to draw on. In assessing what a keeper inherits, questions that come to mind are does it fit? does it protect? and will it do what I want it to do? If the answer is yes, then the job is easy, take care of what you’ve got and it should take care of you. If the answer is no, then you’ve got to prioritise making do with what you’ve got,with what you really need to replace.

In this tip and the equipment tips to come, I’ve put together my priority list. Under the item of equipment there follows a description of what to look for, how it should fit and how to take care of it.

Kickers

There are still a variety of different kickers available on the market and in various stages of circulation from old equipment bags. If there’s one piece of equipment that should be replaced immediately, if not sooner, whether it be inherited or recently purchased, it’s bad kickers.

Bad kickers can be, but are not limited to, bamboo and leather square toe kickers, worn foam kickers, kickers that are too big, or kickers that are too small. First off, kickers determine the techniques available to you to clear the ball. Modern hockey requires a keeper to be able to first time clear a shot. In square toe kickers, that is a technique that is among other things, extremely painful, if not virtually impossible.

If you’ve inherited foam kickers the tests for finding out if they’re up to snuff are fairly quick and simple. If kickers are too big, you won’t be able to fasten the straps tight enough to secure them on your feet. If they’re close, you might be able to punch extra holes in the straps to make them fit. That might keep them on your feet for a while, but the biggest problem with kickers that are too big is that they’re difficult to move in. The foot doesn’t make actual contact with the field, the kicker does. As a result, you end up slipping or tripping.

When kickers are too small, the problem is usually equally obvious. Toes hang out, or the kicker doesn’t sit back far enough to cover the heel. There don’t seem to be enough holes in the straps on the large end. Once again, you might be able to work around it by punching extra holes, but after time and practice, you’ll find that you end up getting hit in all the places that are exposed with kickers that are too small.

The problems with worn kickers are equally painful. When high-density foam kickers break down, they lose their rebound and protective qualities. They’re about as useful as over-sized slippers and should be put out to pasture. Just because kickers are old and ugly, doesn’t mean they have to be replaced. A well struck shot will usually sting no matter how new, or good your kickers are. There’s a difference between sting and collapsing in a heap in pain when the ball contacts your arch. The rebound qualities of the kicker are far more important. As long as rebound off the kicker is fairly proportional to the speed of the shot coming in, there’s life in the kicker.

If after you’ve assessed what you have in your kit bag and finding it lacking, or you just want new kickers there’s a lot out there, good and bad. We’ll start with the good (OBO of course).

OBO kickers, whether it be Robo, Cloud 9 or Yahoo, are all similarly shaped. For a young keeper that’s important because he’ll be playing in a kicker that’s shaped the same way as he grows as a person and a keeper. The kicker is designed with a tongue that locks the leg guard in place and keeps it from twisting. In the Robo line, the straps that keep the kicker down on the foot are built into the kicker. This keeps them from sliding back on the foot, a problem with kickers that have external straps.

When selecting a kicker, durability can be a consideration. How long a kicker will last depends on how often you play, the surface you play on and the velocity of shots you face. OBO kickers are designed to wear well. The foam has a coating that stands up to abrasive surfaces like sand-filled pitches far better than the average foam kicker. The kickers also have bonded rubbing strips for the bottom of the kicker where most contact comes. This adds life to the kicker without sacrificing rebound. If there’s a complaint about OBO’s, it’s that they last too long.

High rebound kickers use foam that is less dense than normal kickers. They offer great rebound, but over time and use, the foam compacts, losing elasticity and rebound. If you play a lot and don’t have the resources to replace your kickers, high rebound kickers probably aren’t your best choice. On the other hand, if you want a kicker that puts a shot back as quick as it comes in, they’re the way to go.

No matter what kickers you select, they become a useless accessory if your foot won’t stay in them. This is a common problem with kickers that use external, web nylon straps. Toe straps frequently slip and the front of your foot is exposed. There are a number of ways to deal with this. You can tape the toe strap to the strap that goes around the ball of the foot. Don’t use so much tape that you lose contact surface with the bottom of your shoe. You can also merge the strap that goes around the ball of the foot with the toe strap so that they cross under the foot. Finally, the way some kickers fit, you might not need the toe strap at all.

Care of kickers is fairly straightforward. Kickers can get dirty and do need to be cleaned even on artificial surfaces and especially on natural surfaces. A plastic scrub brush and a mild household detergent are usually all you need to put a sparkle back into the foam bits of your kit. Avoid cleansers that are abrasive or caustic. On the maintenance front, two tools are very handy, an awl and needle-nose pliers. An awl is great for punching holes in straps when your feet seem to fit just between the pre-punched holes of the kicker. Needle-nose pliers are good for crimping the roller part of buckles that always seem to come off when you tighten your straps. They’re also quite useful when you first slot the internal straps through Robo kickers.

There is a breaking in period for high-density foam kickers. Like any new piece of new equipment, you should use them in training before you break them out in a game. When breaking in kickers, I’ll usually wear two pair of socks for the first three or four training sessions. Foam can be stiff and will rub all the sensitive areas around your ankles. An extra pair of socks will eliminate most of that chafing.

Most kickers are shipped flat from the manufacturer. To help shape the kicker, I’ll tighten the straps as far as they’ll go. Beating the kicker with a stick or wrapping them snugly in an elastic bandage are also good ways to speed the break in process. Know that bottom line, all kickers usually need to break in are three good training sessions with lots of shots.

Good luck,

Jon

e-mail Jon

Please note that OBO together with Jon O’Haire hold copyright over any material appearing on tips pages. We welcome the printing and distribution of these tips, provided that they are not sold, or used for financial gain. This paragraph must appear on all printed or distributed copies. The photographs above must not be used in any form without express permission from Jon O’Haire.

Kicking Drills

When you’re working on skills, it’s important that you isolate them so that you can evaluate technique and success. Skill work is different than situation work. When I work with keepers in situation drills, there are a number of skills they can use in a situation and be successful. When we work on skills, we’re focusing on specific form and results. Any time you work on skills, there are a couple of things to keep in mind.

When you’re working on skills, it’s important that you isolate them so that you can evaluate technique and success. Skill work is different than situation work. When I work with keepers in situation drills, there are a number of skills they can use in a situation and be successful. When we work on skills, we’re focusing on specific form and results. Any time you work on skills, there are a couple of things to keep in mind.

You refine skills with consistent, quality, repetition. Consistent means that you’re giving a keeper the opportunity to play the same type of ball more than once. Ball machines are the best way for a keeper to be exposed to the same type of ball, but they’re not something that is available to every coach or keeper. If you don’t have a ball machine, you need the next best thing, human simulation. When you’re working on kicking skills, the next best thing is someone who can hit a level ball on the ground to a location over and over again. If you can’t find someone who can hit with accuracy, a push will have to do.

Practicing kicking without a ball machine.

Quality infers a lot of things. First is the quality of the surface that you’re training on. It makes no sense to worry about the consistency of the type of ball serviced to the keeper to play when the surface you’re training on makes every ball along the ground an adventure. Obviously, we’re talking about grass here. If you must train on grass, make sure the area you’re working on is as level as you can find. This is essential for kicking. This may mean that you work on kicking outside of the goal area (usually the most worn spot on a grass pitch). If your grass field is particularly rural, tennis courts or indoor gyms are excellent alternatives.

To ensure quality in repetitions, limit the number of repetitions in a set of the drill. In addition, allow the keeper time to recover into a ready position and allow sufficient rest time between sets. When you plan your practice drills, take in to consideration the fitness level of your keepers. If your keepers can’t do ten repetitions of a skill to a set without the skill breaking down, adjust the number of reps to your sets until his or her fitness improves. Fitness drills are different then skill drills.

Now for the drills…

One of the most basic kicking drills for keepers is kicking in pairs. Typically, this is the way I like to warm up for games and practice. Once I’ve warmed up, stretched and padded up, I’ll take another keeper and work on instep kicking over ten yards.

As we start to warm up, I’ll focus on moving to the ball so that I’m pushing off my plant leg and leading with my head when I make contact with my kicking leg. I focus on opening up and following through to my target. I’m specific with my target. I’m not just kicking at a keeper; I’m kicking to his left or right foot. I don’t want to have him move to get my kick, this is a warm up.

Note how the keeper is puching off with his plant leg and leading with his head.

How do I turn this into a drill? Exercises become drills when you can quantify skills. For beginning keepers, give them five minutes to see how many consecutive kicks they can put together. As keepers become more advanced, have the keeper who kicks call the foot the next keeper has to kick with. You can also modify the drill, where the keeper is calling the foot the other keeper has to kick to. Once keepers have warmed up, the next extension is to extend the distance they’re kicking to 25 yards. Once again, the same variations can apply, calling a foot to kick with or to.

In game situations, that can be problematic as you want to change the direction the ball came from. An easy way of remedying that situation is to add a third keeper to the kicking pair. With a third keeper, keepers now have to change the angle of their clear as they kick. This way they can work on crossover clears as well as instep kicks to change the angle of the ball. Usually, I’ll have keepers working in threes, kick in a V shape as opposed to a triangle. Keepers kicking in triangles can have a hard time keeping the ball in play long enough to get the number of repetitions needed for the drill to be productive. Having said that, it is physically possible for more skilled keepers to kick in a triangle and that way they all have to work on changing the angle of the ball.

Kicking in a V.

It’s important that you have keepers practice kicking balls from where they’ll come in a game. If you want a keeper to work on coming up to clear crosses from the sides, start the ball from the wing, not at the edge of the circle. If you have a ball machine, set it up out that wide, if not have a player hitting crosses from about five yards in from the sideline. Footwork is key in kicking. If I set balls up too close to a keeper, I don’t reproduce the situation I want to incorporate in their game. I want my keeper to step up to the ball and clear accurately.

The gate set-up with the ball on the left, flip for right.

I like to give a keeper targets to clear to. We’ll set up cones four yards apart so that there are two or three gates they can clear through around the edge of the circle. I emphasise clear through. If a ball doesn’t leave the circle, it’s likely to come back even faster. There are a number of ways to reinforce that point. As a positive reinforcer (good for beginning keepers), we keep score for a set of ten balls, with keeper’s getting points for putting the ball through designated gates. To simulate game conditions, we’ll put forwards in the gates that are the most dangerous rebound areas and let them play those clears back to goal (a somewhat more negative reinforcer). Angles that I like to focus on for clearing from are marked below.

Places to cross from.

There are a million variations of these types of drills as keepers become more competent. I can put a keeper under pressure by having a player come on to deflect cross balls or simply stand by the keeper. It’s important to identify the skill you’re trying to get out of a drill.

I can consider the drills I’ve explained kicking drills because they are designed for the skill I want from the keeper. When you put field players into these drills, you add variables, and it becomes harder to reinforce through consistent repetition the skill you’ll get from the keeper. There’s nothing wrong with that as long as you’re dealing with a situation and a skill.

The gate set-up.

Good luck,

Jon

e-mail Jon

Please note that OBO together with Jon O’Haire hold copyright over any material appearing on tips pages. We welcome the printing and distribution of these tips, provided that they are not sold, or used for financial gain. This paragraph must appear on all printed or distributed copies. The photographs above must not be used in any form without express permission from Jon O’Haire.