Basic Postions: A Ready Postion

Before a keeper can make a save, he’s got to be in a place where he can even attempt to make a save. That is the crux of basic positioning. A goalkeeper’s primary responsibility revolves around keeping a ball out of the goal. Take a good look at that goal, the one that is seven foot by twelve foot, 84 square feet. Throw in the fact that object to be stopped is a little more than seven inches in circumference and weighs about eight ounces and that the object in question can travel more than 100 miles an hour… a quick show of hands… who thinks this is going to be an easy position? Nobody ever said it was going to be easy, but good basic positioning can make goalkeeping an easier position.

Before a keeper can make a save, he’s got to be in a place where he can even attempt to make a save. That is the crux of basic positioning. A goalkeeper’s primary responsibility revolves around keeping a ball out of the goal. Take a good look at that goal, the one that is seven foot by twelve foot, 84 square feet. Throw in the fact that object to be stopped is a little more than seven inches in circumference and weighs about eight ounces and that the object in question can travel more than 100 miles an hour… a quick show of hands… who thinks this is going to be an easy position? Nobody ever said it was going to be easy, but good basic positioning can make goalkeeping an easier position.

Logic and experience have taught me that if a keeper goes into the net without a plan, goals will happen with alarming frequency. Throw in a plan that allows the keeper to make a play on a shot from a place where he’s not having to desperately dive across the goal to make every save and that frequency starts to go down. In talking about a goalkeeper’s attributes, we talked about things like size, strength, speed and flexibility. These are the ingredients each keeper brings to his game and are unique to him. Successful goalkeeping means taking stock of your attributes and from those strengths, formulating a plan or philosophy as to how and from where you want to defend the goal and the circle. Solid, basic positioning should allow the keeper to make the most of his strengths.

We’ve already discussed the practical problems a keeper is going to have defending the goal. Big net, small, hard, fast ball, you remember. Difficult, right? That doesn’t mean that a keeper’s job has to be impossible. Great shots will go in, but not every shot in a hockey game is decided by a great shot. The longer you watch hockey, the more you realise a lot of games aren’t decided by a great goal at all, rather they’re won or lost on the basis of the “ugly” goal. “Ugly” goals are the ones that leave a keeper shaking his head in disgust immediately after they happen and can keep him awake at night long afterwards. They’re the ones you say to yourself, “Could’ve, should’ve, would’ve, didn’t” and then to the world at large, a big, fat “Sorry.”

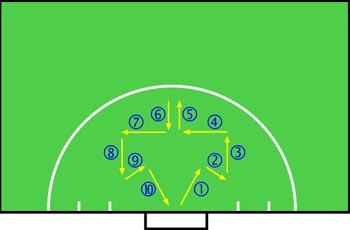
Essentially, basic positioning means never having to say you’re sorry. It revolves around three principles:

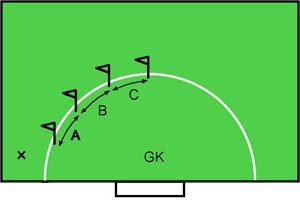
How the keeper stands as balls are played around and to him;

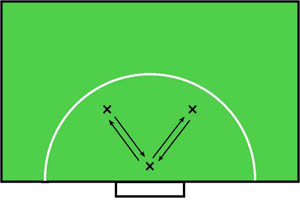
Where he moves or positions himself as the ball moves around him; and

How he moves to get himself to those in-between positions.

How a keeper stands in goal will depend on where the ball is on the field. Essentially we’re talking about what’s commonly referred to as a “ready” position. Ready is a fairly vague term. Ready for what? Goalkeeping requires several different types and level of readiness. Typically the term is used to describe a keeper’s stance immediately before a shot comes at him. How ready and what he’s ready for will depend on the distance between the keeper and the shot and the amount of ground he has to cover before he can make a play on the ball.

First off, playing the ball is critical. Playing the ball and being played by the ball are two entirely different things. When a keeper plays the ball, he is active and acting, he makes the save and is able to clear the ball. When the ball plays the keeper, he is acted upon, he is a passenger. Typically in these situations, he makes the save by either getting hit with the ball or desperately lunging to reach it. The clear is secondary, if at all, and the rebounds are dangerous. Sometimes a keeper has no choice but to make this type of save, but often keepers make this type of save because they weren’t “ready” when the shot is taken.

There’s no one perfect ready position for every keeper. Every keeper is different and as such, has their own strengths. Having said that, there are common things that keepers are looking to do as they play a shot. They’re looking to make the save, first off. They’re looking to clear the ball to safety as quickly as possible. They’re looking to get into a position to play any rebound should they be unable to clear the ball. Save, clear, recover, when you start to think about a stance that allows you to do those things, you start to build the framework for a ready position.

In evaluating the ready position of successful keepers, several common characteristics emerge. Starting from bottom to top, the first thing you notice is that the keeper’s weight is up on the balls of his feet, about shoulder-width apart. If you watch or play good tennis, the stance is very much like a player getting set to return serve. A keeper who wants to play the ball on a save, wants a good base to push off from with his feet. To do this he needs to be able to push off from his non-kicking/saving leg for low balls to the sides. If he can do this, he leads with his head when he extends to the side. Typically, when he pushes off to the side, he’s also coming slightly forward. He wants to play the ball in front of his shoulders from where he’s started in his ready position. When he does this, he cuts off angle at the same time as he extends out. We’ll talk much more about angles in a bit.

There are some things you want to avoid in setting up with your feet. If a keeper’s weight is back on his heels, the keeper will usually lead with his foot out in front of the rest of his body. When a keeper gets his foot out in front of his head and body, the ball either pops up because of the angle of contact on his kicker or goes nowhere because he’s basically making the save with the bottom of his foot. Neither are good results.

When a keeper gets too wide with his feet in his ready position, he also has a hard time pushing off explosively on his non-kicking leg. The result is he’s not able to fully extend with his kicking/saving leg and isn’t able to reach balls that are wide of his body. When his feet are too close together, a keeper can usually push off from his non-kicking leg, but will often get “stuck” picking his saving leg up to make a save. His weight becomes very forward, and he’s almost falling to the side when he makes the save. Because his weight is so forward, this falling causes his foot to get stuck and not fully extend.

As you go up, the knees and the waist are the next significant areas in the ready position. The knees and waist are bent so that the keeper’s chest and head are over, or slightly forward, of his knees. When his head and shoulders are forward, he’s more able to lead with his head to make the save. If he can lead with his head, he gets more extension and can more effectively save/clear the shot (we’ll discuss this concept in much greater detail later).

If a keeper is too upright at his knees and waist, he can still have his weight on the balls of his feet, but he’s unable to keep his weight forward and attack the ball when he goes to play it. A keeper who plays too deep in a crouch can also have problems. The keeper has too much bend at his knees and his waist, expends a lot of wasted energy just maintaining a ready position. Forget about being explosive to make the save, by the time the shot comes, the keeper who has too much bend either ends up falling forward as he goes to make a play on the ball or is dropping back on his heels from fatigue.

Chest and arms are next as we move up and probably the area where there is the most variation in the ready position. The keeper wants to keep his chest above, or in front of his knees. This allows him to keep his weight forward. By also keeping his hands and arms in front of him, the keeper further reinforces keeping his weight forward while maintaining balance. Some coaches prefer keepers to play with their hands out to the side. This allows the keeper to take up more space, but the ready position isn’t completely about taking up space. With his hands out to his side, as opposed to in front of him, the keeper has a harder time moving forward to the shot and maintaining balance. As a result, he might make the save, but often is off-balance if there is a rebound. The keeper who holds his hands out in front of him, also has an easier time opening his shoulders to his side when making a save/clear (once again, more about this later).

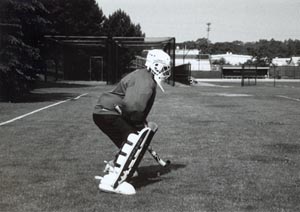
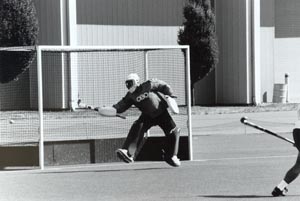
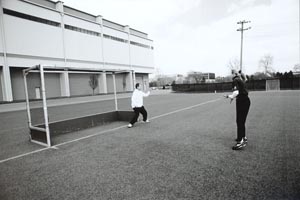
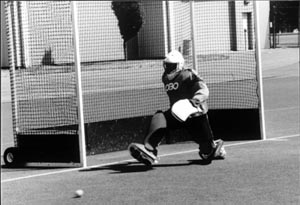
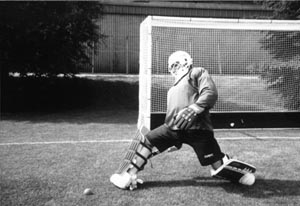
A good example of the ready position from the side, weight is on the balls of the feet, with knees, chest and head forward.

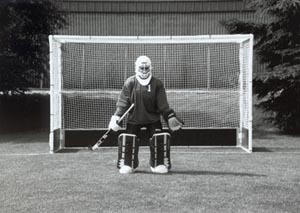
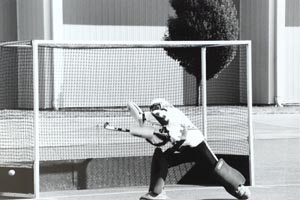
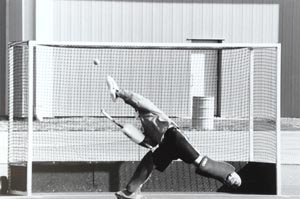
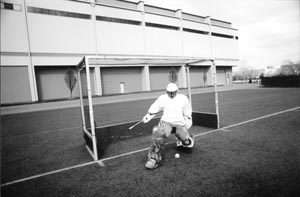
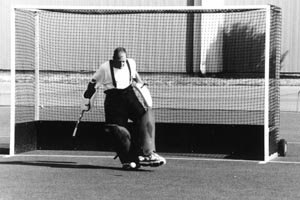
Examples of the ready position head on. Note that with hands in front (see previous tip on aerial balls) that the feet are a little wider. With hands out to the side, a keeper’s shoulders can get pinned back leaving him prone to having his weight back.

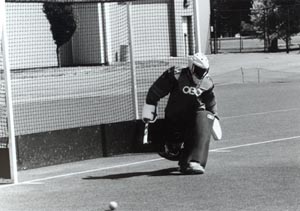
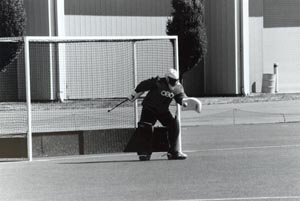
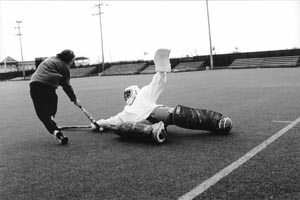
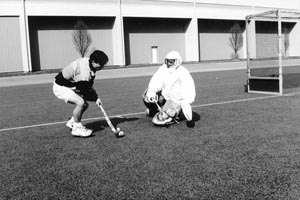
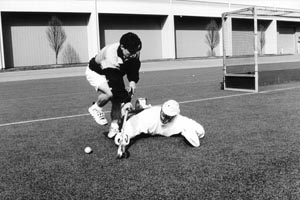
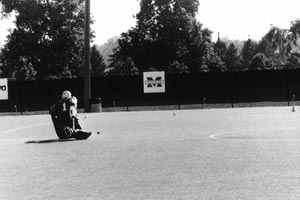
What a good ready position can let you do. Actively playing the ball, the keeper has a good base to cross over and clear the ball using his right foot with power and accuracy.

Having said all that, there is room for variation in the ready position. The bottom line is keepers should be judged by their effectiveness and not their appearance. Going back to the things we want a keeper to be able to do out of his ready position, save, clear, recover, if a keeper can do all this with an unorthodox stance, it may be best to leave him be. If those things aren’t happening, then it’s time to tinker.

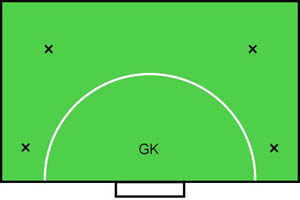
We’ve talked about how to stand when a ball is played towards him, part two is where to stand. This second part to basic positioning revolves around the concept of angles.

Stay tuned!

Good luck,

Jon

e-mail Jon

Please note that OBO together with Jon O’Haire hold copyright over any material appearing on tips pages. We welcome the printing and distribution of these tips, provided that they are not sold, or used for financial gain. This paragraph must appear on all printed or distributed copies. The photographs above must not be used in any form without express permission from Jon O’Haire.

Young Goalies

One of the most important factors in the development of a goalkeeper is getting good, basic instruction early. Too many times, the first specialised instruction a keeper receives is after he/she has been identified as an elite keeper.

One of the most important factors in the development of a goalkeeper is getting good, basic instruction early. Too many times, the first specialised instruction a keeper receives is after he/she has been identified as an elite keeper.

Good, basic instruction isn’t difficult. It requires a coach to have an understanding of the skills required of the position, a concept of what he wants the position played like and the ability to reinforce them. A keeper coach doesn’t need to have been a keeper, they don’t even need to be a keeper coach, he/she has to be an advocate for the position and is responsible for making sure that keepers have the opportunity to learn through supervised repetition.

Supervised repetition is the setting for what works best for your needs. Whether it be making 15 extra minutes to go to goal in a team training session or pulling eight local keepers together for a regional training weekend, it’s the time you’re working with keepers to work on specific situations or skills.

For the purposes of this tip, I just want to focus on coaching beginning keepers. I think it’s important to identify as a team, and in some ways as a league/region how you want to develop keepers. In the ideal world, every team has a qualified keeper coach. Reality says it can be anyone including the team’s one and only coach. Some leagues have been creative and arranged for a keeper coach to be shared among the league’s teams. Whatever your scenario, my experience has been that you get the most success working with keepers by having a specific coach work with a group in controlled settings.

By controlled settings I mean drills where you can focus on specific skills, giving keepers the opportunity to practice and master skills. It all sounds rather dry, but it shouldn’t. It’s practice; and practice is games; and games are fun. Mastering skills should be fun. It takes a lot to create an environment where keepers are constantly motivated, but if you do that you win half the battle.

Going back to the fun/motivating stuff, I’ll start with something not fun, but important. Make a list of all the skills that you want your keepers to have. That will be the foundation of getting what you want out of the experience as a coach. Turning the list in to drills isn’t hard. Get a feeder, put balls repetitively in a place, and give the keepers the opportunity to play those balls and voila, you have drills. Still doesn’t quite sound like fun, though.

It’s all in the presentation when it comes to drills. Footwork has to be fun, left footed instep clearing has to be fun, stick-side aerials have to be fun. Fun is greatly influenced by what and how actions are reinforced. By that, I mean a coach praising a desired quality/effort/execution in a natural, enthusiastic way, a la “great skill!”

Going back to beginning keepers, recognise that there are a variety of qualities to the position: flexibility, strength, agility and co-ordination are all required to execute skills. You have to coach them. You can do that with games and relays easily enough. Think of the footwork required as a ball travels around the circle and lay a course for the keepers to go through. You can turn it into a race by having the keepers run it for time, while still concentrating on form. You don’t want to reinforce bad form. I have the hand/toss game that I have in one of the earlier tips. Make it a situation appropriate to keepers age/level. I think for beginning keepers it’s important to make it a game.

As far as basic skills, I think it’s crucial to emphasise from the first time a keeper puts pads on, the ball has to go some place; that the save is a save/clear. A good way of developing a skills inventory is to think of shots that can happen in a game, where they go in goal and where a keeper has to be able to clear them. Right-side balls with pace at hands and feet, left-side, balls with medium pace and all have to be cleared to left and right.

With a little imagination, that’s the next phase for developing your curriculum. Put a feeder in with a bunch of balls, they have to put it at a spot, the keeper has to play it to a target. The target could be another keeper, it could be two cones, it could be a keeper defending two cones, it could be a field player, it could be anything, just reinforce the concept that the ball has to go somewhere. Getting there could take two skills. Make sure that keepers have the time and opportunity to finish a ball. Count how many times a keeper is able to hit the target. Move the targets, have them worth different points, there are a ton of extensions you can add on to a drill. Put rebounders in that the keeper has to clear through.

Quality and quantity are important when teaching skills. You don’t want to have a keeper in a drill so long that they’re tired and can’t do anything but get hit. Groups of three or four work well as far as getting good repetitions and staying fresh. You can have them take five to ten balls and switch out, or recycle them so that they go one after the other.

Movement is important. Keepers need to be able to play shots from a static position and shots as they’re moving. Footwork is critical in determining how a keeper can play a ball. How a keeper plays a ball is going to dictate what he can do next, i.e. recovery. A keeper needs to be able to play the second shot. When you think of all of these elements, there’s a lot to reinforce.

It’s important to use the resources available to you when working with beginning keepers. We might not have a ton of hockey balls, but we probably have a tennis racquet and a ton of balls, we probably have a soccer ball. Use these things. I like to use a size three soccer ball and just have keepers play the ball first time with their feet with just a stick in their hand. Have the keepers kick in a group and see how many kicks they can put together. Have them call the keeper they want to kick to.

Use your imagination. I think there are a million fun drills out there for the taking if we just use our minds. On a co-operative note, I think it’s important to share ideas.

An important part of coaching keepers is identifying what motivates them. This is especially true with younger keepers. Some times it might be silly, but if it gets them to do what you want them to do, who’s to argue.

I think coaching beginning keepers can be a very rewarding experience. You see them grow so quickly with structured attention. Hopefully that’s something that’s happening in your area and if not, maybe you could get it going!

Good luck,

Jon

e-mail Jon

Please note that OBO together with Jon O’Haire hold copyright over any material appearing on tips pages. We welcome the printing and distribution of these tips, provided that they are not sold, or used for financial gain. This paragraph must appear on all printed or distributed copies. The photographs above must not be used in any form without express permission from Jon O’Haire.

Aerial Balls

As goalkeeping continues to be reinvented, the most recent changes have come in the aerial ball. Today’s keeper sees more hard, lifted shots from different angles than ever before. Fortunately, he is better equipped and has new tools and skills for meeting the task. No offsides, drag flicks and reverse stick chips have increased the number of chances above the waist that a keeper has to defend. Upper body pads and hand protectors now give him effective protection to make those plays.

As goalkeeping continues to be reinvented, the most recent changes have come in the aerial ball. Today’s keeper sees more hard, lifted shots from different angles than ever before. Fortunately, he is better equipped and has new tools and skills for meeting the task. No offsides, drag flicks and reverse stick chips have increased the number of chances above the waist that a keeper has to defend. Upper body pads and hand protectors now give him effective protection to make those plays.

A couple of notes about equipment, I’m for it, especially upper body pads. A lot of times today’s keeper is getting hit by a hard ball when making a save. That’s not a whole lot of fun if you don’t have protection. Yeah, you do have to figure in mobility, but I prefer protection over mobility. I wear an ice hockey body pad. Some people like ice hockey body pads less. There are a wide variety of makes and models. I think you have to look at how you play and where you’re getting hit and make your decision accordingly.

The days of gloves are coming to an end. Hand protectors are much more protective than gloves and offer you a new range of skills to defend. umw webmail High density foam and functional engineering have opened up doors for the keeper to clear with his hands, much the same way that foam kickers allowed the keeper to use his feet. He can use the rebounding and protective qualities of foam to play a ball, rather than be played by it.

What you can do with your hands is profoundly effected by how you hold your hands in your ready and moving positions around the goal. Ready and moving positions or stances are distinct. When a keeper has to move big distance, he’s running and arms are pumping. When he needs to cover three yards on a side shuffle while a forward pulls right, he’s trying to make himself big while covering the ball and moving, all at the same time. He does that by keeping his hands outside his shoulders and slightly forward from his sides. He does that by being balanced, quick footed, with his weight forward. If a forward shoots as you’re moving, getting hit with the ball is a success.

Total ready position is when you have a forward striking from the top of the circle and you’re able to react and save/clear. I don’t think hand protectors have radically changed the way I am in my basic ready position/attack stance. I keep my hands in front of me, stick held about two/fifths down the length. I want to position myself at a distance from where I can react and position myself to clear the ball. For me, that’s probably 11 yards or 10 meters from the shooter. That distance is really going to vary because it depends on where each individual keeper is most comfortable and effective playing the ball.

I will change how I hold my stick according to the situation. My needs are going to be different when taking on a forward running the baseline with passing options, than say, the forward alone at the penalty spot with a bouncing ball in front of him and time and space to tee off. If somebody has the time to hit/chip a shot, I don’t want the ball to carom off of me because I was too long on my stick, hence two/fifths.

While not exactly textbook, this is where I like to take the ball on my stick. The ball has hit the stick mid-shaft and is headed around the post. As evidenced by the legs in the foreground, this is a chip shot from close range.

I don’t think we’ve reached the limits of what can be done with hand protectors, but among the skills and changes that have developed are the keeper being able to deflect a shot with his hands. On the stick side, the facing surface is a deflection surface. I think that’s one of the great design features of the Robo RHP, you have a big, flat, deflecting surface. Some of the more flashy, round, right hand protectors are functionally difficult. With the Robo RHP you’re protected comfortably and effectively taking the smashing hit straight on the hand or making a reverse stick tackle and being able to get your stick down.

On balls to my stick side, I like to play them close to my hand. That means for me figuring early on whether the ball is going to be one that I will play with my right hand. If the ball is reachable, I prefer to cross over and take it with my left hand and that still depends on where’s going to be a safe space for me to save/clear to. How my shoulders are set effects how I can play a ball and to where. Just as I need to open my hips kicking the ball, I need to open my shoulders when I play the ball with my hands.

If the ball is to my stick side and far enough that I can’t reach it with my left hand, I try to take the ball on my hand protector. With the big, flat surface and the rebounding qualities of foam, I can deflect the ball into space. If I have to use my stick to make a save, I like to take the ball mid shaft. I don’t wave at the ball when making the save. Because I play with my hands in front in my ready position, I have to open up automatically. On my stick side, that really allows me to angle my body back to put balls to the side as well as giving me a little more time to see the ball. Whatever way you play, the tiptoe of your stick should never be considered a primary stopping surface.

Going back to the ball hit to my right hand that I can cross over and play with my left. If I drop my right shoulder, come forward with my left shoulder, angling my left hand while I bring it back, I can deflect a shot with pace, wide right to safety. In the old days, you had to stop the shot dead, drop it and hope someone wouldn’t kill you while you tried to clear it. If you didn’t do those things in just the right order you could bet it was going to be at least a corner.

Your left hand becomes your primary aerial deflecting surface. We talked about bringing your left hand across for saves to the right, obviously it’s pretty much the only option on shots to the keeper’s left. You can use the pace of the ball to deflect it to space and safety and that’s something you couldn’t do with gloves. There are a couple of things I like about the Robo LHP, it’s big, bulky and functional. There’s a nice sweet spot.

Taking the ball to his right, low; notice hand angle, shoulder and leg position. There’s a lot of preparation to making a clear.

One of the things that’s happened since hand protectors came on the scene is that keepers have been allowed a fair bit of freedom in deflecting/parrying the ball. Obviously a keeper still can’t bat the ball, but if you’ve got to bring your left hand across your body while reaching/falling/jumping, that ball has got some zip as it comes off your hand. We can use zip to our advantage. We do that when we move our whole body to the ball when we use our hands, rather than just reach. When you reach and deflect a ball, it often appears that the keeper is batting the ball. When you get your body to the ball, you keep your hand and forearm set up early so that you can deflect and then get your body there to make the skill. I think your legs are really important when you make hand saves. Footwork is still critical because it dictates body position. There’s no point in worrying about the skill to use at point A if you can’t get there. When you get your body to the ball, you need to get your hand and forearm set up early so that you can deflect the ball, as opposed to batting it. You want to “sell” your deflection to the umpire with body movement rather than arm movement.

Taking the ball to his right, high; notice again the hand angle, shoulder and leg position.

With hand protectors, hard shots have become easy. Too often a ball without pace is more difficult for the keeper. In such cases a keeper still needs to be able to execute the basics-stopping the ball and controlling it into a safe space-than quickly clearing it. You need to know where the ball is going off of your hands. Slower paced shots require the keeper to execute a multi-part skill with power and precision. That skill requires co-ordination which comes with repetition. I like to take my left hand back if I’m trying to control/cushion a shot to keep it close to me. I need to stay up on the balls of my feet as I’m taking the ball so I can come forward when making my clear. If I don’t, I have no power, no extension, I’m flat footed and typically reacting to the ball hitting me.

Controlling the ball down to clear. Notice the hand and head position. The keeper is over the ball, legs ready to take it to space.

The ball will not deflect itself to safety by itself with hand protectors. Learning how the ball rebounds off your hands is part of the process. The process comes through training and repetition. Tennis balls are good. Get someone to help you out with a tennis racquet and balls. Have them set up around the top of the circle and whack tennis balls to your hands. You don’t need to be in full kit, get your helmet, hand protectors, stick and pelvic protector and just take balls. Whether it be a hockey ball in full kit, or tennis ball in light gear, a keeper needs to learn through experience where balls will rebound to. That means taking a lot of balls. Notice how the keepers body and hands are set up when he is able to play the ball safely in to space. You can do the same with a Jugs machine, or a couple of shooters and work chips and flicks. Take note of how ball speed and rebound are related. Try to deflect balls to places.

Hand protectors have really opened up the doors for what a keeper can do with aerial balls. Tools without skills are useless. If we don’t use hand protectors properly we’re back to being the wall, put anything above our waist and we’ll give it right back to you. That didn’t work so well. We have a better way, we just need to master it.

Good luck,

Jon

e-mail Jon

Please note that OBO together with Jon O’Haire hold copyright over any material appearing on tips pages. We welcome the printing and distribution of these tips, provided that they are not sold, or used for financial gain. This paragraph must appear on all printed or distributed copies. The photographs above must not be used in any form without express permission from Jon O’Haire.

Training Programs

Last tip we talked a little about off-season conditioning and training. Since that time, I’ve gotten a lot of questions about specifics for a training program. They range from sprint workouts, to length of program to types of agility drills. First off, there is no perfect one size fits all training program for every keeper.

Last tip we talked a little about off-season conditioning and training. Since that time, I’ve gotten a lot of questions about specifics for a training program. They range from sprint workouts, to length of program to types of agility drills. First off, there is no perfect one size fits all training program for every keeper.

The best program for you is the one that addresses your weaknesses and builds strengths. That will depend on each individual’s athleticism. Having said that, there are general things you should look to build into your program at some level. In this tip, we’ll plot out a sample program, and highlight some drill areas, especially agilities.

Big time note here, this training program is hardly MY training program. It is a program I’ve compiled with lots of sources, thank you to all those who’ve shared ideas about training.

It usually takes eight to ten weeks for a training period to be effective. You’ve got to be diligent if you expect any pay off. Get a journal and keep your training times. Monitor what you eat and how you feel before and after workouts. It’s also good to keep track of your sleep time. A journal is a good way to build diligence in.

I like to have phases to my training, phase one will be aerobic; longer runs, fitness, probably three weeks. Phase two will be interval type work, lots of agilities, another three weeks. Phase three is all short sharp stuff, lots of sprints and agilities, three weeks.

In phase one, I’ll look to keep my runs to about 30-35 minutes constant. I like to run every day (therapeutically), but while training, you should run every other day to allow for recovery. I have three types of run, I mix in. One is a timed 5k, with a proper warm up and warm down (five minutes each side). The other is a 35 minute fartlek where I’m really concentrating on discernible changes of pace and how long I can maintain them. The third type is a hill repeater, usually a 1km loop with a hill built in. Something where you’ll have a consistent incline thrown in.

In phase two, my running is over 800m, 400m and 200m. If I use three workouts again, I mix them from a group. In the beginning, I like 800s. They’re not fun, but they’re effective. I try not to do more than 3,200m total in making a workout and I’ve got to build in proper recovery time. Workout 1: 2 x 800m, 80%, 3 minute recovery, 2 x 400m, 100% 90 second recovery. Workout 2: 6 x 400m, 80%, 90 second recovery, 4 x 200m, 100%, 30 second recovery. Workout 3: 2 x 400m, 90%, 90 second recovery, 8 x 200m, 100%, 45 second recovery.

Phase three is nothing more than a 100m at one time. I try to keep my workouts to no more than 2500m total. I’ll build longer recovery time in between sets of a distance. Workout 1: 4 x 100, 80%, 15 second recovery, one minute recovery, 8 x 50m, 100%, 20 second recovery, two minute recovery, 10 x 25m, 100%, ten second recovery. Workout 2: 2 x 100, 80%, 15 second recovery, one minute recovery, 12 x 50m, 20 second recovery, two minute recovery, 12 x 25m, 100%, 10 second recovery. Workout 3: Use agility drills.

And now on to agility drills. I talked a little bit about them in the last tip in terms of distances and guidelines for making your own drills. Here are a couple, I’ve begged/borrowed/made/fell into along the way.

I like to build my agilities along lines I would move in the circle in sequences that sort of make sense as to what might happen in a game. I try to mix changes in direction in while trying to reinforce angles by moving around the circle. Below are diagrammed out two patterns I like to use (#7 and #5). I’ll try to work the yardage out and build in proper recovery time. If I’ve got another keeper to run with, a good guideline is one second work, one second rest, so if an agility takes you 36 seconds, your rest is 36 seconds. You should have balance to your agilities, don’t always go in the same direction.

#7

Forwards:

1. sprint forward (5 yards)

2. side shuffle (3 yards)

3. sprint forward (5 yards)

4. side shuffle (5 yards)

5. sprint forward (3 yards)

6. back pedal (3 yards)

7. side shuffle (5 yards)

8. back pedal (5 yards)

9. side shuffle (3 yards)

10. back pedal (5 yards)

Reverse:

10. sprint forwards (5 yards)

9. side shuffle (3 yards)

8. sprint forwards (5 yards)

7. side shuffle (5 yards)

6. sprint forwards (3 yards)

5. back pedal (3 yards)

4. side shuffle (5 yards)

3. back pedal (5 yards)

2. side shuffle (3 yards)

1. back pedal (5 yards)

#5

Forwards:

1. sprint forward (8 yards)

2. back pedal (4 yards)

3. side shuffle (4 yards)

4. sprint forward (3 yards)

5. side shuffle (3 yards)

6. back pedal (3 yards)

7. side shuffle (4 yards)

8. sprint forward (4 yards)

9. back pedal (8 yards)

Reverse:

9. sprint forwards (3 yards)

8. back pedal (5 yards)

7. side shuffle (5 yards)

6. sprint forwards (3 yards)

5. side shuffle (3 yards)

4. back pedal (5 yards)

3. side shuffle (5 yards)

2. sprint forward (3 yards)

1. back pedal (5 yards)

I have a fun agility drill that I’ll do with a partner. It takes a goal and a ball. I start on the goal line at the center of the goal, I start to side shuffle to a post, once I get near the post, my partner who is three yards off the line, tosses a ball towards that post. I catch with the hand closest to the post, toss it back immediately to the partner, and start to shuffle to the opposite post. As soon as I get to the post, the feeder tosses, I catch, toss and immediately shuffle back to the other post. I repeat the process. I’m focusing on a couple of things. Keeping in my ready position as I move, I try to keep my body stable (not bobbing up and down as I move), watching the ball all the way in to my hand, pushing off my opposite leg to change direction when I make a catch, these are all things I want to do. I’ll do anywhere between 25 and 30 catches to a set. If I’m a feeder, I can mix up the level I’m throwing to so the catcher may have to jump to reach a ball. I can also do this drill so that the catcher has to come forward, catch, then back pedal, instead of going side to side.

Rachel also has a bunch of good agility drills in her tip. No one drill is the perfect drill for everyone. Create your own drills. The thing is, think about what you want to work on and find a way to do it. That’s the shortest path to improvement.

Good luck,

Jon

e-mail Jon

Please note that OBO together with Jon O’Haire hold copyright over any material appearing on tips pages. We welcome the printing and distribution of these tips, provided that they are not sold, or used for financial gain. This paragraph must appear on all printed or distributed copies. The photographs above must not be used in any form without express permission from Jon O’Haire.

Off Season Training

To borrow a line from Shakespeare, "Now is the Winter of our discontent." For keepers in the Northern Hemisphere, Winter means snow, sleet and a break from outdoor hockey. For those in Southern Hemisphere, Summer and the heat provide the break. Wherever you are and whatever the time of year, at some point you're going to have a break in your hockey season (my source of discontent). As the holidays approach, I've received a lot of questions about off-season training programs and activities.

To borrow a line from Shakespeare, “Now is the Winter of our discontent.” For keepers in the Northern Hemisphere, Winter means snow, sleet and a break from outdoor hockey. For those in Southern Hemisphere, Summer and the heat provide the break. Wherever you are and whatever the time of year, at some point you’re going to have a break in your hockey season (my source of discontent). As the holidays approach, I’ve received a lot of questions about off-season training programs and activities.

The longer you play and the higher the level, the more you’ll find that what you do during that time will impact what your next playing experience is going to be like. Hockey has become a year-round sport and not all of that preparation comes in your playing season. At the international level, months and sometimes years are spent as a build-up to peaking for a two-week period. While your off-season preparation may not make the difference between Olympic Gold or also-ran, it can be the difference to in-season success.

What’s appropriate as your off-season training program depends on a number of things; age, playing experience, fitness, athleticism, skill-level, weather, facilities, dreams and goals are all factors in determining what’s the best off-season program for you. First off, please check Rachel’s Tip on Off-Season Training. There’s a lot of good information there. Second, there is no one right off-season training program for everyone. The best program for you, depends on you.

I want to reinforce a couple of things Rachel mentions. A training diary is critical if you’re serious about improving your game. I’ve heard it said many times, if it’s worth doing, it’s worth writing about. Putting things down on paper reinforces accountability. It can make dreams real. I don’t keep a diary, as much as I keep a journal. During the season I’ll write down what we’re working on in training, practice and games. I’ll track my strengths and weaknesses, things like how I feel and what I’m doing. At the end of the season, I’ll look back at the journal and use it to plan my off-season program.

It’s a good idea to work with your coach when you plan your off-season program. By working with your coach, you gain a couple of things. You find out what your coach thinks of your game, you get feedback on what to work on and you get a better picture of what your coach wants from the position. In developing your program, use all the available resources to you, especially when it comes to experts outside the sport.

As a coach, I won’t pretend to be an expert on a lot of things that contribute to success on the field (i.e. building strength and speed, increasing aerobic capacity, etc.), but as a player, I was good at finding people who were and using their insights. If you want to get faster, find a track coach; stronger, find a strength coach; and so on and so on. If you can’t find a person, find a book. The more information I had, the better. After all that, go back to your coach. It’s important to prioritize what you want to accomplish in the off-season. Some goals can not be met in eight weeks.

Now (finally), about training programs.

I’m a big fan of aerobic activities in the off-season and as much as most keepers play goals because they hate running, I think running is important. As a player, we always had to do the same fitness tests the field players did in selections. At least one of those tests was an aerobic test, whether it was a five-minute run, a twelve-minute run, a timed five-mile or 5km run. Nothing did more to hurt my confidence, or perception on the team, than to finish last in those runs. I don’t know that the ability to run 1500 meters in five minutes made me a better keeper, but it made me a better athlete.

There are a wide variety of aerobic activities that are excellent for building endurance. Swimming, roller-blading, cycling and jumping rope are all good activities. How long and how hard you do these activities will obviously depend on things like age and your starting fitness. As a general guideline, aerobic means more than fifteen minutes of continuous activity. If you bike or blade and are stopping every other block, it no longer constitutes an aerobic event. In the off-season, I like to fit in two or three aerobic workouts a week.

Speed work is important. The further away from the start of the season I am, the more I try to focus on sprint work at longer distances. Sprint work is any distance shorter than 400 meters. As I get closer to the start of my season, I’ll move to shorter distances. Once again, things like distances, repetitions and recovery time between sprints will vary from keeper to keeper.

Agility is important. I can’t just be straight line quick, I need to be able to change direction. Basketball and soccer are good sources for agility drills. I make up a lot of patterns built around movements inside the circle. I’ll place anywhere from ten to twelve cones around the circle in different positions and incorporate the movements I’ll use in the circle: forward, backward, side shuffle right, left, etc. I’ll place them anywhere between three to ten meters apart and make keepers touch the cones to make things more dynamic. I won’t do these things in pads, and I like to keep the drill so the total distance they’ll do in a drill isn’t more than 75 meters. Once again, distance, repetitions and recovery will depend on the keeper. I try to fit in two or three speed/agility workouts a week in during the off-season

Rachel makes a really good point about working out of pads in the off-season. I want to be excited when I get in to pads during the season. Having said that, depending where you are, indoor hockey might be an option. I highly recommend it for keepers. The number of touches, types of situations you face and decisions you have to make happen more frequently in the indoor game. A keeper can see more shots in three indoor games than he does in an entire outdoor season.

I think soccer is a great off-season activity, not as a keeper though. In earlier tips, I’ve mentioned the importance of kicking. Playing soccer in the field allows you to work on aerobic fitness as well as kicking.

I like to throw in reflex workouts/activities into my off-season also. Tennis or racquetball are good for working on eye-hand coordination. I mentioned that you make best use of the facilities you have available to you at the time of year. I’ve used racquetball courts to do soccer ball work. In the Summer months, I’ll move my workouts to the beach. Be creative, make up games or drills.

Strength training has become a major part of all sport. Explosive leg strength is critical to goalkeeping. Hamstrings, quadriceps and calves are important muscles. Upper body strength is required for quick recovery. While a keeper doesn’t need to be the Incredible Hulk, he does need to be able to lift his body weight. If you don’t have access to weights, things like push-ups, pull-ups, squat thrusts and knee bends are good alternate exercises.

Anytime you workout, it’s important that you warm up. Warming up means, a short jog, followed by a complete stretch. By the same token, following your workout, it’s important to warm down and stretch.

Finally, one important thing about an off-season training program, take some time to do nothing. Rest is important. Burnout is a real problem in sport. Too many times I see keepers go straight from their outdoor season, right in to an indoor season and all the rigors of training full time for both. Your body and mind need a break.

Some things need to be done just to have fun. Recognize that. When you’re doing a fun workout, keep it fun, but know that it’s different than a hard workout. Hard workouts aren’t always fun. There’s the need for both the hard and the fun and good off-season training programs capitalize on them.

Good luck,

Jon

e-mail Jon

Please note that OBO together with Jon O’Haire hold copyright over any material appearing on tips pages. We welcome the printing and distribution of these tips, provided that they are not sold, or used for financial gain. This paragraph must appear on all printed or distributed copies. The photographs above must not be used in any form without express permission from Jon O’Haire.

Slide Tackling

There have been a lot of questions about what to do in situations where a keeper is faced with a forward bearing down on him or her alone. Most centre around what the keeper should do. There isn’t a text book answer that says, “If the forward enters the circle with a five yard gap between him and his defender, at a 45′ angle to the goal and the ball on his front stick, the keeper extends his body in a prone position to his strong stick side at a rate of speed of 15 mph, bisecting the path of the ball at his midsection.” That’s certainly one way of handling the situation, but the fact of the matter is there isn’t any one way to play any one situation, especially one on ones with the keeper and a forward.

There have been a lot of questions about what to do in situations where a keeper is faced with a forward bearing down on him or her alone. Most centre around what the keeper should do. There isn’t a text book answer that says, “If the forward enters the circle with a five yard gap between him and his defender, at a 45′ angle to the goal and the ball on his front stick, the keeper extends his body in a prone position to his strong stick side at a rate of speed of 15 mph, bisecting the path of the ball at his midsection.” That’s certainly one way of handling the situation, but the fact of the matter is there isn’t any one way to play any one situation, especially one on ones with the keeper and a forward.

When a keeper is faced with an unmarked forward breaking to goal, he has seconds to assess the situation and come up with a plan that will allow his team to succeed. First off, we need to qualify what success is. Success is not allowing your opponent to score, pure and simple. Having said that, how does a keeper go about succeeding? He does that by not allowing his opponent to make the play he wants. That comes by making a forward beat you in a path he doesn’t want to take, by making him take a shot he doesn’t want to take from a place he doesn’t want to take it from, early or later than he wants to take it. Now, how do you do that?

A forward with the ball alone at the 25 can be a pretty intimidating site for a keeper. By the same token, a keeper poised and ready at the top of the circle can be equally intimidating. This takes us back to our plan. Before a forward can score, he’s got to get into the circle. As a keeper, that gives me a boundary that if successfully defended, never allows a shot to happen. As the forward enters the circle, elements that give him the advantage are time, vision, control of the ball and speed. Those elements can also work against him. It’s hard for a forward to have vision and control of the ball. When he’s got vision, typically that’s when the ball is off his stick. When he’s got speed, the ball is either on his stick and his head is down, or the ball’s off his stick. Those are the times when a keeper can win the situation.

One of the skills I can use to win the situation is a slide tackle. What are the elements of a slide tackle? The two big ones are timing and execution. As far as timing my tackle and positioning myself, I want to time my tackle so that the forward is just entering the circle. That means that I want to start my tackle two to three yards inside the circle. When taking a forward on top of the circle, I’m not just going out and dropping. Slide tackle means forward slide tackle. There is a lead up, and a follow through to the tackle. Timing is key and I’ve got to wait until the forward has committed to a direction. If the forward is going from my left to right, I have an ideal opportunity to tackle him strong stick side. As he goes from my right to left, I’ll usually have to take him on my reverse stick.

A strong stick tackle from the baseline.

Footwork is key in setting up the slide tackle. If I get too close to the forward on a slide, I miss the ball and take out the forward. If I’m too far away, the forward can pull the ball around me. By the same token, if I get wrong footed, I’m not going to be able to slide to the side I want. If I want to make a strong stick tackle, my last step is going to be off my left foot. As I push off my left foot, my right leg is out in front of my body as I go down. My goal is to make my body a big, sliding, horizontal block. To do that, I need to get down and horizontal quickly. I try to get my right leg out and get down on my right hip as quickly as possible while extending my torso out at the same time. I use my hip and elbow to brace myself as I go down. When I make my slide, my hips and shoulders are in a line perpendicular to the ground so that my block is as tall as it can be. If my hips and shoulders are angled back, the forward can throw the ball over or I risk having the ball deflect off and over me.

I like to line the ball up on my chest when sliding for a couple of reasons. If I line the ball up on my hands, the forward can beat me by pulling a yard to his left. If he does that on my chest, I can still tackle with my stick. I’ll also adjust the grip on my stick in a one on one situation so that I use the full length of my stick. It’s critical that if you do go tackle with your stick, you tackle through the line of the forward’s pull. A common mistake is for the keeper to make his tackle parallel to the line of the pull and as a result, the forward runs around his tackle. Also, my upper body is a more substantial obstacle for a forward to run through Wedding Dresses .

Obviously a keeper should be well equipped if slide tackling is going to be a safe, productive part of his game. The skill requires courage. The thing we alluded to before was intimidation, and I’ll go out on a limb and say the thought of a keeper coming after a forward at the top of the circle can be fairly unnerving. If you’ve never performed a slide tackle before, the thought of a forward running in to you can be pretty scary. The reality is that one on ones are a lot like the game of chicken. If you wait long enough most forwards bail. No forward likes to get hit by a flying speed bump and that’s what a well-executed slide tackle is like. When you stop the ball on your chest, the forward usually ends up jumping over you and you now have the ball with time and space to clear it.

Tackling to the reverse stick is basically the same except to the other side. I’m setting up the tackle by pushing off my right foot and throwing my left leg and hip out. I’m trying to get my hip down and torso extended as quickly as possible. If there is a difference between tackling on the front and reverse stick, it’s that I can’t extend as far on my upper body side with my reverse stick. As a result, I may to have turn on to my stomach to get full extension if I’m pulled wide.

A slide tackle to the reverse stick side, from the baseline.

Whether, I’m slide tackling to my reverse or strong stick, I’ve got to be aware that a forward with vision may try to throw the ball over me as I’m sliding. It’s important that I stay focused on the ball and the angle of the forward’s stick as he comes in. While I’m definitely looking to get down and wide in a hurry, I still have to be able to deal with a flick over me.

The tackle executed, fully extended.

If a forward has vision and control of the ball, a slide tackle isn’t going to be in his best interests. A keeper has to try to stay with the forward until he’s got the forward in a position where the keeper has the advantage. Going back to our initial criteria for success, that’s taking a forward to a place he doesn’t want to be. If I want a forward to take the ball to his reverse stick, I might want to overplay to my left, to bait him to go to my right where I can make a strong stick tackle. It might mean that I go out and stay up and force the forward to go around me. If I’ve got help coming back in the form of a defender, time may be all I need to win the situation.

If I’m trying to take on a forward upright away from the goal, it’s important that I keep my steps small and quick. If I take big, long steps, it may seem that I cover more ground, but I also leave a lot of gaps as I move. I’m vulnerable between my legs and to any shot that’s put on the leg that I have weight on. I want to keep my hips square to the forward so I can move in either direction. So I don’t get wrong-footed, I try to keep my shoulders in a line inside straight up from the balls of my feet with my weight slightly forward. Ultimately, a forward should be able to outrun a fully padded keeper and a keeper will be forced to put on a skill. At that point the skill is a dive.

A dive is different than a slide. As we talked about before, a slide has forward momentum to it. A dive typically comes from movement to the side. If I’m taking a forward on upright, my dive will come about the time that my shoulders start to get outside the line of my feet as I move. That’s about the time that my movement stops being controlled. A dive isn’t just falling in the direction of the ball. A dive is an explosive movement where I’m pushing off both legs to get extension.

Once I’ve successfully stopped the ball, composure is important. If I’ve been able to clear the ball out of circle, then I’m up quickly and recover back to the goal. If I’ve only stopped the ball, it’s important to take in the situation. Do I have help? If I do, I can just leave the ball for a team-mate. If I don’t have help, I need to assess where and how to clear the ball, depending on the amount of time I have available. If I’m tackling on my strong stick side, sweeping the ball with my stick to the nearest sideline is the easiest, quickest method. If the forward has run past me, I may have the time to get to my feet and clear the ball with my kicker. If the forward is still right on top of me, I may not be in the position to get up. If getting up is going to allow the forward to put the ball under me, then I need to stay down. That doesn’t mean I don’t try to move to the ball, it just means that I’m moving from a prone position.

We’ve talked a lot about the technique aspects of one on ones; now, a few notes about the tactical aspects. One on ones can happen at the top of the circle or along the baseline. They can occur when there is one forward in the circle, or six forwards and several defenders. For me, a one on one situation is any situation where there is not a defender available to play the forward with the ball and the likely, resulting scenario is going to result in a scoring opportunity that doesn’t favour my team.

If I’m going to take a forward on, I must communicate that to my defence so they can work with me, either to cover the goal or mark passing lanes that open as a result of my leaving the goal. When I leave the goal, I can’t go out for the sake of going out. I’ve got to go out to get ball. There will be some situations where a forward has support. I must be aware of where that support is, as well as know where my help is coming from. I’ve got to be able to anticipate the shot as well as the pass. Sometimes that might mean that I’ve got to cheat a little trying to play both the pass and the shot.

If there is a recurring theme in many of these tips, it’s that there are a lot of ways to play situations, especially one on ones. Several things help you be successful: know your strengths, work on your weaknesses and learn from your experiences. If I’ve been beaten in a one on one, write down what you did in the situation. The same holds true for when you’re successful, write it down. There is nothing random about success. Do what works; work on what doesn’t. It may take time, but if you work on situations methodically, consistent success is usually the payoff.

Making the tackle at the top of the circle (ignore that man in the undershirt, he’s not helping!).

Good luck,

Jon

e-mail Jon

Please note that OBO together with Jon O’Haire hold copyright over any material appearing on tips pages. We welcome the printing and distribution of these tips, provided that they are not sold, or used for financial gain. This paragraph must appear on all printed or distributed copies. The photographs above must not be used in any form without express permission from Jon O’Haire.

Kicking

There is no more essential skill to a keeper in the game of hockey, than kicking. Just as a field player must have stick skills, a keeper must have kicking skills. The importance of this most basic of skills is often overlooked. People tend to think all a keeper need do is worry about saving the ball. A keeper can make all the saves in the world in a game, but if he can’t clear the ball, he almost assures himself of allowing goals.

There is no more essential skill to a keeper in the game of hockey, than kicking. Just as a field player must have stick skills, a keeper must have kicking skills. The importance of this most basic of skills is often overlooked. People tend to think all a keeper need do is worry about saving the ball. A keeper can make all the saves in the world in a game, but if he can’t clear the ball, he almost assures himself of allowing goals.

Typically most practices for a keeper centre around stopping shots on goal. He is presented with some forwards, about thirty balls and faced with various exercises designed to do nothing more than test his reflexes. Stop one shot; move on to the next. It is essential that keepers get in his mind set that a save is not completed until the ball is safely cleared to a defender or out over the side line. Think about the situations in a game that can require a keeper to play a ball with his feet. Loose balls in the circle, passes in the goal area, shots in the circle and back passes from his defenders are all opportunities for keepers to create positive ball possession for his team-mates.

Kicking is an active skill that incorporates many techniques. Note the word active. Kicking is not simply allowing the ball to hit your foot and redirect. It can be, especially on hard shots, but in most cases, it involves a keeper stepping up to interject himself into a situation and playing the ball.

Kicking is controlling the ball. For the sake of this piece, we’re only going to discuss one type of kicker, high-density foam. On high-density foam kickers, the area of greatest control is located on the instep, between the ankle and the round of the foot. If a keeper is looking to play the ball with his foot for maximum control, instep is the way to go. The type of ball you’re dealing with, obviously impacts the technique a keeper has available to him to kick the ball with his instep.

For shots that are basically straight at a keeper (surprisingly they constitute a large percentage of the balls a keeper faces), he is stepping in to play the ball, rather than waiting for the ball to come to him. The kick starts from a good ready position, with the keeper up on the balls of his feet. The mechanic starts with the keeper opening the foot/instep of his kicking leg up to the angle that he wants to clear to. He is pushing off from his non-kicking leg. As he goes forward, he leads with his head, then his chest. If a keeper does this, the knee of his kicking leg should be in a straight line up from his foot when he makes contact with the ball. As he contacts the ball, the follow through of his kick should carry on to the line of the clear. Assuming he does all this, the results should be a low, hard, clear to target.

Common problems for keepers with kicking seem to come from relatively few areas. They range from kicks rising, to inaccuracies, to little or no power. One at a time, these are the things to look for:

Rising balls – start on the balls of your feet. Get on to the line of the ball early. Open up the instep of your kicking foot. Push forward off your non-kicking leg. Get your head out in front of your body. Kick through with your kicking foot towards your target.

If you don’t push off with your non-kicking leg, your head goes back, which results in a keeper making contact with ball with his foot in an angle in front of his knee. Think about your foot as a golf club, and in this position your foot is a 9 iron.

Inaccuracies – When a keeper has problems with accuracy, they usually stem from him not getting on to the line of the ball early enough. There is a lot of footwork in getting your body in to a position where you can kick to your desired target. It’s a lot of short quick steps, very similar to how a tennis player moves. A keeper will also have trouble kicking to his target if he doesn’t open up his body to change the angle. If a keeper doesn’t change the angle of his body with a straight on shot, an instep clear will go directly back to the shooter. That’s a bad thing.

A keeper needs to open up his stance to change the angle of the ball. It starts with him opening up his shoulder, then his hip, then his instep on his kicking side. Opening up will give him a slight back swing as he steps for his last “prep step” before performing the kick (we’ll call the steps you take to set up performing a skill as “prep steps”). The downswing on the kick should be in as direct a line as possible, along the line of where you want the ball to go (i.e. towards your target).

Keepers also have problems with accuracy when they don’t open up their instep up early enough to the ball, or take it on their foot between the ankle and the round of the foot. When a keeper doesn’t open up early enough he ends up twisting his foot as he is kicking. He can’t get any follow through. Unless you take the ball on the sweet spot of the kicker, you’re making contact with a rounded surface at either your heel or your toe.

No Power – problems with power often come from the plant. If your plant leg is too far away when you kick the ball, you have to reach with your kicking foot getting out in front of the knee at contact. This causes you to basically kick with the bottom of your foot, as opposed to your kicker. Unless you have high-density foam on the bottom of your shoes, you’re going to have a problem getting power. Follow through adds power to kicks and the only way to get is to be able push off with your plant leg and kick through the ball.

The keeper is about to kick the ball with his right foot. Notice how the knee is out in front of the foot before making contact with the ball. As contact is made the knee will be straight up from the foot.

Kicking through the ball. The keeper has pushed off his left leg, to be able to kick through the ball with his right leg. Note how the head and chest are forward.

How not to kick, the keeper has his foot out in front of his body, with his weight back. The ball will rise off the kicker.

In the tips to come, we’ll cover other kicking techniques and give you drill ideas designed to improve your kicking.

Good luck,

Jon

e-mail Jon

Please note that OBO together with Jon O’Haire hold copyright over any material appearing on tips pages. We welcome the printing and distribution of these tips, provided that they are not sold, or used for financial gain. This paragraph must appear on all printed or distributed copies. The photographs above must not be used in any form without express permission from Jon O’Haire.

Kickers

No matter how talented a carpenter is, with bad tools he'll be hard pressed to produce a good product. The same holds true for a keeper. A good keeper with bad pads has a hard job, made harder.

No matter how talented a carpenter is, with bad tools he’ll be hard pressed to produce a good product. The same holds true for a keeper. A good keeper with bad pads has a hard job, made harder.

How does the job get easier? Simple logic says good equipment helps. Somewhere along the line, though, logic has become expensive when it comes to pads. Outfitting a keeper can be expensive and money isn’t always something that’s available by the buckets.

It is possible for a keeper to be well kitted without spending a fortune, just as it’s possible for a keeper to spend a ton of money and be poorly protected. Part of being well kitted is assessing what you have and what you need based on the requirements of the level you play, the surface you play on, your size, your aspirations, your gender and finally your budget.

In the modern game, the typical list for the well kitted keeper includes a helmet with face mask, chest protector, pelvic protection, padded shorts, hand protection, legguards and kickers. At the international level, a keeper can easily spend over US$1,000 on equipment. By the same token, you don’t have to spend US$1,000 to have a set of useful equipment.

Very rarely does a keeper come to the goals without some kit to draw on. In assessing what a keeper inherits, questions that come to mind are does it fit? does it protect? and will it do what I want it to do? If the answer is yes, then the job is easy, take care of what you’ve got and it should take care of you. If the answer is no, then you’ve got to prioritise making do with what you’ve got,with what you really need to replace.

In this tip and the equipment tips to come, I’ve put together my priority list. Under the item of equipment there follows a description of what to look for, how it should fit and how to take care of it.

Kickers

There are still a variety of different kickers available on the market and in various stages of circulation from old equipment bags. If there’s one piece of equipment that should be replaced immediately, if not sooner, whether it be inherited or recently purchased, it’s bad kickers.

Bad kickers can be, but are not limited to, bamboo and leather square toe kickers, worn foam kickers, kickers that are too big, or kickers that are too small. First off, kickers determine the techniques available to you to clear the ball. Modern hockey requires a keeper to be able to first time clear a shot. In square toe kickers, that is a technique that is among other things, extremely painful, if not virtually impossible.

If you’ve inherited foam kickers the tests for finding out if they’re up to snuff are fairly quick and simple. If kickers are too big, you won’t be able to fasten the straps tight enough to secure them on your feet. If they’re close, you might be able to punch extra holes in the straps to make them fit. That might keep them on your feet for a while, but the biggest problem with kickers that are too big is that they’re difficult to move in. The foot doesn’t make actual contact with the field, the kicker does. As a result, you end up slipping or tripping.

When kickers are too small, the problem is usually equally obvious. Toes hang out, or the kicker doesn’t sit back far enough to cover the heel. There don’t seem to be enough holes in the straps on the large end. Once again, you might be able to work around it by punching extra holes, but after time and practice, you’ll find that you end up getting hit in all the places that are exposed with kickers that are too small.

The problems with worn kickers are equally painful. When high-density foam kickers break down, they lose their rebound and protective qualities. They’re about as useful as over-sized slippers and should be put out to pasture. Just because kickers are old and ugly, doesn’t mean they have to be replaced. A well struck shot will usually sting no matter how new, or good your kickers are. There’s a difference between sting and collapsing in a heap in pain when the ball contacts your arch. The rebound qualities of the kicker are far more important. As long as rebound off the kicker is fairly proportional to the speed of the shot coming in, there’s life in the kicker.

If after you’ve assessed what you have in your kit bag and finding it lacking, or you just want new kickers there’s a lot out there, good and bad. We’ll start with the good (OBO of course).

OBO kickers, whether it be Robo, Cloud 9 or Yahoo, are all similarly shaped. For a young keeper that’s important because he’ll be playing in a kicker that’s shaped the same way as he grows as a person and a keeper. The kicker is designed with a tongue that locks the leg guard in place and keeps it from twisting. In the Robo line, the straps that keep the kicker down on the foot are built into the kicker. This keeps them from sliding back on the foot, a problem with kickers that have external straps.

When selecting a kicker, durability can be a consideration. How long a kicker will last depends on how often you play, the surface you play on and the velocity of shots you face. OBO kickers are designed to wear well. The foam has a coating that stands up to abrasive surfaces like sand-filled pitches far better than the average foam kicker. The kickers also have bonded rubbing strips for the bottom of the kicker where most contact comes. This adds life to the kicker without sacrificing rebound. If there’s a complaint about OBO’s, it’s that they last too long.

High rebound kickers use foam that is less dense than normal kickers. They offer great rebound, but over time and use, the foam compacts, losing elasticity and rebound. If you play a lot and don’t have the resources to replace your kickers, high rebound kickers probably aren’t your best choice. On the other hand, if you want a kicker that puts a shot back as quick as it comes in, they’re the way to go.

No matter what kickers you select, they become a useless accessory if your foot won’t stay in them. This is a common problem with kickers that use external, web nylon straps. Toe straps frequently slip and the front of your foot is exposed. There are a number of ways to deal with this. You can tape the toe strap to the strap that goes around the ball of the foot. Don’t use so much tape that you lose contact surface with the bottom of your shoe. You can also merge the strap that goes around the ball of the foot with the toe strap so that they cross under the foot. Finally, the way some kickers fit, you might not need the toe strap at all.

Care of kickers is fairly straightforward. Kickers can get dirty and do need to be cleaned even on artificial surfaces and especially on natural surfaces. A plastic scrub brush and a mild household detergent are usually all you need to put a sparkle back into the foam bits of your kit. Avoid cleansers that are abrasive or caustic. On the maintenance front, two tools are very handy, an awl and needle-nose pliers. An awl is great for punching holes in straps when your feet seem to fit just between the pre-punched holes of the kicker. Needle-nose pliers are good for crimping the roller part of buckles that always seem to come off when you tighten your straps. They’re also quite useful when you first slot the internal straps through Robo kickers.

There is a breaking in period for high-density foam kickers. Like any new piece of new equipment, you should use them in training before you break them out in a game. When breaking in kickers, I’ll usually wear two pair of socks for the first three or four training sessions. Foam can be stiff and will rub all the sensitive areas around your ankles. An extra pair of socks will eliminate most of that chafing.

Most kickers are shipped flat from the manufacturer. To help shape the kicker, I’ll tighten the straps as far as they’ll go. Beating the kicker with a stick or wrapping them snugly in an elastic bandage are also good ways to speed the break in process. Know that bottom line, all kickers usually need to break in are three good training sessions with lots of shots.

Good luck,

Jon

e-mail Jon

Please note that OBO together with Jon O’Haire hold copyright over any material appearing on tips pages. We welcome the printing and distribution of these tips, provided that they are not sold, or used for financial gain. This paragraph must appear on all printed or distributed copies. The photographs above must not be used in any form without express permission from Jon O’Haire.

Kicking Drills

When you’re working on skills, it’s important that you isolate them so that you can evaluate technique and success. Skill work is different than situation work. When I work with keepers in situation drills, there are a number of skills they can use in a situation and be successful. When we work on skills, we’re focusing on specific form and results. Any time you work on skills, there are a couple of things to keep in mind.

When you’re working on skills, it’s important that you isolate them so that you can evaluate technique and success. Skill work is different than situation work. When I work with keepers in situation drills, there are a number of skills they can use in a situation and be successful. When we work on skills, we’re focusing on specific form and results. Any time you work on skills, there are a couple of things to keep in mind.

You refine skills with consistent, quality, repetition. Consistent means that you’re giving a keeper the opportunity to play the same type of ball more than once. Ball machines are the best way for a keeper to be exposed to the same type of ball, but they’re not something that is available to every coach or keeper. If you don’t have a ball machine, you need the next best thing, human simulation. When you’re working on kicking skills, the next best thing is someone who can hit a level ball on the ground to a location over and over again. If you can’t find someone who can hit with accuracy, a push will have to do.

Practicing kicking without a ball machine.

Quality infers a lot of things. First is the quality of the surface that you’re training on. It makes no sense to worry about the consistency of the type of ball serviced to the keeper to play when the surface you’re training on makes every ball along the ground an adventure. Obviously, we’re talking about grass here. If you must train on grass, make sure the area you’re working on is as level as you can find. This is essential for kicking. This may mean that you work on kicking outside of the goal area (usually the most worn spot on a grass pitch). If your grass field is particularly rural, tennis courts or indoor gyms are excellent alternatives.

To ensure quality in repetitions, limit the number of repetitions in a set of the drill. In addition, allow the keeper time to recover into a ready position and allow sufficient rest time between sets. When you plan your practice drills, take in to consideration the fitness level of your keepers. If your keepers can’t do ten repetitions of a skill to a set without the skill breaking down, adjust the number of reps to your sets until his or her fitness improves. Fitness drills are different then skill drills.

Now for the drills…

One of the most basic kicking drills for keepers is kicking in pairs. Typically, this is the way I like to warm up for games and practice. Once I’ve warmed up, stretched and padded up, I’ll take another keeper and work on instep kicking over ten yards.

As we start to warm up, I’ll focus on moving to the ball so that I’m pushing off my plant leg and leading with my head when I make contact with my kicking leg. I focus on opening up and following through to my target. I’m specific with my target. I’m not just kicking at a keeper; I’m kicking to his left or right foot. I don’t want to have him move to get my kick, this is a warm up.

Note how the keeper is puching off with his plant leg and leading with his head.

How do I turn this into a drill? Exercises become drills when you can quantify skills. For beginning keepers, give them five minutes to see how many consecutive kicks they can put together. As keepers become more advanced, have the keeper who kicks call the foot the next keeper has to kick with. You can also modify the drill, where the keeper is calling the foot the other keeper has to kick to. Once keepers have warmed up, the next extension is to extend the distance they’re kicking to 25 yards. Once again, the same variations can apply, calling a foot to kick with or to.

In game situations, that can be problematic as you want to change the direction the ball came from. An easy way of remedying that situation is to add a third keeper to the kicking pair. With a third keeper, keepers now have to change the angle of their clear as they kick. This way they can work on crossover clears as well as instep kicks to change the angle of the ball. Usually, I’ll have keepers working in threes, kick in a V shape as opposed to a triangle. Keepers kicking in triangles can have a hard time keeping the ball in play long enough to get the number of repetitions needed for the drill to be productive. Having said that, it is physically possible for more skilled keepers to kick in a triangle and that way they all have to work on changing the angle of the ball.

Kicking in a V.

It’s important that you have keepers practice kicking balls from where they’ll come in a game. If you want a keeper to work on coming up to clear crosses from the sides, start the ball from the wing, not at the edge of the circle. If you have a ball machine, set it up out that wide, if not have a player hitting crosses from about five yards in from the sideline. Footwork is key in kicking. If I set balls up too close to a keeper, I don’t reproduce the situation I want to incorporate in their game. I want my keeper to step up to the ball and clear accurately.

The gate set-up with the ball on the left, flip for right.

I like to give a keeper targets to clear to. We’ll set up cones four yards apart so that there are two or three gates they can clear through around the edge of the circle. I emphasise clear through. If a ball doesn’t leave the circle, it’s likely to come back even faster. There are a number of ways to reinforce that point. As a positive reinforcer (good for beginning keepers), we keep score for a set of ten balls, with keeper’s getting points for putting the ball through designated gates. To simulate game conditions, we’ll put forwards in the gates that are the most dangerous rebound areas and let them play those clears back to goal (a somewhat more negative reinforcer). Angles that I like to focus on for clearing from are marked below.

Places to cross from.

There are a million variations of these types of drills as keepers become more competent. I can put a keeper under pressure by having a player come on to deflect cross balls or simply stand by the keeper. It’s important to identify the skill you’re trying to get out of a drill.

I can consider the drills I’ve explained kicking drills because they are designed for the skill I want from the keeper. When you put field players into these drills, you add variables, and it becomes harder to reinforce through consistent repetition the skill you’ll get from the keeper. There’s nothing wrong with that as long as you’re dealing with a situation and a skill.

The gate set-up.

Good luck,

Jon

e-mail Jon

Please note that OBO together with Jon O’Haire hold copyright over any material appearing on tips pages. We welcome the printing and distribution of these tips, provided that they are not sold, or used for financial gain. This paragraph must appear on all printed or distributed copies. The photographs above must not be used in any form without express permission from Jon O’Haire.